Java Image Similarity Comparison - Color Distribution Method
0. The Implementation Approach in This Article Comes from These Blogs:
Principles of Similar Image Search (Part 2) Principles of Similar Image Search
1. How to Determine the Similarity Between Two Images
The code implementation in this article has been uploaded to GitHub. You can get it here: calculate-pic-looklike
For the detailed version, please read this article: Principles of Similar Image Search.
TL;DR version:
When humans compare whether two images are similar, we actually associate based on whether the contours of shapes in the image already exist in our memory, and then our brain automatically connects to the memories we've seen.
For computers, determining the similarity of two images relies on "perceptual hashing algorithms". It generates a "fingerprint" for each image, then compares the fingerprints of two images - the closer the results, the more similar the images.
How to compare the similarity of two fingerprints? The article above mentions: Pearson Correlation Coefficient or Cosine Similarity
The Pearson Correlation Coefficient measures whether two datasets are on the same line. It measures the linear relationship between interval variables.
The Pearson correlation coefficient measures linear correlation. If r=0, it only means there's no linear correlation between x and y, not that there's no correlation at all. The larger the absolute value of the correlation coefficient, the stronger the correlation: the closer the coefficient is to 1 or -1, the stronger the correlation; the closer to 0, the weaker the correlation.
Typically, the following ranges are used to judge correlation strength: Correlation coefficient 0.8-1.0: Very strong correlation 0.6-0.8: Strong correlation 0.4-0.6: Moderate correlation 0.2-0.4: Weak correlation 0.0-0.2: Very weak or no correlation
For the correlation coefficient r between x and y: When r is between 0 and 1, x and y have a positive correlation When r is between -1 and 0, x and y have a negative correlation When r=1, x and y are perfectly positively correlated; r=-1 means perfectly negatively correlated When r=0, x and y are uncorrelated
So, comparing the similarity of two images involves obtaining image fingerprints (datasets) and plugging these two datasets into the Pearson correlation coefficient.
How do we get the image fingerprint from an image?
1.1 From Image to Image Fingerprint
We all know that any image displayed on an electronic screen is composed of the three primary colors of light (red, green, blue). In computers, we represent these with RGB, for example:
(255, 180, 0) represents this color:

We can use code to get all the pixels of an image, then split each pixel to get RGB values. Counting these RGB values gives us:
(0,0,0) appears 10000 times
(0,0,1) appears 25 times
...
(0,0,1) appears 90 times
Collecting these counts into a set {10000,25,...,90} gives us the image fingerprint.
Do this for both images, get the datasets, then compare using the Pearson Correlation Coefficient or Cosine Similarity mentioned above to determine the similarity of the two images.
However, if we use the 0-255 range for R, G, B comparison, the possibilities would be: 
To simplify calculations, we typically divide 0-255 into four zones: 0-63 is zone 0, 64-127 is zone 1, 128-191 is zone 2, 192-255 is zone 3. This means red, green, and blue each have 4 zones, totaling 64 combinations (4 to the power of 3).
As shown below:
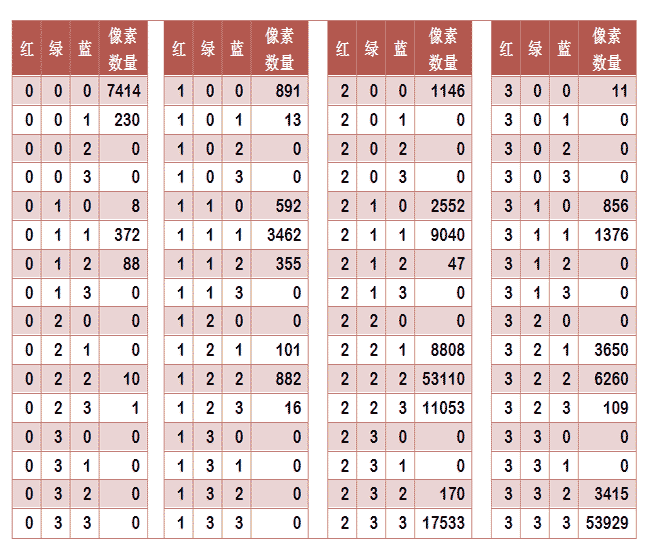
Extract the last column from the table to form a 64-dimensional vector (7414, 230, 0, 0, 8, ..., 109, 0, 0, 3415, 53929). This vector is the image's feature value or "fingerprint".
Then plug it into the Pearson correlation coefficient for calculation.
2. Code Implementation
After understanding the principles, the Java code implementation has these parts:
- Get all pixels of an image and their RGB values
- Count all pixels to get the image fingerprint
- Apply the Pearson correlation coefficient
2.1 Get All Pixels and RGB Values of an Image
BufferedImage bimg = ImageIO.read(new File(path));
for(int i = 0; i < bimg.getWidth(); i++){
	for(int j = 0; j < bimg.getHeight(); j++){
		Color color = new Color( bimg.getRGB(i, j));
		int r = color.getRed();
		int g = color.getGreen();
		int b = color.getBlue();

	}
}
2.2 Count Pixels to Get Image Fingerprint
This step is crucial. After getting the pixels, observe the three yellow columns in the image below - the numbers formed by red, green, blue are exactly from 001-333, following quaternary (base-4) rules.
This means when iterating through pixels, we calculate which zone (0-3) a pixel belongs to and put the value into an array with quaternary capacity.
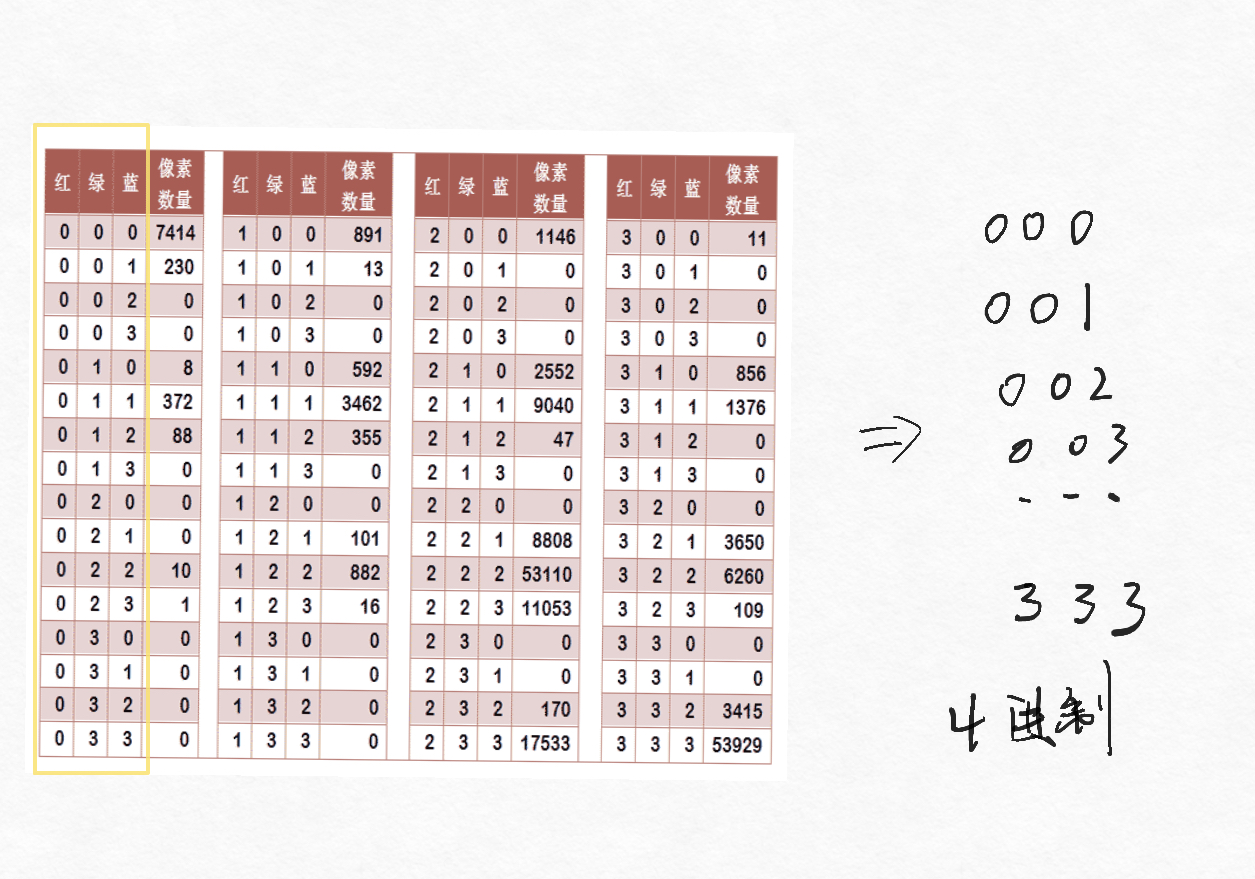
So before iterating through the image, create a collection with zoneszoneszones=List capacity, then initialize the collection.
// Comparison level - number of zones after dividing 256 pixels
public static int compareLevel = 4;
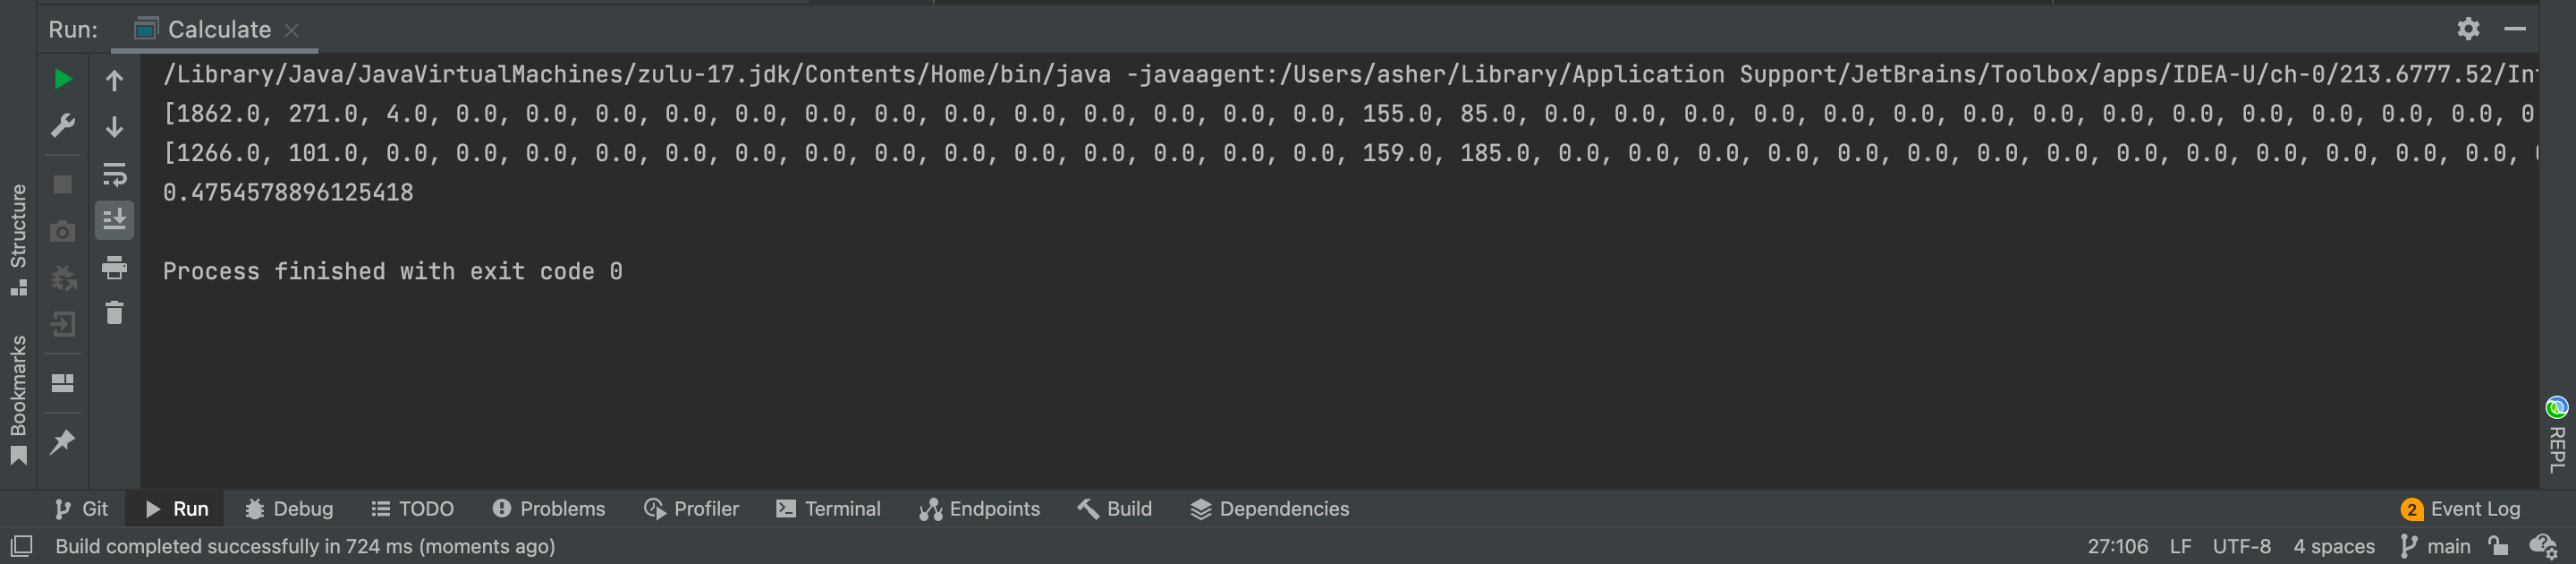
public static void main(String[] args) throws IOException {
final String pic1Path = Objects.requireNonNull(Calculate.class.getClassLoader().getResource("pic1.jpeg")).getPath();
final String pic2Path = Objects.requireNonNull(Calculate.class.getClassLoader().getResource("pic2.jpeg")).getPath();
final List<Double> origin = getPicArrayData(pic1Path);
System.out.println(origin);
final List<Double> after = getPicArrayData(pic2Path);
System.out.println(after);
System.out.println(PearsonDemo.getPearsonBydim(origin, after));
}
public static List<Double> getPicArrayData(String path) throws IOException {
BufferedImage image = ImageIO.read(new File(path));
// Initialize collection
final List<Double> picFingerprint = new ArrayList<>(compareLevel*compareLevel*compareLevel);
IntStream.range(0, compareLevel*compareLevel*compareLevel).forEach(i->{
picFingerprint.add(i, 0.0);
});
// Iterate through pixels
for(int i = 0; i < image.getWidth(); i++){
for(int j = 0; j < image.getHeight(); j++){
Color color = new Color(image.getRGB(i, j));
// Calculate pixel
putIntoFingerprintList(picFingerprint, color.getRed(), color.getGreen(), color.getBlue());
}
}
return picFingerprint;
}
/**
* Put pixel's RGB values for calculation to get List position
* @param picFingerprintList picFingerprintList
* @param r r
* @param g g
* @param b b
* @return
*/
public static List<Double> putIntoFingerprintList(List<Double> picFingerprintList, int r, int g, int b){
// e.g., if r g b is 126, 153, 200 and compareLevel is 16, get string: 79c, then convert to decimal - this number is the List position
final Integer index = Integer.valueOf(getBlockLocation(r) + getBlockLocation(g) + getBlockLocation(b), compareLevel);
final Double origin = picFingerprintList.get(index);
picFingerprintList.set(index, origin + 1);
return picFingerprintList;
}
/**
* Calculate which zone the current primary color should be in
* @param colorPoint colorPoint
* @return
*/
public static String getBlockLocation(int colorPoint){
return IntStream.range(0, compareLevel)
// Calculate zone in decimal
.filter(i -> {
int areaStart = (256 / compareLevel) * i;
int areaEnd = (256 / compareLevel) * (i + 1) - 1;
return colorPoint >= areaStart && colorPoint <= areaEnd;
})
// If compareLevel > 10, convert to corresponding base string
.mapToObj(location -> compareLevel > 10 ? Integer.toString(location, compareLevel) : location+"")
.findFirst()
.orElseThrow();
}
In the code, compareLevel is a factor of 256. Usable numbers are: 1,2,4,8,16,32,64,128,256. Each number represents how many parts 256 pixels will be evenly divided into.
In the putIntoFingerprintList method, we calculate for each pixel's R, G, B primary colors. The calculation process is in the getBlockLocation method, with the following principle:
2.2.1 Getting the Zone Position
Assume the primary color value is: x, number of zones is: n
First zone range: 
Second zone range: 
The i-th zone range is: 
So: 
This i is the zone position where x should be placed.
Example:
Assume the primary color value is 235 Using the formula above: 0-63 is zone 0, 64-127 is zone 1, 128-191 is zone 2, 192-255 is zone 3 So 235 belongs to zone 3
In code:
public static String getBlockLocation(int colorPoint){
    return IntStream.range(0, compareLevel)
            // Calculate zone in decimal
            .filter(i -> {
                int areaStart = (256 / compareLevel) * i;
                int areaEnd = (256 / compareLevel) * (i + 1) - 1;
                return colorPoint >= areaStart && colorPoint <= areaEnd;
            })
            // If compareLevel > 10, convert to corresponding base string
            .mapToObj(location -> compareLevel > 10 ? Integer.toString(location, compareLevel) : location+"")
            .findFirst()
            .orElseThrow();
}
In this method: return colorPoint >= areaStart && colorPoint <= areaEnd;
This line means:
If:  and
and  Then return true, indicating it matches our desired data
Finally put into the List - this List is the image fingerprint.
2.3 Apply Pearson Correlation Coefficient
There's already plenty of Java implementation code online, so no need to reinvent the wheel. Here's code found online:
package run.runnable.calculatepiclooklike.utils;

import java.util.ArrayList;
import java.util.List;

/**
 * Pearson Correlation Coefficient
 */
public class PearsonDemo {
    public static Double getPearsonBydim(List<Double> ratingOne, List<Double> ratingTwo) {
        try {
            if(ratingOne.size() != ratingTwo.size()) {
                if(ratingOne.size() > ratingTwo.size()) {
                    List<Double> temp = ratingOne;
                    ratingOne = new ArrayList<>();
                    for(int i=0;i<ratingTwo.size();i++) {
                        ratingOne.add(temp.get(i));
                    }
                }else {
                    List<Double> temp = ratingTwo;
                    ratingTwo = new ArrayList<>();
                    for(int i=0;i<ratingOne.size();i++) {
                        ratingTwo.add(temp.get(i));
                    }
                }
            }
            double sim = 0D;
            double commonItemsLen = ratingOne.size();
            double oneSum = 0D;
            double twoSum = 0D;
            double oneSqSum = 0D;
            double twoSqSum = 0D;
            double oneTwoSum = 0D;
            for(int i=0;i<ratingOne.size();i++) {
                double oneTemp = ratingOne.get(i);
                double twoTemp = ratingTwo.get(i);
                oneSum += oneTemp;
                twoSum += twoTemp;
                oneSqSum += Math.pow(oneTemp, 2);
                twoSqSum += Math.pow(twoTemp, 2);
                oneTwoSum += oneTemp*twoTemp;
            }
            double num = (commonItemsLen*oneTwoSum) - (oneSum*twoSum);
            double den = Math.sqrt((commonItemsLen * oneSqSum - Math.pow(oneSum, 2)) * (commonItemsLen * twoSqSum - Math.pow(twoSum, 2)));
            sim = (den == 0) ? 1 : num / den;
            return sim;
        } catch (Exception e) {
            return null;
        }
    }

    public static double getPearsonCorrelationScore(List<Double> x, List<Double> y) {
        if (x.size() != y.size())
            throw new RuntimeException("Data incorrect!");
        double[] xData = new double[x.size()];
        double[] yData = new double[x.size()];
        for (int i = 0; i < x.size(); i++) {
            xData[i] = x.get(i);
            yData[i] = y.get(i);
        }
        return getPearsonCorrelationScore(xData,yData);
    }

    public static double getPearsonCorrelationScore(double[] xData, double[] yData) {
        if (xData.length != yData.length)
            throw new RuntimeException("Data incorrect!");
        double xMeans;
        double yMeans;
        double numerator = 0;
        double denominator = 0;

        double result = 0;
        xMeans = getMeans(xData);
        yMeans = getMeans(yData);
        numerator = generateNumerator(xData, xMeans, yData, yMeans);
        denominator = generateDenomiator(xData, xMeans, yData, yMeans);
        result = numerator / denominator;
        return result;
    }

    private static double generateNumerator(double[] xData, double xMeans, double[] yData, double yMeans) {
        double numerator = 0.0;
        for (int i = 0; i < xData.length; i++) {
            numerator += (xData[i] - xMeans) * (yData[i] - yMeans);
        }
        return numerator;
    }

    private static double generateDenomiator(double[] xData, double xMeans, double[] yData, double yMeans) {
        double xSum = 0.0;
        for (int i = 0; i < xData.length; i++) {
            xSum += (xData[i] - xMeans) * (xData[i] - xMeans);
        }
        double ySum = 0.0;
        for (int i = 0; i < yData.length; i++) {
            ySum += (yData[i] - yMeans) * (yData[i] - yMeans);
        }
        return Math.sqrt(xSum) * Math.sqrt(ySum);
    }

    private static double getMeans(double[] datas) {
        double sum = 0.0;
        for (int i = 0; i < datas.length; i++) {
            sum += datas[i];
        }
        return sum / datas.length;
    }
}
2.4 Results
The calculated results can be referenced against:
Typically, the following ranges are used to judge correlation strength: Correlation coefficient 0.8-1.0: Very strong correlation 0.6-0.8: Strong correlation 0.4-0.6: Moderate correlation 0.2-0.4: Weak correlation 0.0-0.2: Very weak or no correlation
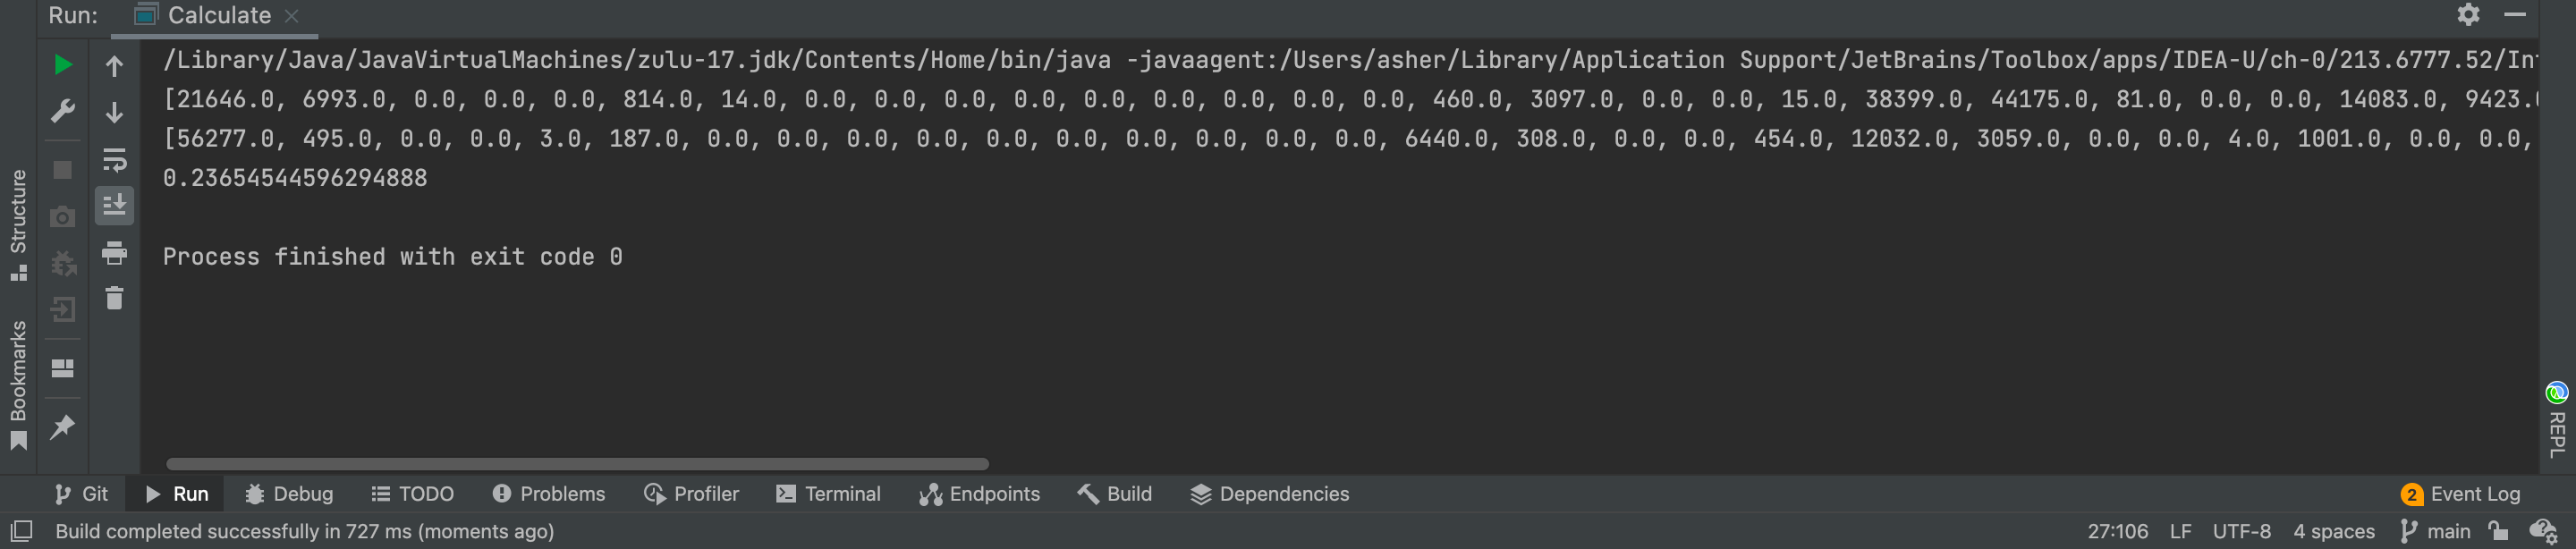
Dissimilar Image Calculation
Using Image 1:
 Image 2:

With compareLevel set to 4, the similarity comparison gives: 0.23654544596294888
Similar Image Calculation
Using Image 3:
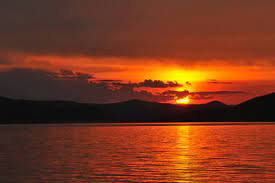 Using Image 4:
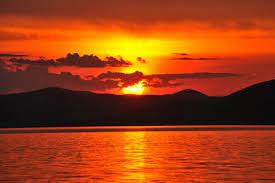
With compareLevel set to 16, the similarity comparison gives: 0.4754578896125418
Code implementation has been uploaded to GitHub: calculate-pic-looklike
2.5 Can We Use Map Instead of List?
After completing the above, this thought popped into my head.
Store in Map like this: Map<calculated pixel index, count>
After implementing, I found it doesn't work because an image often doesn't contain all color pixels. If a pixel doesn't exist, the Map key is incomplete, making the image fingerprint incomplete.
Like an ID card:
 You need area code + birth date code + (sequence and gender code) + checksum to form a complete ID card.
Using Map implementation is like getting an ID card with area code + (sequence and gender code) + checksum, missing a part.
You need area code + birth date code + (sequence and gender code) + checksum to form a complete ID card.
Using Map implementation is like getting an ID card with area code + (sequence and gender code) + checksum, missing a part.
Here's the Map implementation code:
public static void putIntoFingerprintMap(Map<Integer, Integer> picFingerprintMap, int r, int g, int b){
    final Integer picFingerprint = Integer.valueOf(getBlockLocation(r) + getBlockLocation(g) + getBlockLocation(b), compareLevel);
    Integer value = picFingerprintMap.containsKey(Integer.valueOf(picFingerprint)) ? picFingerprintMap.get(Integer.valueOf(picFingerprint)) + 1 : 1;
    picFingerprintMap.put(Integer.valueOf(picFingerprint), value);
}


public static List<Double> getPicArrayDataByMap(String path) throws IOException {
    BufferedImage bimg = ImageIO.read(new File(path));

    final Map<Integer, Integer> picFingerprintMap = new HashMap<>();

    for(int i = 0; i < bimg.getWidth(); i++){
        for(int j = 0; j < bimg.getHeight(); j++){
            Color color = new Color( bimg.getRGB(i, j));
            int r = color.getRed();
            int g = color.getGreen();
            int b = color.getBlue();
            putIntoFingerprintMap(picFingerprintMap, r, g, b);
        }
    }

    final List<Integer> keys = picFingerprintMap.keySet().stream().sorted().collect(Collectors.toList());
    final ArrayList<Double> picFingerprintList = new ArrayList<>(keys.size());
    keys.forEach(key->{
        picFingerprintList.add(Double.valueOf(picFingerprintMap.get(key)));
    });
    return picFingerprintList;
}
3. Information Sources
Principles of Similar Image Search (Part 2) Principles of Similar Image Search Collaborative Filtering Algorithm