Nacos Basic Usage Guide
1. Preface
I've always believed that when learning a new technology, the first thing to look at is the official website or the GitHub README.md, rather than various blog posts. This helps avoid misunderstandings about new concepts.
2. Official Website
Official Website and Quick Start
The official description: A platform for dynamic service discovery, configuration management, and service management that makes it easier to build cloud-native applications.
Key points to note: dynamic service discovery, configuration management, and service management.
These are the things we can accomplish after learning Nacos, or in other words, the problems it can solve.
2.1 Features
2.1.1 Dynamic Configuration Service
Dynamic configuration service allows you to manage configurations across all environments in a centralized, externalized, and dynamic manner. Dynamic configuration eliminates the need to redeploy applications and services when configurations change. Centralized configuration management makes it easier to implement stateless services and scale services elastically on demand.
Reading comprehension: We can dynamically manage configurations for development and production environments. We can make dynamic configurations - when we modify a configuration, we don't need to redeploy the application. Everyone knows that in a Spring Boot project, modifying server.port=9001 requires restarting the project. Nacos can eliminate this. Of course, how it eliminates this requires learning.
Centralized configuration management enables stateless services. What does this mean? First, we need to understand what stateless services are.
You can search for this yourself, for example Stateful and Stateless Services. I'll quote from that blog post - it's easy to understand:
Stateful Services
When purchasing an item in a mall, you need to go through multiple steps: adding to cart, confirming the order, and payment.
Since the HTTP protocol itself is stateless, to implement stateful services, additional solutions are needed. The most common is session - saving the items the user selected (shopping cart) in the session, and retrieving the product information from the cart when paying.
Stateless Services
For the client, requests can be sent to any server, and the request contains uniquely identifiable user information. Technologies like JWT enable this.
If you understand stateless services, then you should also understand that stateless services can better achieve horizontal scaling through load balancing and other means.
2.1.2 Service Discovery and Management
Dynamic service discovery is crucial for service-centric (e.g., microservices and cloud-native) application architectures. Nacos supports DNS-Based and RPC-Based (Dubbo, gRPC) service discovery modes. Nacos also provides real-time health checks to prevent requests from being sent to unhealthy hosts or service instances. With Nacos, you can more easily implement circuit breakers for your services.
My understanding: It can integrate with Dubbo. Health checks periodically verify whether services registered with Nacos are still alive - similar to ZooKeeper's ephemeral nodes if you have that experience. It also mentions that Nacos can implement circuit breakers.
What is a circuit breaker? Take two minutes to watch this video: Circuit Breaker Pattern in Microservices
2.1.3 Dynamic DNS Service
By supporting weighted routing, dynamic DNS service enables easy implementation of middle-tier load balancing, more flexible routing policies, traffic control, and simple DNS resolution services within data centers. Dynamic DNS service also makes it easier to implement DNS protocol-based service discovery, eliminating the risk of coupling to vendor-specific service discovery APIs.
I'm not very familiar with routing, but load balancing, traffic control, and service discovery are concepts everyone knows.
OK, after reading the official introduction, we now understand Nacos's features and what problems it can solve. Imagine yourself as Nacos's product manager - when promoting Nacos, you can highlight these features.
3. Installation
Enough talk about non-essentials - let's download and try it. The current recommended stable version on the official website is 1.4.1.
Here's the official Quick Start, which is essentially the following content.
3.1 Download Source Code or Installation Package
3.1.1 Download from GitHub
git clone https://github.com/alibaba/nacos.git
cd nacos/
mvn -Prelease-nacos -Dmaven.test.skip=true clean install -U
ls -al distribution/target/

// Navigate to your downloaded nacos version
cd distribution/target/nacos-server-$version/nacos/bin
3.1.2 Download Compiled Package
You can download the nacos-server-$version.zip package from the latest stable release.
unzip nacos-server-$version.zip or tar -xvf nacos-server-$version.tar.gz
cd nacos/bin
4. Start the Server
4.1 Linux/Unix/Mac
Start command (standalone means single-node mode, not cluster mode):
sh startup.sh -m standalone
If you're using Ubuntu or get an error about [[ symbol not found, try:
bash startup.sh -m standalone
4.2 Windows
Start command (standalone means single-node mode, not cluster mode):
cmd startup.cmd -m standalone
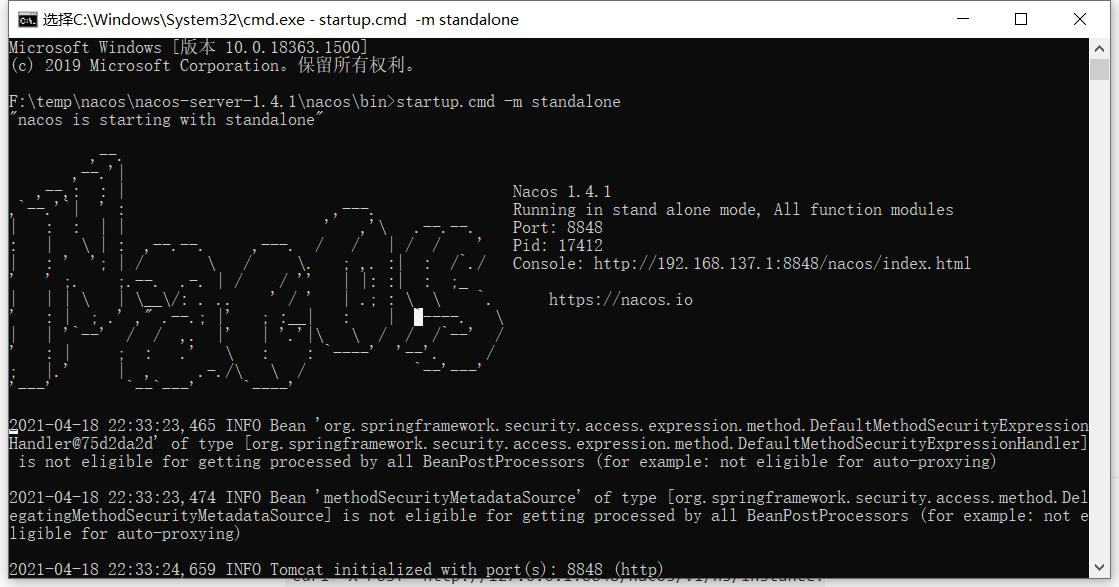
Access via browser at: http://127.0.0.1:8848/nacos/index.html#/login
Username and password are both nacos

5. Service Registration & Discovery and Configuration Management
5.1 Service Registration
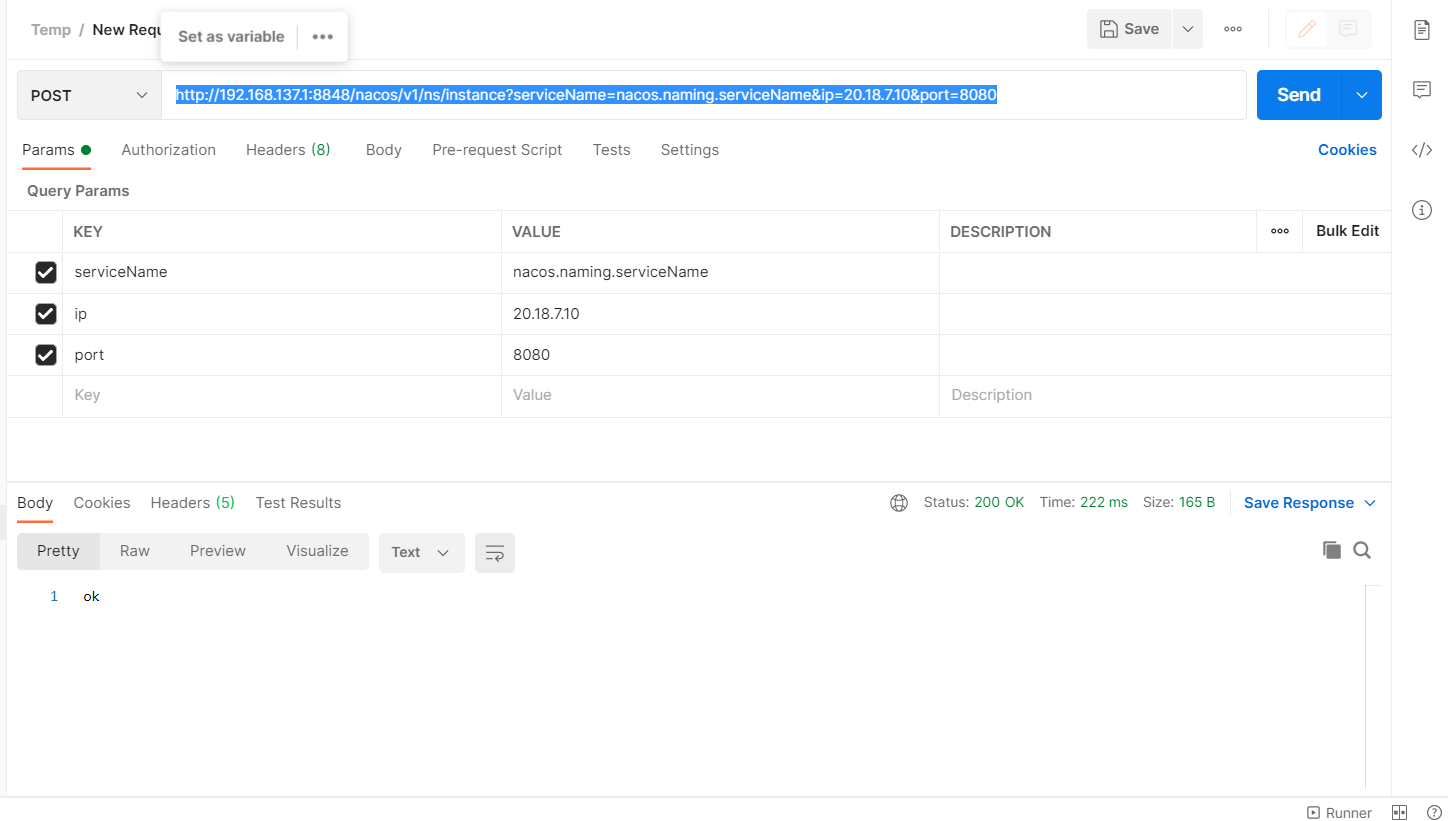
curl -X POST 'http://127.0.0.1:8848/nacos/v1/ns/instance?serviceName=nacos.naming.serviceName&ip=20.18.7.10&port=8080'
Since Windows doesn't have curl, you can use Postman:
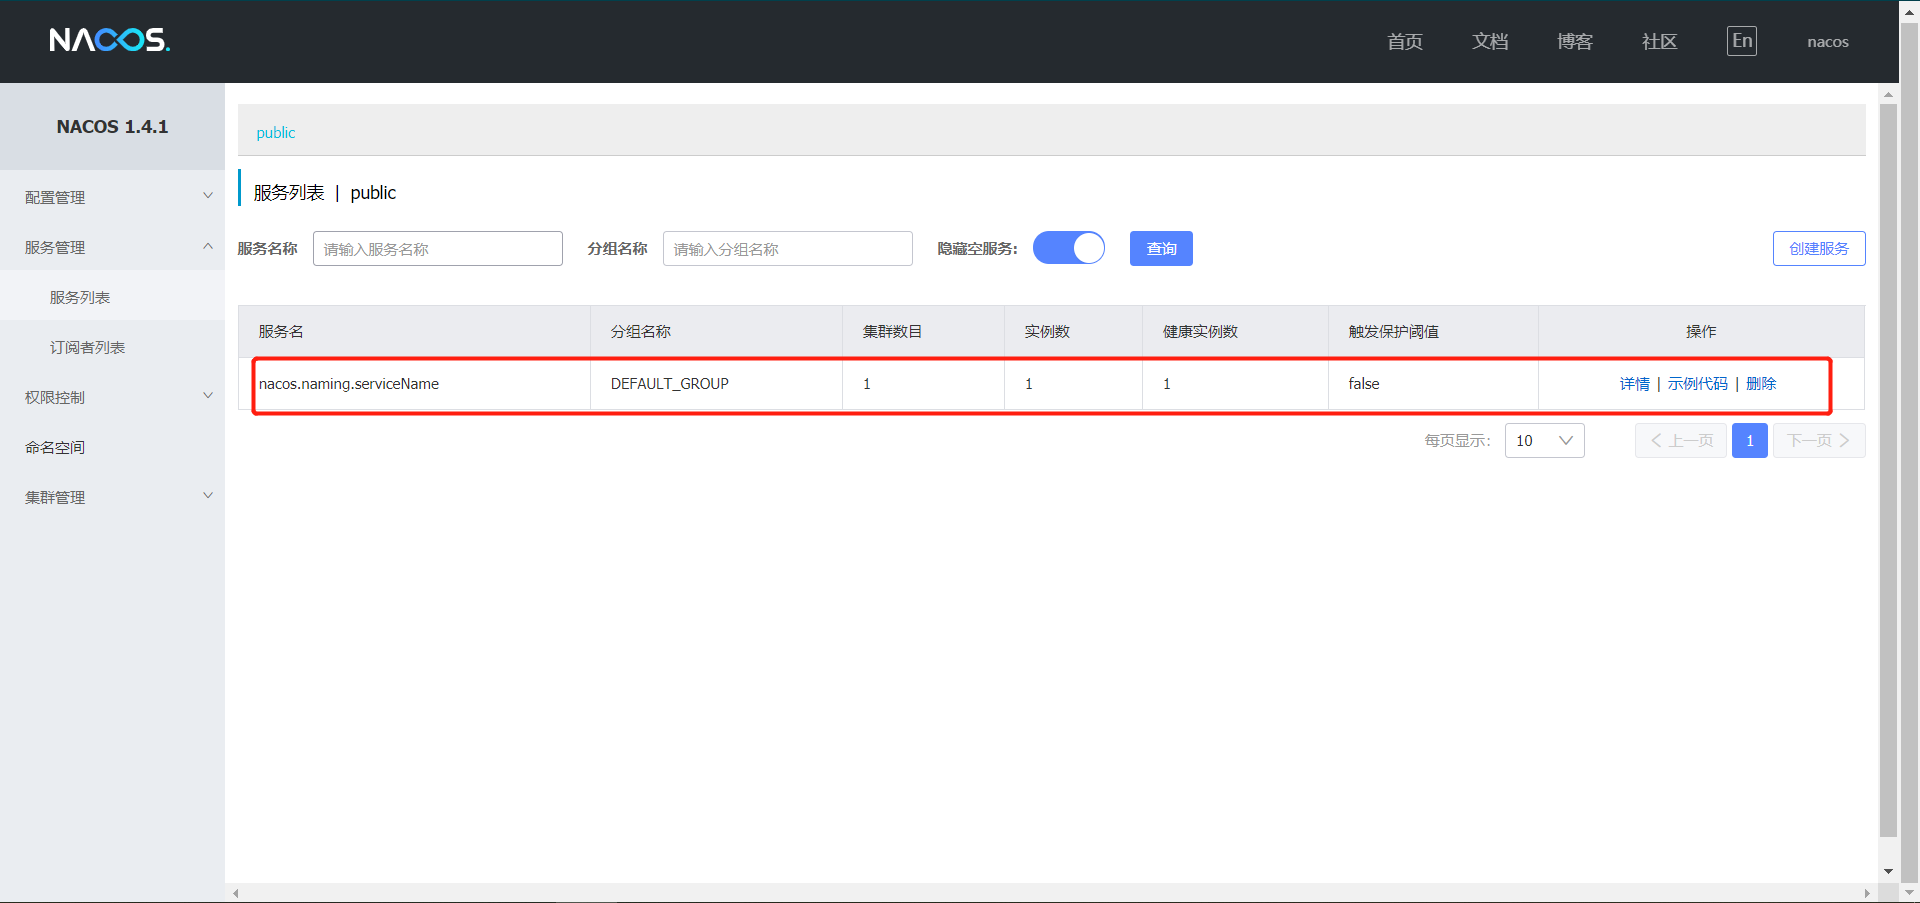
Go back to your browser to check - be quick though, or it will timeout:
5.2 Service Discovery
curl -X GET 'http://127.0.0.1:8848/nacos/v1/ns/instance/list?serviceName=nacos.naming.serviceName'
5.3 Publish Configuration
curl -X POST "http://127.0.0.1:8848/nacos/v1/cs/configs?dataId=nacos.cfg.dataId&group=test&content=HelloWorld"
5.4 Get Configuration
curl -X GET "http://127.0.0.1:8848/nacos/v1/cs/configs?dataId=nacos.cfg.dataId&group=test"
6. Shutdown Server
6.1 Linux/Unix/Mac
sh shutdown.sh
6.2 Windows
cmd shutdown.cmd
Or double-click shutdown.cmd
That's the most basic Nacos operations. Now let's look at the code.
7. Spring Boot Integration
Since Spring Boot is simpler, I won't use Spring examples.
The following is still from the official website. Wow, the official documentation is so detailed - why am I copying it again?
7.1 Enable Configuration Management [Dynamic Configuration]
After starting the Nacos server, you can refer to the following example code to enable Nacos configuration management for your Spring Boot application. Complete example code: nacos-spring-boot-config-example
- Add dependency:
<dependency>
    <groupId>com.alibaba.boot</groupId>
    <artifactId>nacos-config-spring-boot-starter</artifactId>
    <version>${latest.version}</version>
</dependency>
Note: Version 0.2.x.RELEASE corresponds to Spring Boot 2.x, version 0.1.x.RELEASE corresponds to Spring Boot 1.x.
This note is important! If you plan to integrate Nacos into your project, pay attention to this, otherwise you may encounter strange errors.
- Configure Nacos server address in
application.properties:
nacos.config.server-addr=127.0.0.1:8848
- Use
@NacosPropertySourceto load configuration source withdataIdofexample, and enable auto-refresh:
@SpringBootApplication
@NacosPropertySource(dataId = "example", autoRefreshed = true)
public class NacosConfigApplication {

    public static void main(String[] args) {
        SpringApplication.run(NacosConfigApplication.class, args);
    }
}
- Set property values using Nacos's
@NacosValueannotation:
@Controller
@RequestMapping("config")
public class ConfigController {

    @NacosValue(value = "${useLocalCache:false}", autoRefreshed = true)
    private boolean useLocalCache;

    @RequestMapping(value = "/get", method = GET)
    @ResponseBody
    public boolean get() {
        return useLocalCache;
    }
}
- Start
NacosConfigApplication, callcurl http://localhost:8080/config/get, returnsfalse. - Use Nacos Open API to publish configuration to Nacos server: dataId is
example, content isuseLocalCache=true
curl -X POST "http://127.0.0.1:8848/nacos/v1/cs/configs?dataId=example&group=DEFAULT_GROUP&content=useLocalCache=true"
- Access
http://localhost:8080/config/getagain, now returnstrue, indicating thatuseLocalCachevalue has been dynamically updated.
Did you notice? This implements dynamic configuration! So simple!
8. Enable Service Discovery
This section demonstrates how to enable Nacos service discovery in your Spring Boot project. Complete example code: nacos-spring-boot-discovery-example
- Add dependency:
<dependency>
    <groupId>com.alibaba.boot</groupId>
    <artifactId>nacos-discovery-spring-boot-starter</artifactId>
    <version>${latest.version}</version>
</dependency>
Note: Version 0.2.x.RELEASE corresponds to Spring Boot 2.x, version 0.1.x.RELEASE corresponds to Spring Boot 1.x.
- Configure Nacos server address in
application.properties:
nacos.discovery.server-addr=127.0.0.1:8848
- Use
@NacosInjectedto inject Nacos'sNamingServiceinstance:
@Controller
@RequestMapping("discovery")
public class DiscoveryController {

    @NacosInjected
    private NamingService namingService;

    @RequestMapping(value = "/get", method = GET)
    @ResponseBody
    public List<Instance> get(@RequestParam String serviceName) throws NacosException {
        return namingService.getAllInstances(serviceName);
    }
}

@SpringBootApplication
public class NacosDiscoveryApplication {

    public static void main(String[] args) {
        SpringApplication.run(NacosDiscoveryApplication.class, args);
    }
}
- Start
NacosDiscoveryApplication, callcurl http://localhost:8080/discovery/get?serviceName=example, returns empty JSON array[]. - Use Nacos Open API to register a service named
exampleto Nacos server:
curl -X PUT 'http://127.0.0.1:8848/nacos/v1/ns/instance?serviceName=example&ip=127.0.0.1&port=8080'
- Access
curl http://localhost:8080/discovery/get?serviceName=exampleagain, now returns:
[
  {
    "instanceId": "127.0.0.1-8080-DEFAULT-example",
    "ip": "127.0.0.1",
    "port": 8080,
    "weight": 1.0,
    "healthy": true,
    "cluster": {
      "serviceName": null,
      "name": "",
      "healthChecker": {
        "type": "TCP"
      },
      "defaultPort": 80,
      "defaultCheckPort": 80,
      "useIPPort4Check": true,
      "metadata": {}
    },
    "service": null,
    "metadata": {}
  }
]