First Experience with GraalVM and Spring Native - A Tool That Starts Your Application in 100ms
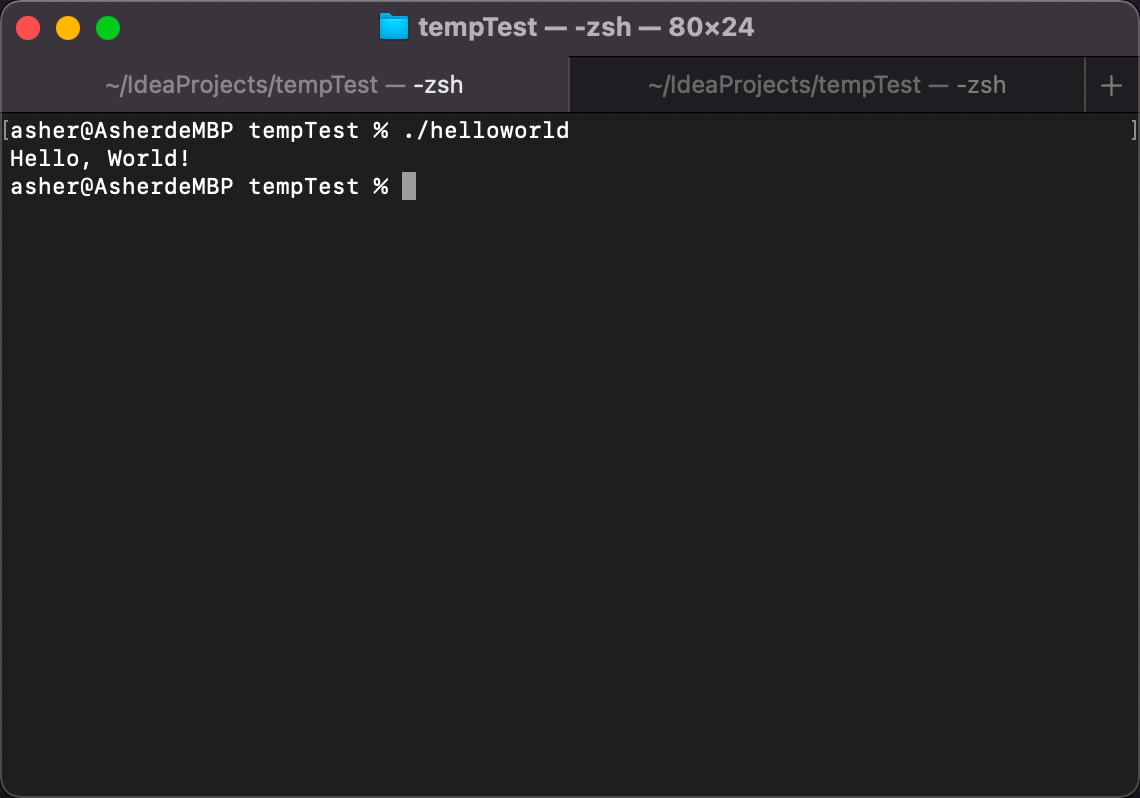
 Let me start with this screenshot - the SpringBoot startup only took 0.036 seconds. Without Spring Native, who else could achieve this?
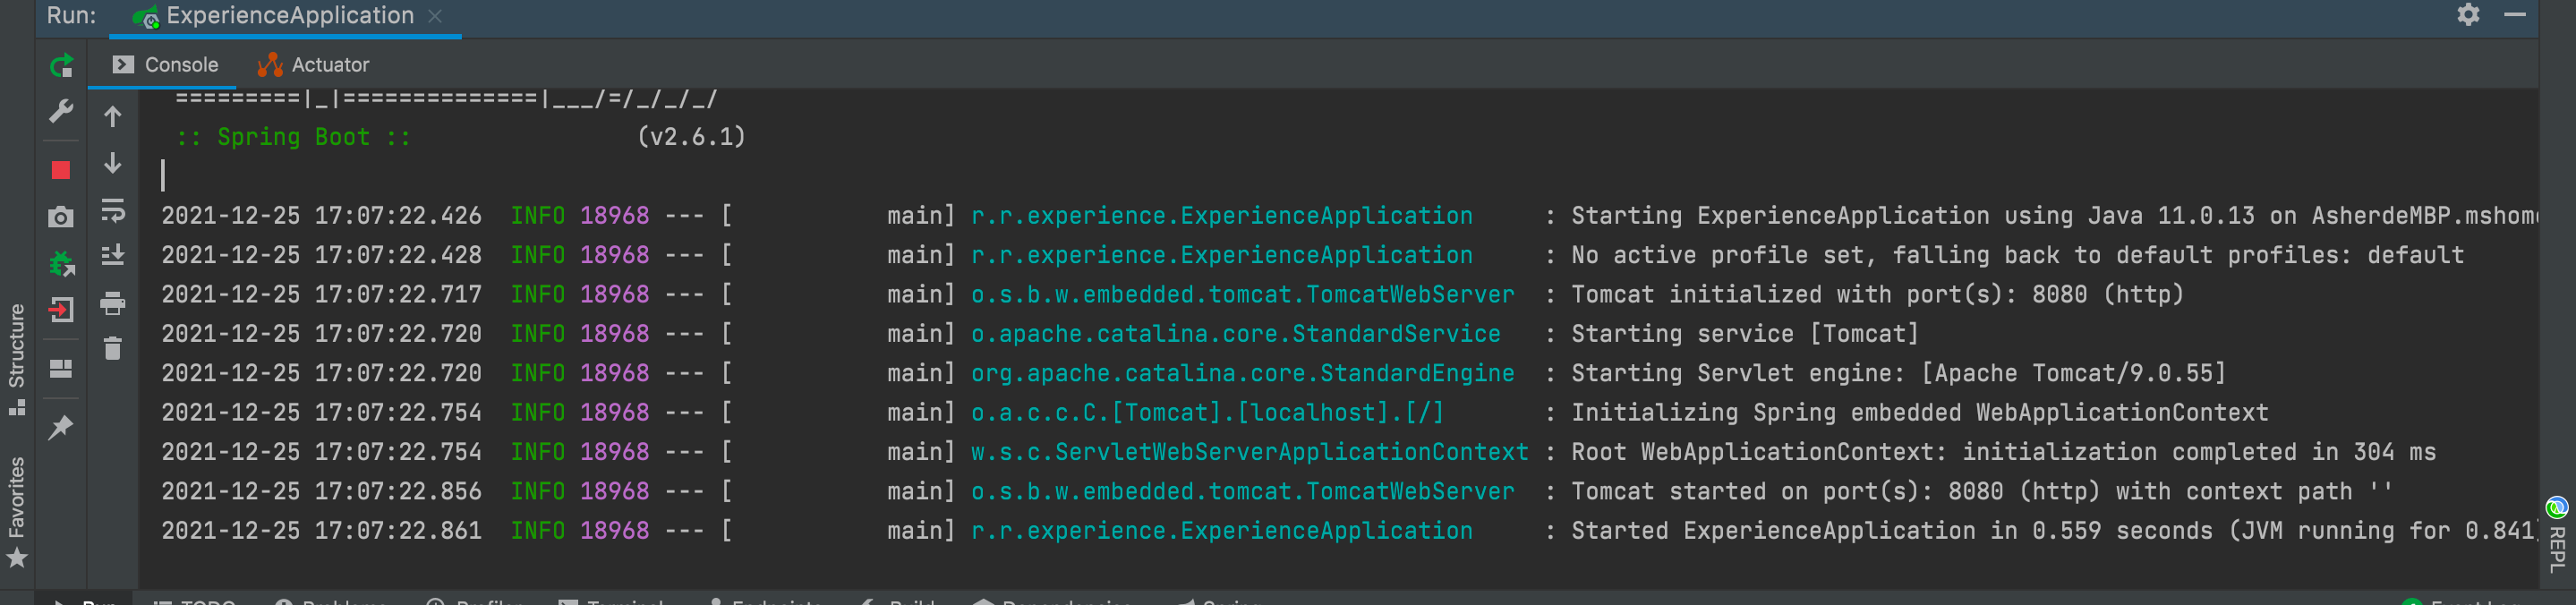
Even an M1 Mac Pro takes 0.559 seconds to start. The time gap between the two images is quite long because while writing this blog, I suddenly wanted to convert my Solo blog to GraalVM too, but unfortunately it failed. I'll skip the long story here but will mention why it failed.
Let me start with this screenshot - the SpringBoot startup only took 0.036 seconds. Without Spring Native, who else could achieve this?
Even an M1 Mac Pro takes 0.559 seconds to start. The time gap between the two images is quite long because while writing this blog, I suddenly wanted to convert my Solo blog to GraalVM too, but unfortunately it failed. I'll skip the long story here but will mention why it failed.
1. Background Knowledge
1.1 GraalVM
GraalVM describes itself on its official website as High Performance. Cloud Native. Polyglot.
GraalVM for Java provides a high-performance runtime with new compiler optimizations to accelerate Java application performance and reduce infrastructure costs in the cloud. GraalVM is a high-performance runtime for Java and other JVM languages. It includes a compatible JDK and provides distributions based on Java 8 (GraalVM Enterprise Edition only), Java 11, and Java 17. GraalVM offers multiple compiler-optimized distributions designed to accelerate Java application performance while consuming fewer resources. To get started with GraalVM or migrate from another JDK distribution, you don't need to change any source code. Any application running on Java HotSpot VM will run on GraalVM.
That's quite official. Simply put, GraalVM is an ecosystem with a shared runtime that provides performance advantages for both JVM-dependent languages (Java, Scala, Groovy, Kotlin) and other programming languages (JavaScript, Ruby, Python, R). Additionally, GraalVM can execute native code on the JVM through an LLVM frontend.
2. Installing GraalVM
Here I'll cover the installation process for Windows, Mac, and Linux.
2.1 Download
Find the version matching your installed JDK version.
I recommend installing Java 11. I found issues with the Java 17 version, but after switching to Java 11 without changing any other configuration, it worked.
2.2 Installation
Linux and Mac
I'm covering Linux and Mac together because they're similar. If you know one, you can extend it to the other.
After downloading and extracting, place it in the same directory as your JDK:
tar -xzf <graalvm-archive>.tar.gz

Modify environment variables:
For Linux (CentOS as example), edit /etc/profile. For macOS, edit ~/.zshrc. You need to change the JAVA_HOME you configured when installing JDK to the GraalVM path:
export JAVA_HOME=/Users/asher/workspace/software/jdk/graalvm-ce-java11-21.3.0/Contents/Home
Then add to PATH:
export PATH=$PATH:$MAVEN_HOME/bin:$FFMPEG_HOME/bin:/Users/asher/workspace/software/jdk/graalvm-ce-java11-21.3.0/Contents/Home/bin:$JAVA_HOME:.
Note: I added /Users/asher/workspace/software/jdk/graalvm-ce-java11-21.3.0/Contents/Home/bin to the path - this needs to be added.
Don't forget source /etc/profile on CentOS.
Windows
Extract the downloaded file.
Then press Win+R to open command line:
setx /M JAVA_HOME "C:\Progra~1\Java\<graalvm>"
Configure environment variables:
setx /M PATH "C:\Progra~1\Java\<graalvm>\bin;%PATH%"
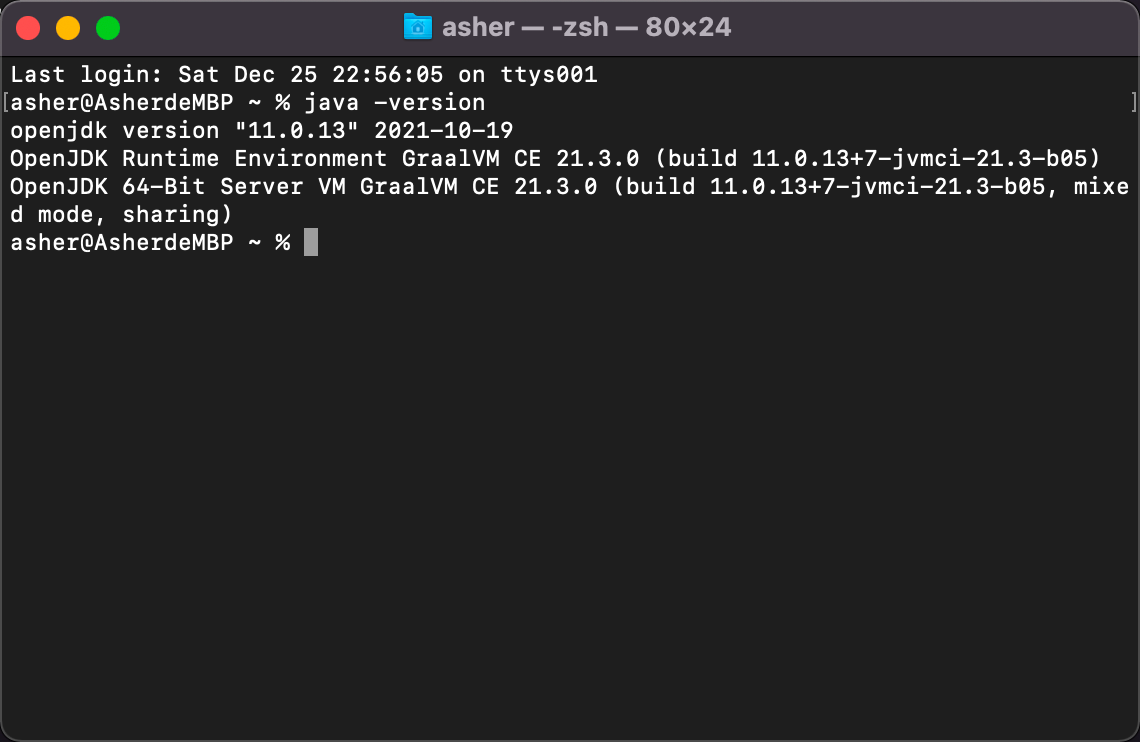
After installation and configuration, open a new command line window and run java -version.
You'll see the JDK has changed to the newly installed one, similar to this screenshot:
3. Starting with Hello World
Now that installation is complete, let's start with the simplest Hello World to experience the difference between GraalVM and JVM.
Create a new Java file, HelloWorld.java:
public class HelloWorld {
  public static void main(String[] args) {
    System.out.println("Hello, World!");
  }
}
3.1 JVM Version
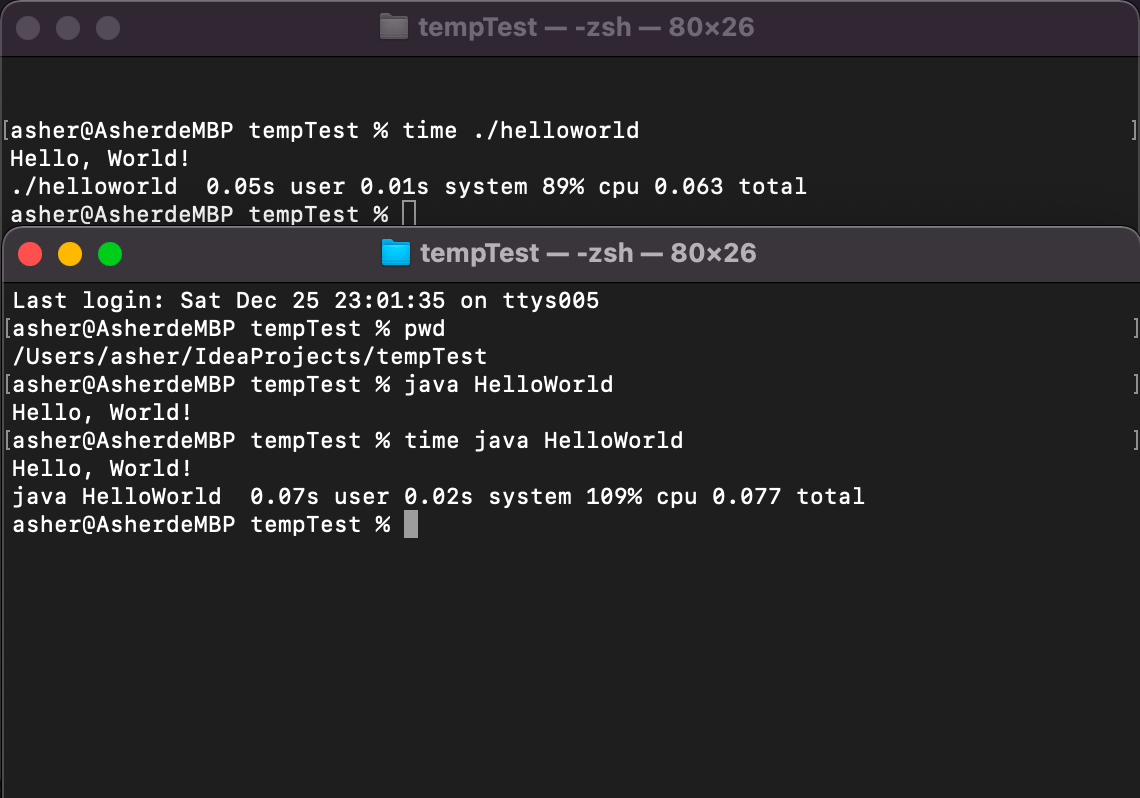
We need to run javac HelloWorld.java, then java HelloWorld. Let's record the time for java HelloWorld:
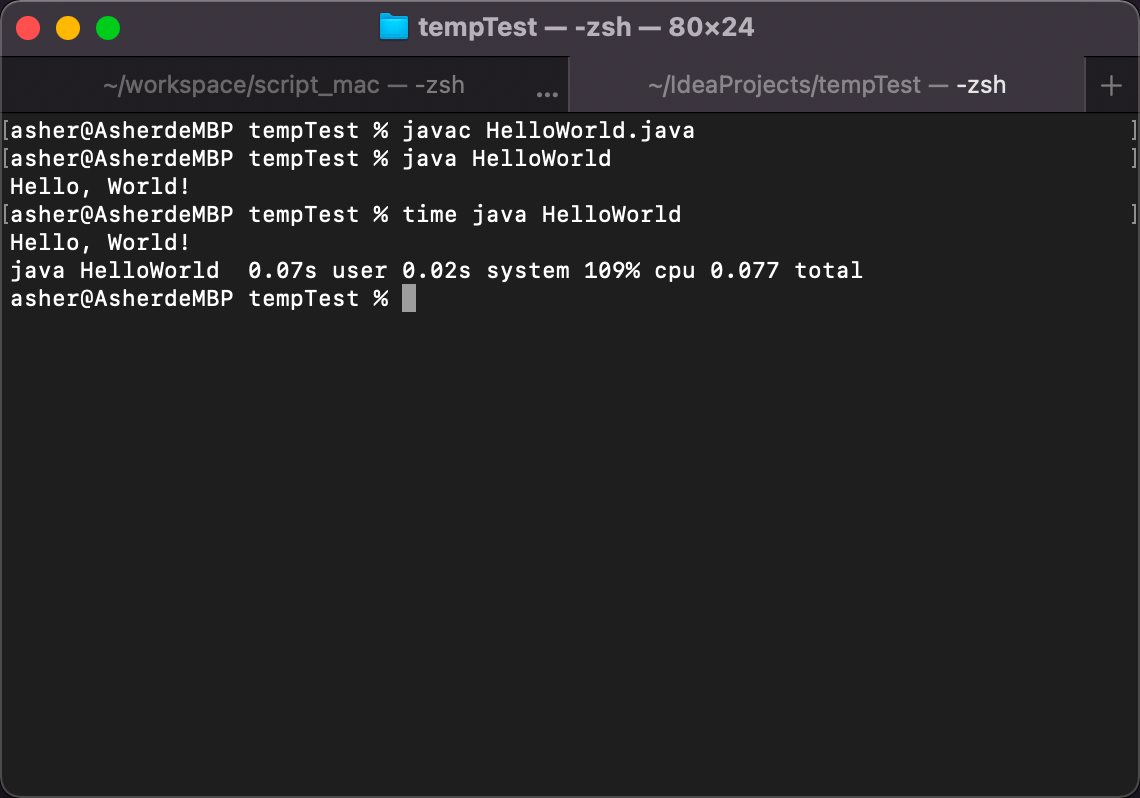 Total: 0.077 seconds
3.2 GraalVM Version
First install native-image:
gu install native-image
Then in the directory where you compiled HelloWorld, run:
native-image HelloWorld
Wait for a while - this will directly generate an executable file.
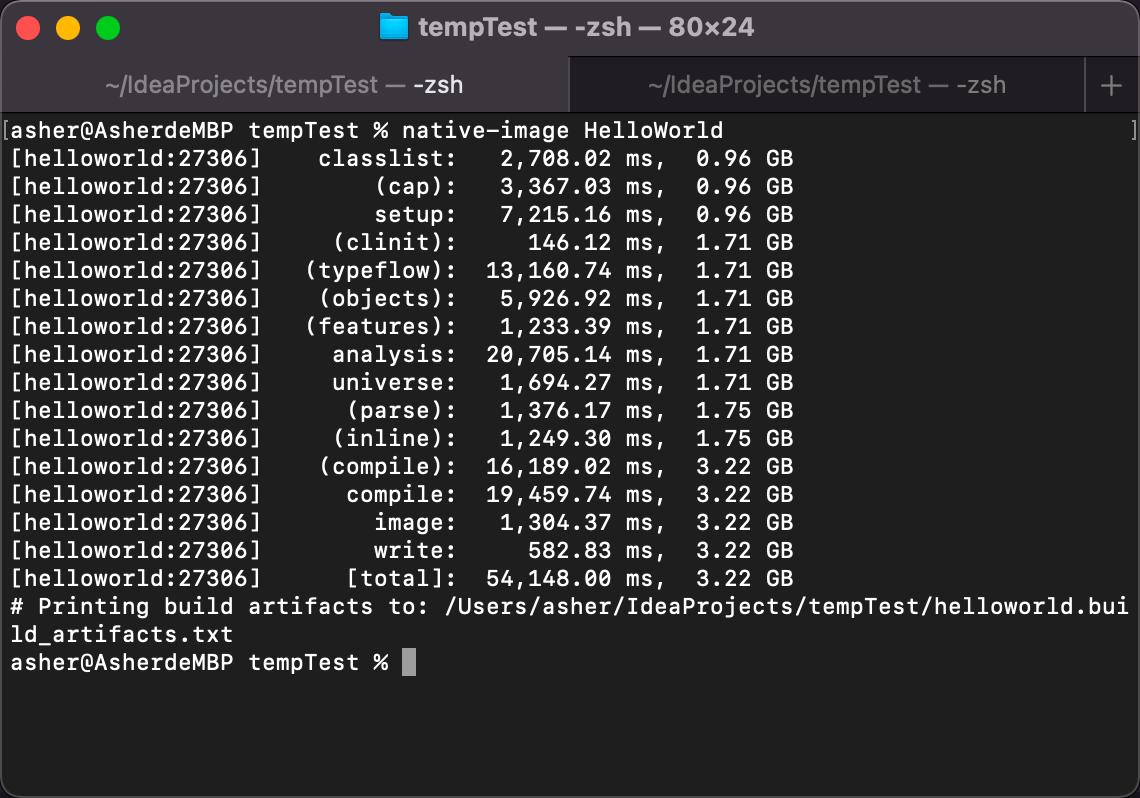
After waiting, you'll see the file has been generated:

Let's run it:
Works perfectly! Now let's test the time:

0.063 seconds! Compared to the JVM execution, both user and system time are lower than JVM:
Although GraalVM is indeed faster, you may have noticed that when running native-image HelloWorld, there are several stages that are time and memory consuming.
4. Advanced: Maven Plugin Compilation
After seeing the above, you might think the difference isn't significant - after all, we can't really feel a few microseconds.
Here I'll explain how to use GraalVM in common Maven projects.
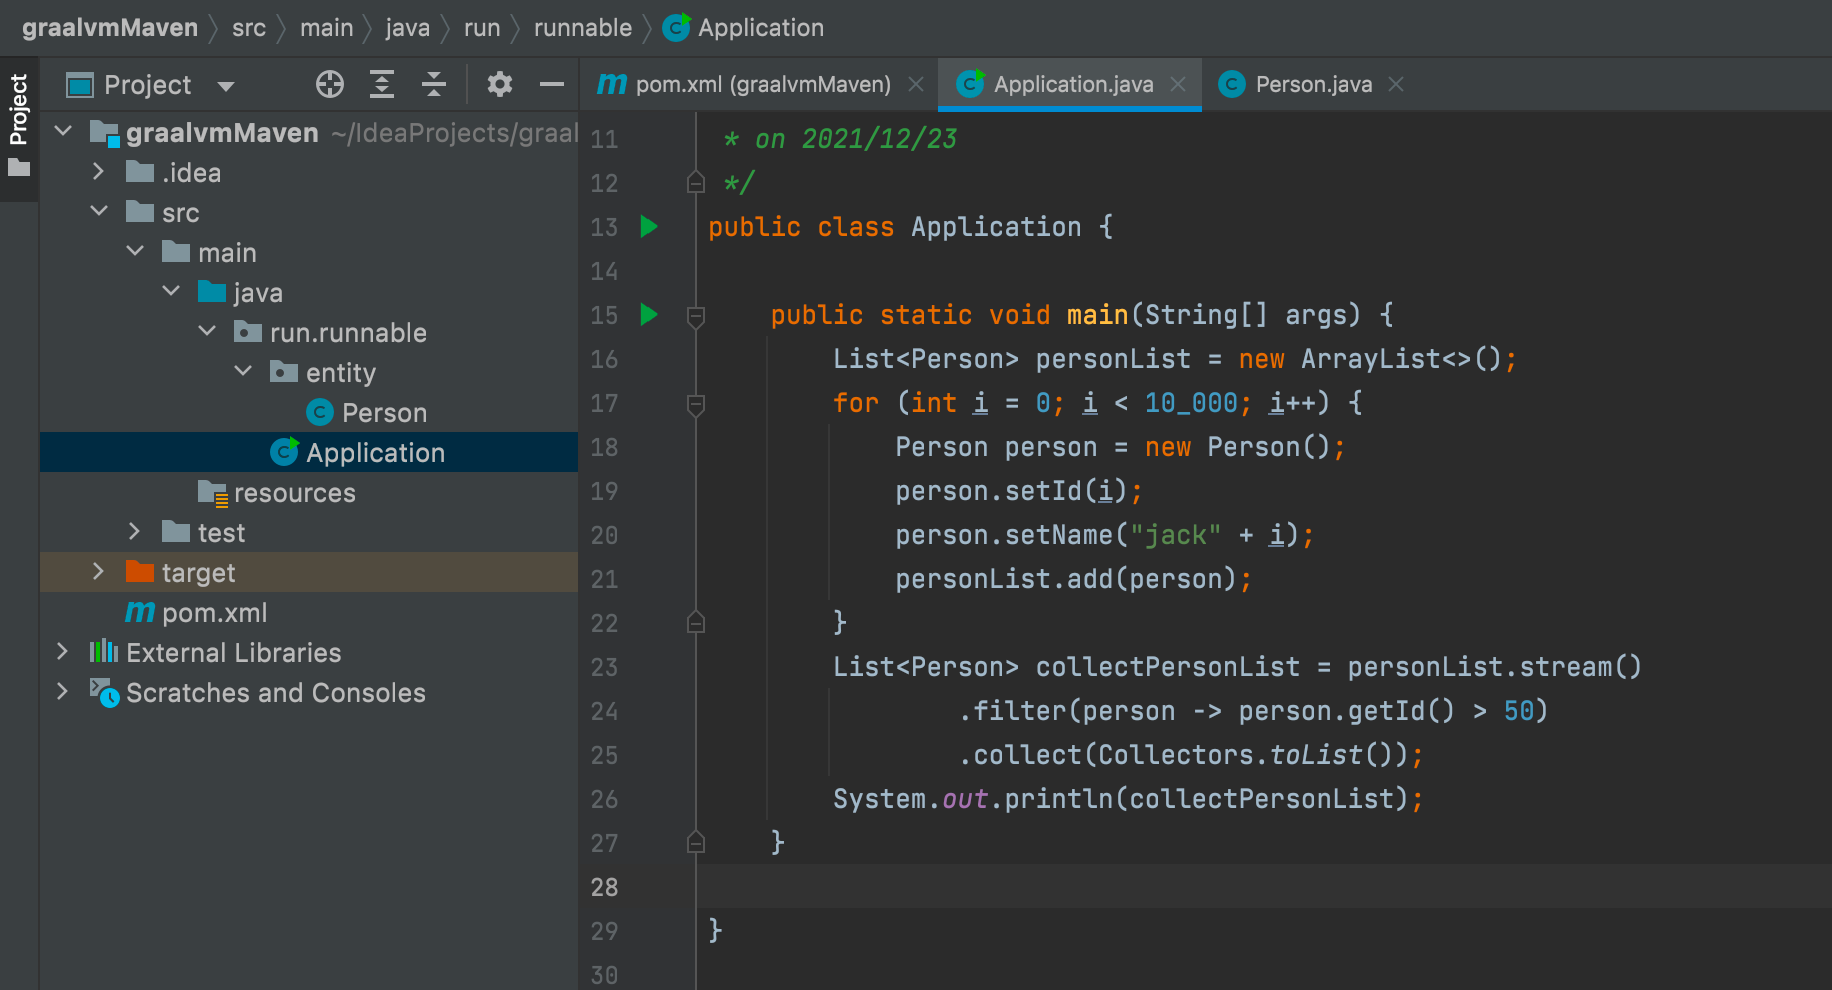
Let's create a new Maven project. The entire program structure looks like this, with only an Application.java and a Person.java file:
4.1 pom.xml
Since we're using maven plugin for packaging, we added the graal-sdk dependency and introduced native-image-maven-plugin:
    <properties>
        <maven.compiler.source>11</maven.compiler.source>
        <maven.compiler.target>11</maven.compiler.target>
        <graal-sdk.version>21.3.0</graal-sdk.version>
    </properties>

    <dependencies>
        <dependency>
            <groupId>org.graalvm.sdk</groupId>
            <artifactId>graal-sdk</artifactId>
            <version>${graal-sdk.version}</version>
            <scope>provided</scope>
        </dependency>
    </dependencies>

    <build>
        <plugins>
            <plugin>
                <groupId>org.graalvm.nativeimage</groupId>
                <artifactId>native-image-maven-plugin</artifactId>
                <version>21.2.0</version>
                <executions>
                    <execution>
                        <goals>
                            <goal>native-image</goal>
                        </goals>
                        <phase>package</phase>
                    </execution>
                </executions>
                <configuration>
                    <skip>false</skip>
                    <imageName>graalvmMaven</imageName>
                    <mainClass>run.runnable.Application</mainClass>
                    <buildArgs>
                        --no-fallback
                    </buildArgs>
                </configuration>
            </plugin>
        </plugins>
    </build>
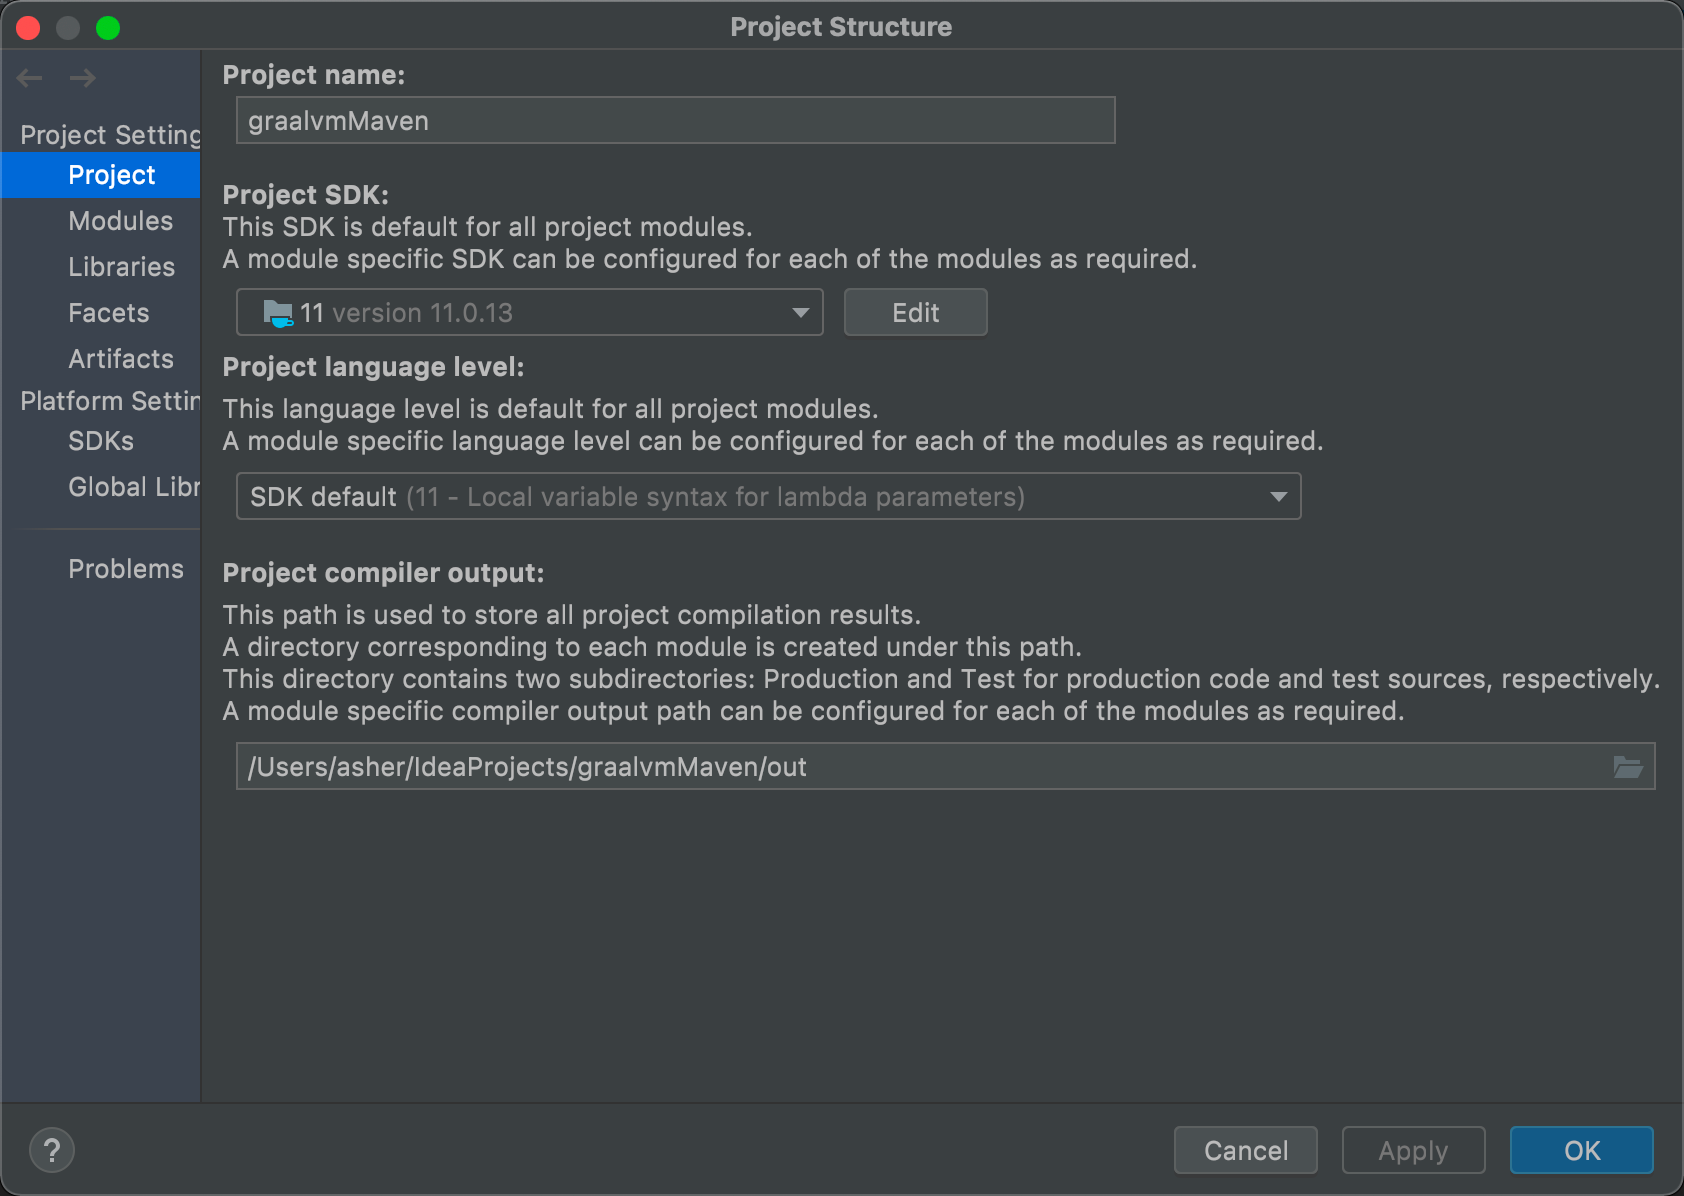
Then we need to configure the Java version in IDEA to use the downloaded GraalVM's Java:
After modification, let's add some code to the project. Here I created a Person entity class and Application startup class:
Person.java
package run.runnable.entity;

/**
 * @author Asher
 * on 2021/12/23
 */
public class Person {

    private Integer id;

    private String name;

    public String getName() {
        return name;
    }

    public void setName(String name) {
        this.name = name;
    }

    public Integer getId() {
        return id;
    }

    public void setId(Integer id) {
        this.id = id;
    }

    @Override
    public String toString() {
        return "Person{" +
                "id=" + id +
                ", name='" + name + '\'' +
                '}';
    }
}
Application
package run.runnable;

import run.runnable.entity.Person;

import java.util.ArrayList;
import java.util.List;
import java.util.stream.Collectors;

/**
 * @author Asher
 * on 2021/12/23
 */
public class Application {

    public static void main(String[] args) {
        List<Person> personList = new ArrayList<>();
        for (int i = 0; i < 10_000; i++) {
            Person person = new Person();
            person.setId(i);
            person.setName("jack" + i);
            personList.add(person);
        }
        List<Person> collectPersonList = personList.stream()
                .filter(person -> person.getId() > 5000)
                .collect(Collectors.toList());
        System.out.println(collectPersonList);
    }

}
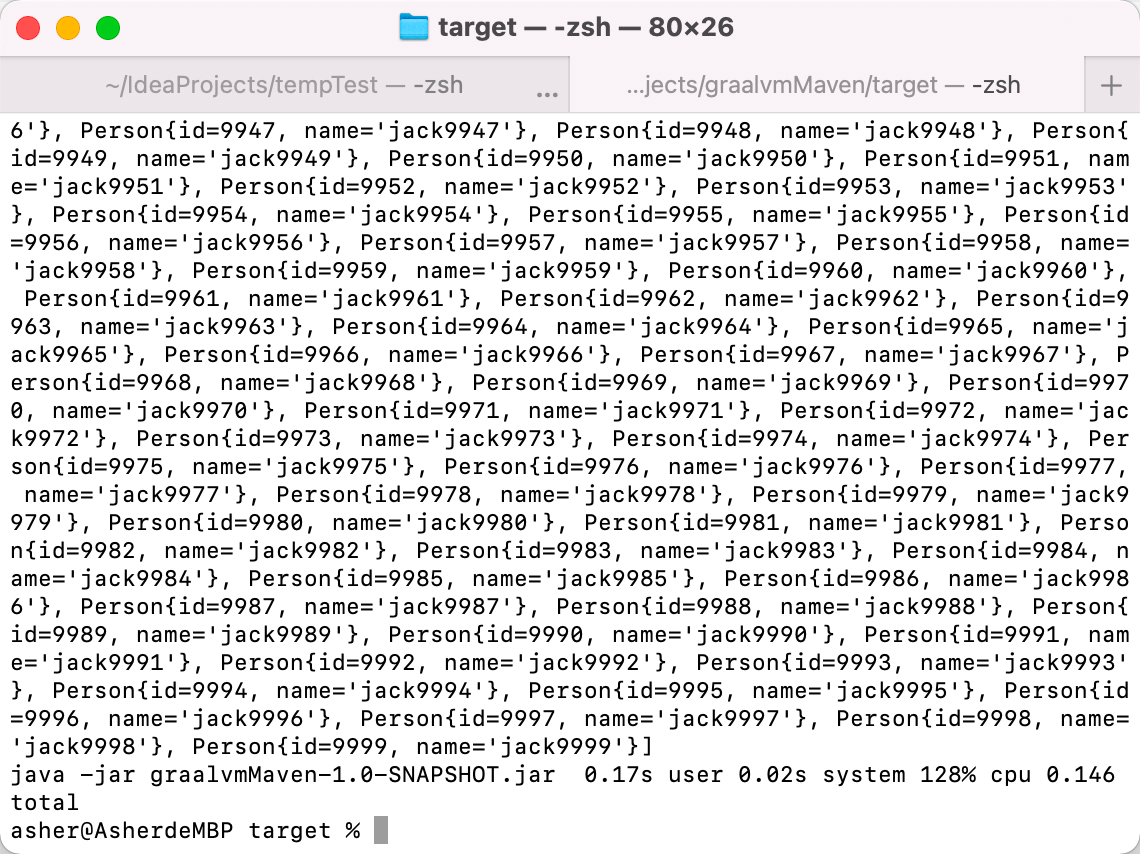
The code logic is simple: create a personList, add 10,000 items, then filter for id > 5000.
4.2 JVM Version
I won't go into detail about packaging a regular Maven project as a JAR. Here's the result directly.
The JVM version uses Zulu JDK adapted for M1, so no performance degradation from translation.
Execute:
time java -jar graalvmMaven-1.0-SNAPSHOT.jar
Execution time: 0.146 seconds
4.3 GraalVM Version
Just click Maven's package to build:
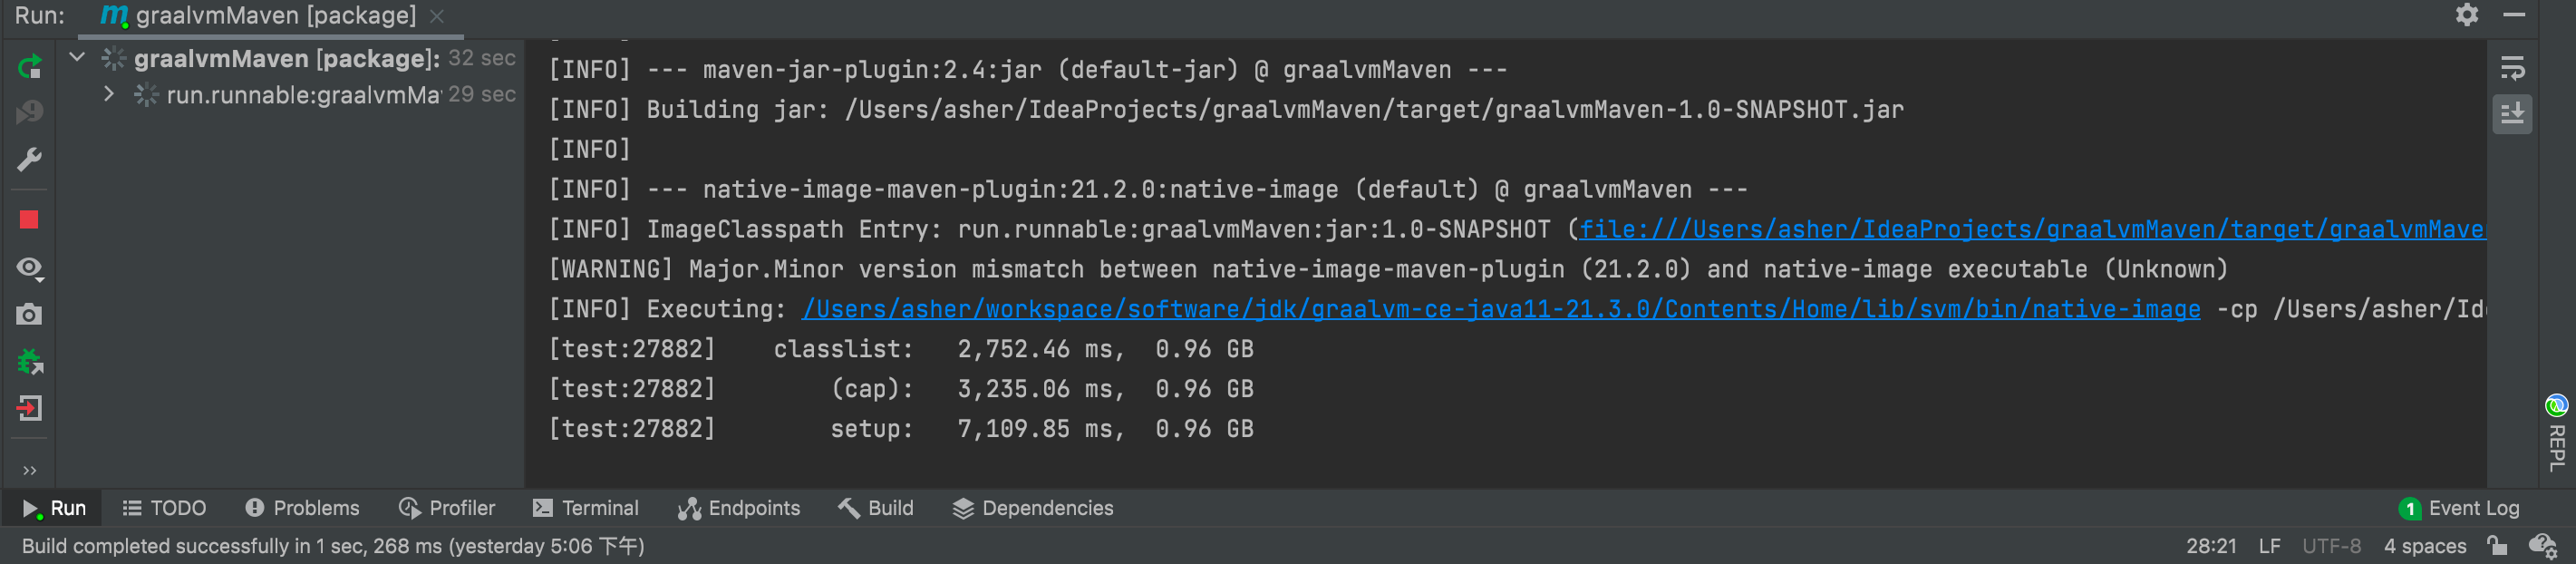
Build time: about one minute
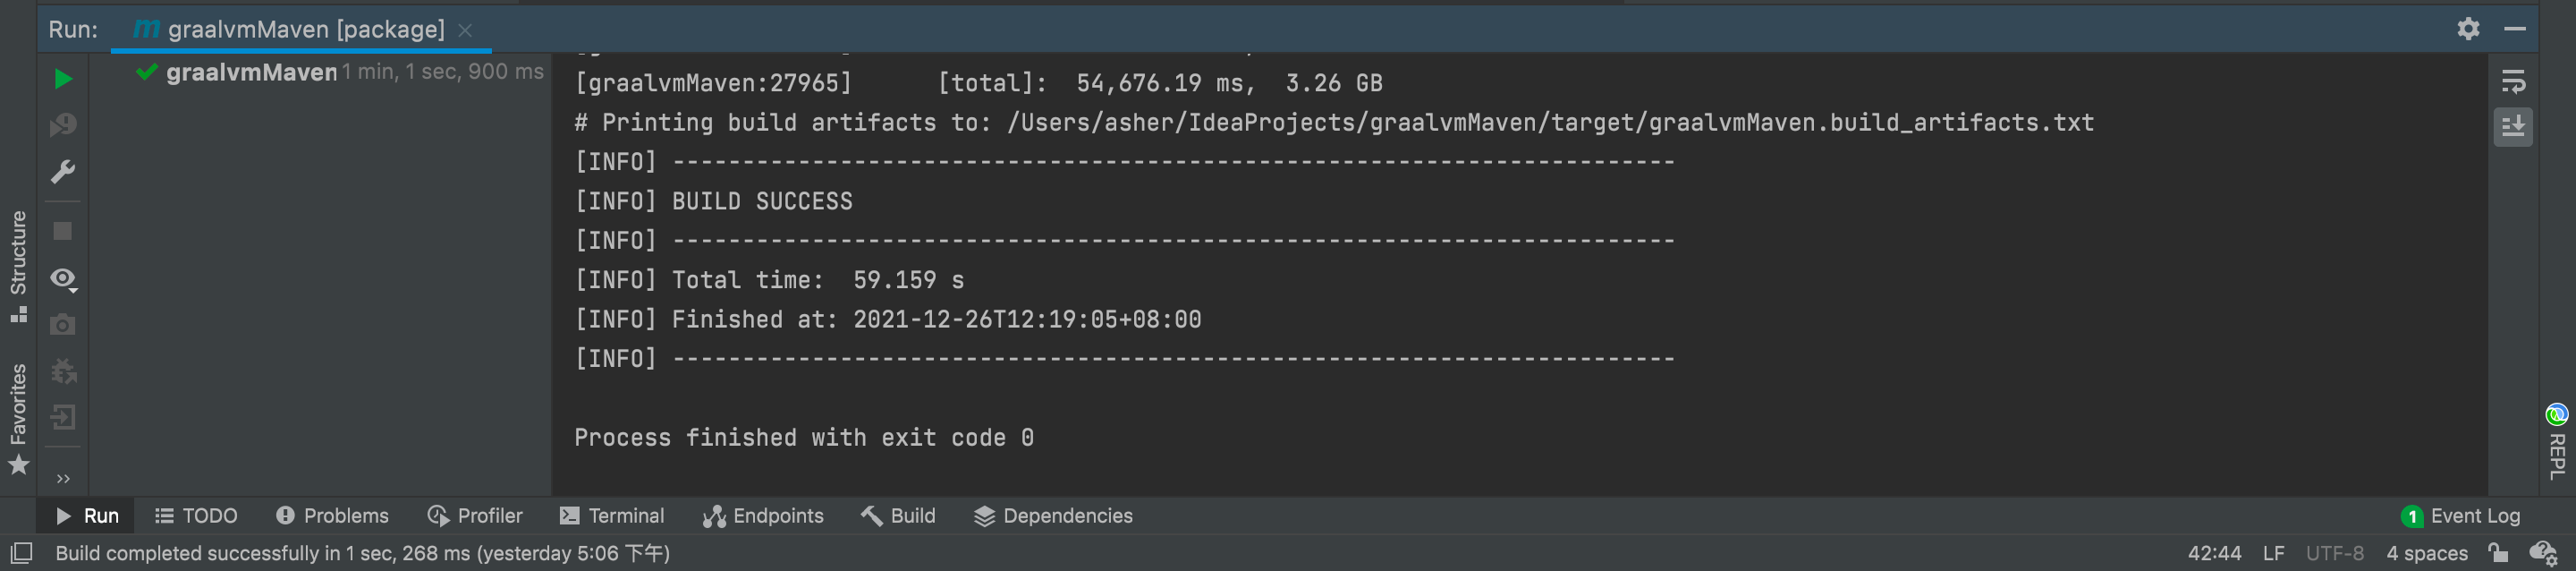
Now let's run the generated executable:

0.085 seconds! Compared to the JVM version's 0.146 seconds, the time difference is becoming more significant.
5. Advanced: Packaging SpringBoot Project as Image with Spring Native
In this section, you don't even need to install GraalVM locally.
5.1 Create SpringBoot Project
In this part, I'll explain how to package a simple SpringBoot project as a Docker image. I recommend using WSL2 on Windows because this process is very resource-intensive. On Mac, even with 10GB RAM and 4 CPU cores allocated to Docker, it would mysteriously freeze at certain points.
Of course, if you have a Linux host, that's even better - no need to worry about this issue.
Let's create a simple SpringBoot project.
In Spring Initializr, select the SpringBoot version, and on the right side, select Spring Native dependency and Spring:
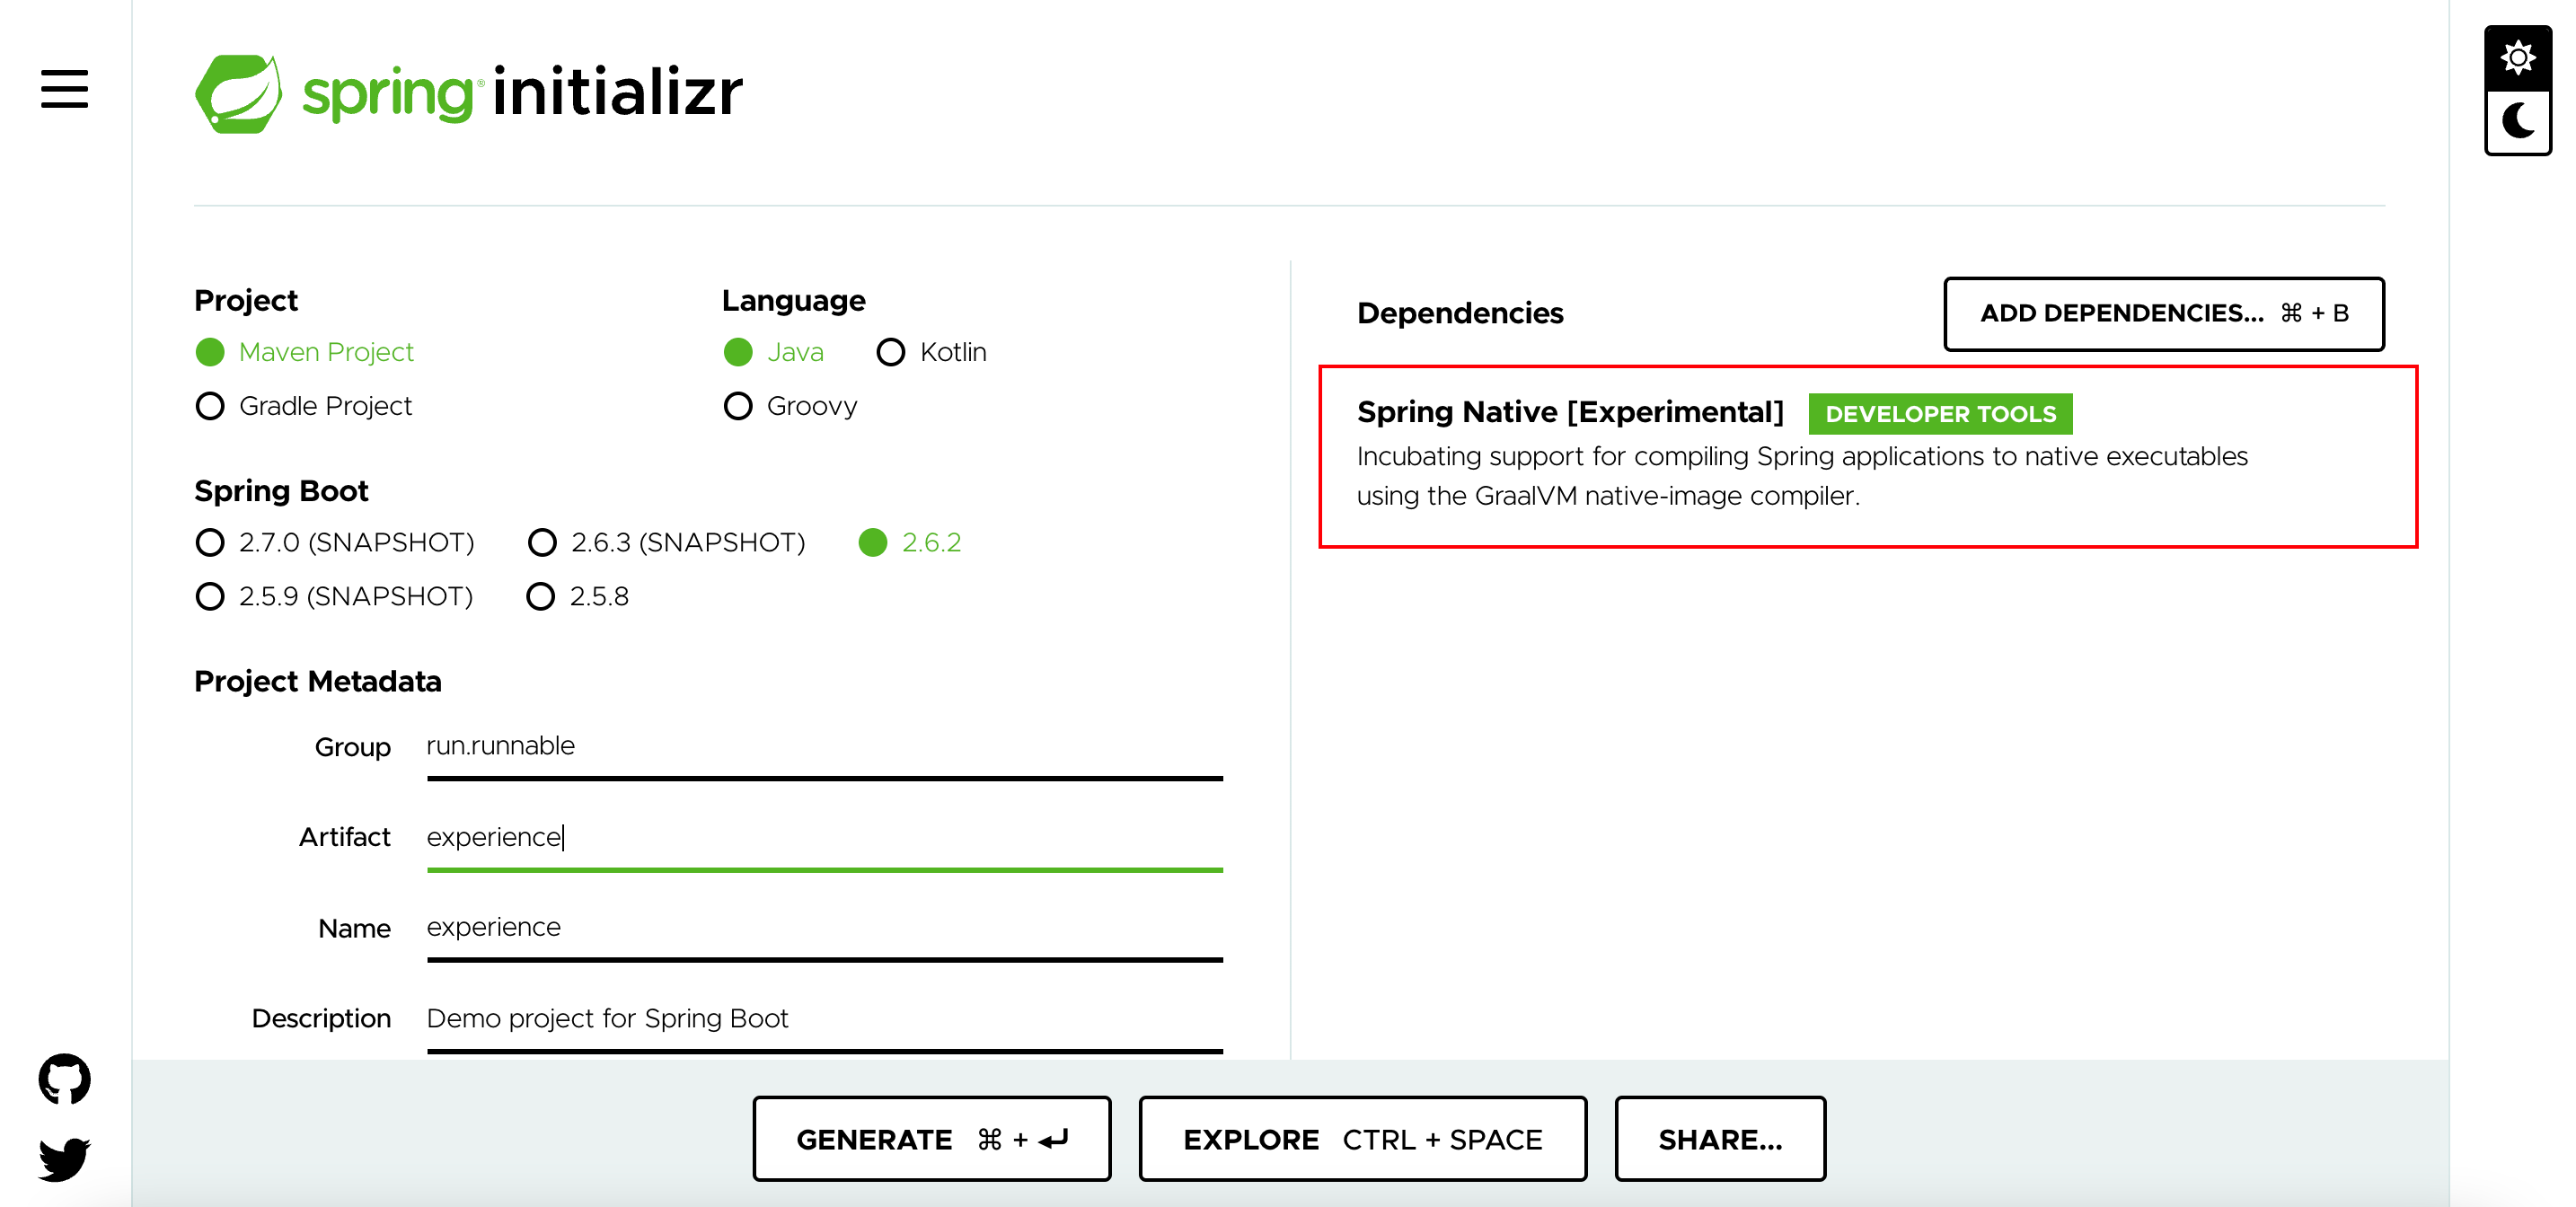
Click generate below to download a zip file. Extract it in your working directory and import it into your IDEA.
5.2 Slightly Modify the pom File
In the generated pom file, Spring has thoughtfully added all the configurations for us.
So I only added a spring-boot-starter-web dependency:
<?xml version="1.0" encoding="UTF-8"?>
<project xmlns="http://maven.apache.org/POM/4.0.0" xmlns:xsi="http://www.w3.org/2001/XMLSchema-instance"
	xsi:schemaLocation="http://maven.apache.org/POM/4.0.0 https://maven.apache.org/xsd/maven-4.0.0.xsd">
	<modelVersion>4.0.0</modelVersion>
	<parent>
		<groupId>org.springframework.boot</groupId>
		<artifactId>spring-boot-starter-parent</artifactId>
		<version>2.6.1</version>
		<relativePath/>
	</parent>
	<groupId>run.runnable</groupId>
	<artifactId>experience</artifactId>
	<version>0.0.1-SNAPSHOT</version>
	<name>experience</name>
	<description>Experience Spring Native</description>
	<properties>
		<java.version>11</java.version>
		<repackage.classifier/>
		<spring-native.version>0.11.0</spring-native.version>
	</properties>
	<dependencies>
		<dependency>
			<groupId>org.springframework.boot</groupId>
			<artifactId>spring-boot-starter-web</artifactId>
		</dependency>
		<dependency>
			<groupId>org.springframework.experimental</groupId>
			<artifactId>spring-native</artifactId>
			<version>${spring-native.version}</version>
		</dependency>

		<dependency>
			<groupId>org.springframework.boot</groupId>
			<artifactId>spring-boot-starter-test</artifactId>
			<scope>test</scope>
		</dependency>

		<dependency>
			<groupId>org.graalvm.buildtools</groupId>
			<artifactId>native-maven-plugin</artifactId>
			<version>0.9.8</version>
		</dependency>

		<!-- https://mvnrepository.com/artifact/org.apache.maven.plugins/maven-idea-plugin -->
		<dependency>
			<groupId>org.apache.maven.plugins</groupId>
			<artifactId>maven-idea-plugin</artifactId>
			<version>2.2.1</version>
		</dependency>

		<dependency>
			<groupId>org.springframework.boot</groupId>
			<artifactId>spring-boot-maven-plugin</artifactId>
			<version>2.5.0</version>
		</dependency>

	</dependencies>

	<build>
		<plugins>
			<plugin>
				<groupId>org.springframework.boot</groupId>
				<artifactId>spring-boot-maven-plugin</artifactId>
				<configuration>
					<classifier>${repackage.classifier}</classifier>
					<image>
						<builder>paketobuildpacks/builder:tiny</builder>
						<env>
							<BP_NATIVE_IMAGE>true</BP_NATIVE_IMAGE>
						</env>
					</image>
				</configuration>
			</plugin>
			<plugin>
				<groupId>org.springframework.experimental</groupId>
				<artifactId>spring-aot-maven-plugin</artifactId>
				<version>${spring-native.version}</version>
				<executions>
					<execution>
						<id>test-generate</id>
						<goals>
							<goal>test-generate</goal>
						</goals>
					</execution>
					<execution>
						<id>generate</id>
						<goals>
							<goal>generate</goal>
						</goals>
					</execution>
				</executions>
			</plugin>
		</plugins>
	</build>
	<repositories>
		<repository>
			<id>spring-releases</id>
			<name>Spring Releases</name>
			<url>https://repo.spring.io/release</url>
			<snapshots>
				<enabled>false</enabled>
			</snapshots>
		</repository>
	</repositories>
	<pluginRepositories>
		<pluginRepository>
			<id>spring-releases</id>
			<name>Spring Releases</name>
			<url>https://repo.spring.io/release</url>
			<snapshots>
				<enabled>false</enabled>
			</snapshots>
		</pluginRepository>
	</pluginRepositories>

	<profiles>
		<profile>
			<id>native</id>
			<properties>
				<repackage.classifier>exec</repackage.classifier>
				<native-buildtools.version>0.9.8</native-buildtools.version>
			</properties>
			<dependencies>
				<dependency>
					<groupId>org.junit.platform</groupId>
					<artifactId>junit-platform-launcher</artifactId>
					<scope>test</scope>
				</dependency>
			</dependencies>
			<build>
				<plugins>
					<plugin>
						<groupId>org.graalvm.buildtools</groupId>
						<artifactId>native-maven-plugin</artifactId>
						<version>0.9.8</version>
						<extensions>true</extensions>
						<executions>
							<execution>
								<id>test-native</id>
								<phase>test</phase>
								<goals>
									<goal>test</goal>
								</goals>
							</execution>
							<execution>
								<id>build-native</id>
								<phase>package</phase>
								<goals>
									<goal>build</goal>
								</goals>
							</execution>
						</executions>
					</plugin>
				</plugins>
			</build>
		</profile>
	</profiles>

</project>
Then add an endpoint to the startup class:
@SpringBootApplication
@Controller
public class ExperienceApplication {

	public static void main(String[] args) {
		SpringApplication.run(ExperienceApplication.class, args);
	}

	@GetMapping("hello")
	@ResponseBody
	private String hello(){
		return "hello world";
	}

}
Now you can run directly by clicking IDEA's run button, which uses local Java to get a JVM version startup time.
My computer specs:
Processor: Intel(R) Core(TM) i5-8300H CPU @ 2.30GHz   2.30 GHz
RAM: 32.0 GB (31.9 GB available)
Startup time: 1.479 seconds
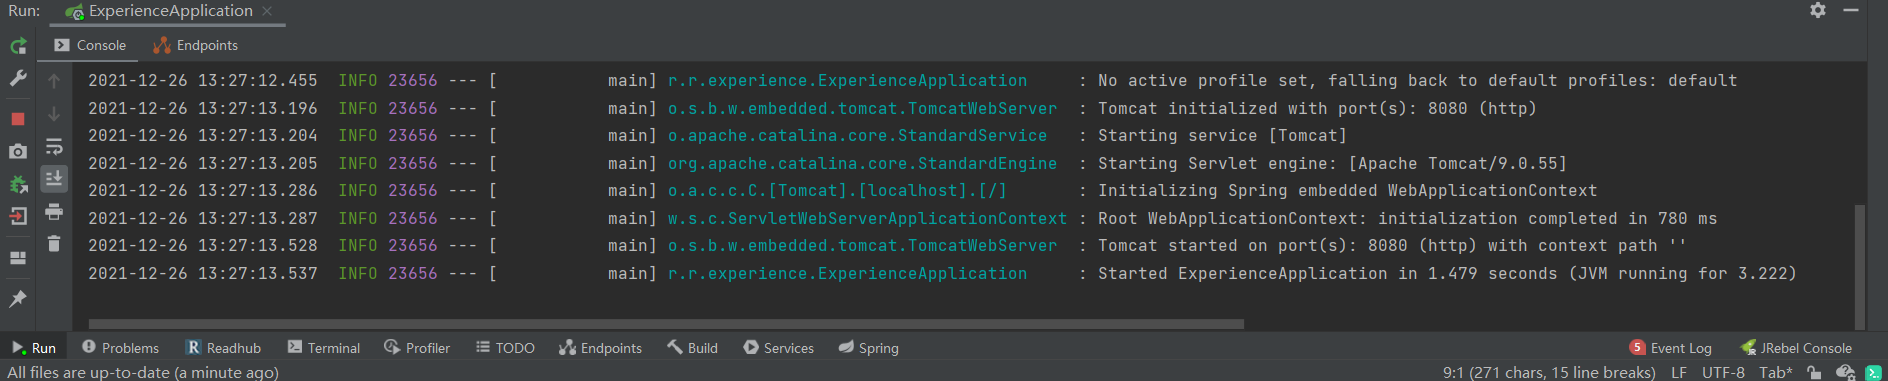
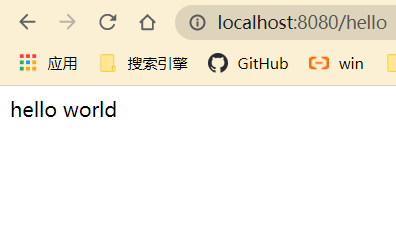
Opening the browser, it's accessible:
5.3 Spring Native Packaging
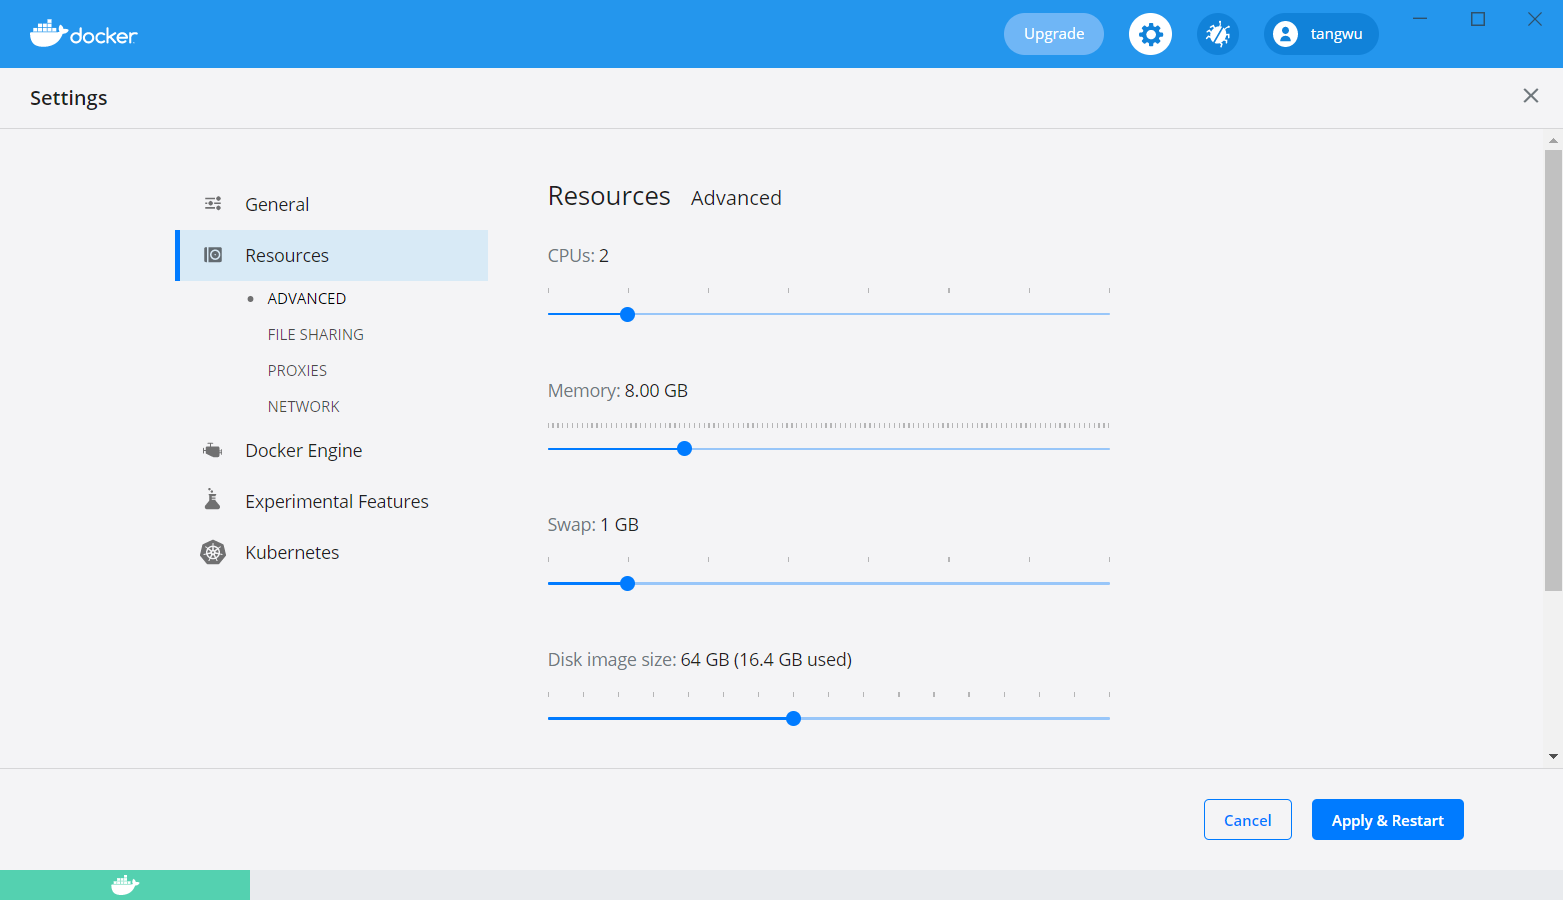
Now let's do the Spring Native packaging. Open Docker on Windows.
Click settings and increase your configuration - packaging will be faster:
Then go back to IDEA, use cmd window and navigate to your project directory.
Use:
mvn spring-boot:build-image
Or specify the Maven path:
D:\maven\apache-maven-3.8.4-bin\apache-maven-3.8.4\bin\mvn clean -U -DskipTests spring-boot:build-image
To build. Then comes the long wait. You might encounter some errors, like:
5.4 Execution default-cli of goal org.springframework.boot:spring-boot-maven-plugin:2.6.1:build-image failed: Builder lifecycle 'creator' failed with status code 145
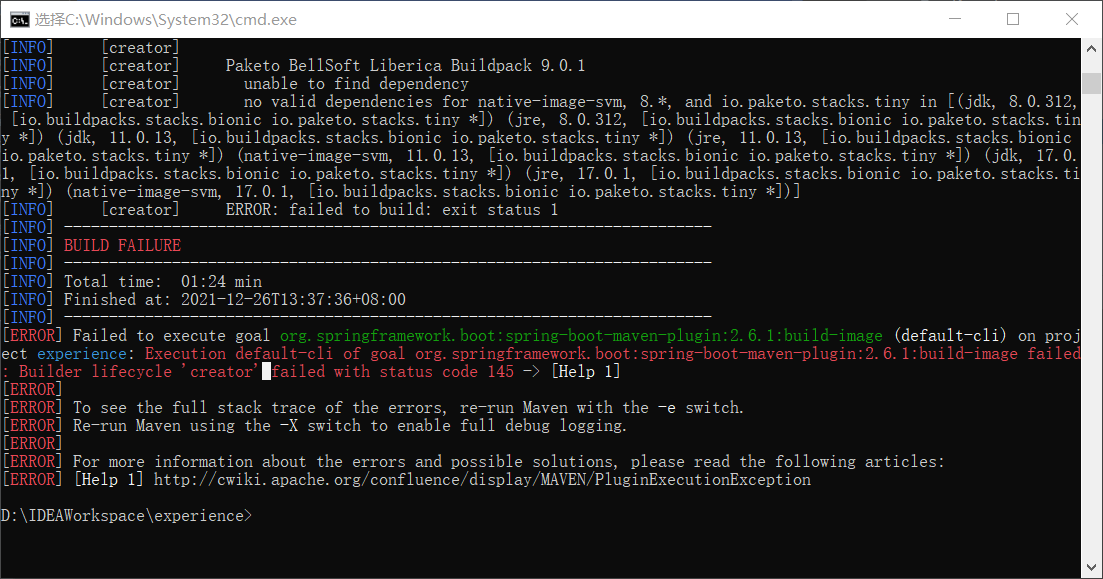
You need to check:
- Your local runtime JDK version matches the project
- Check if your IDEA project settings JDK is correct
- The mvn command is calling the correct JDK version
- Using the correct Maven version - too old won't work
If everything is fine, you should see output like this:
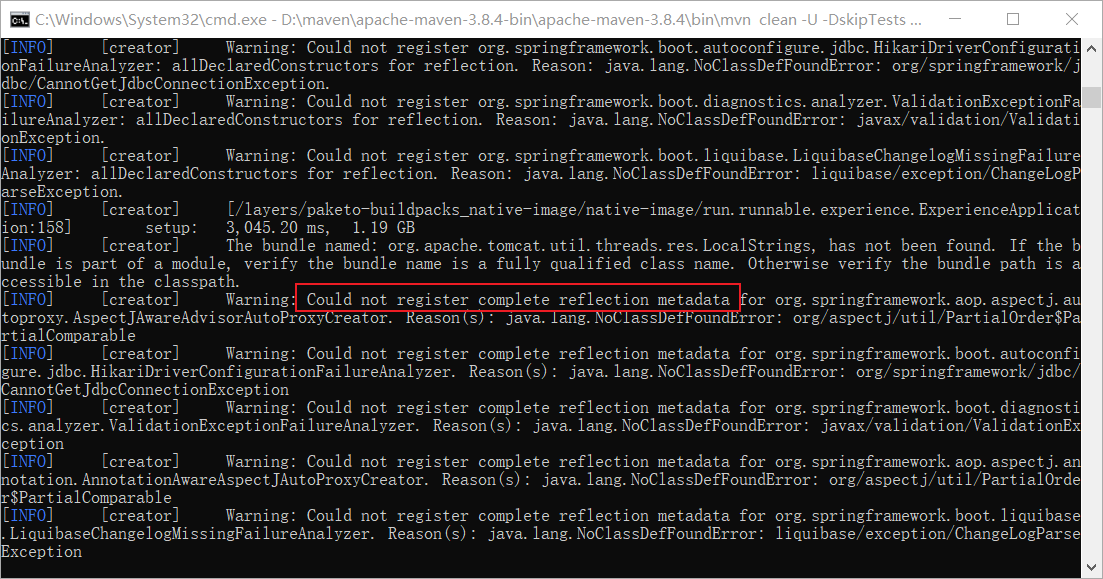
All normal.
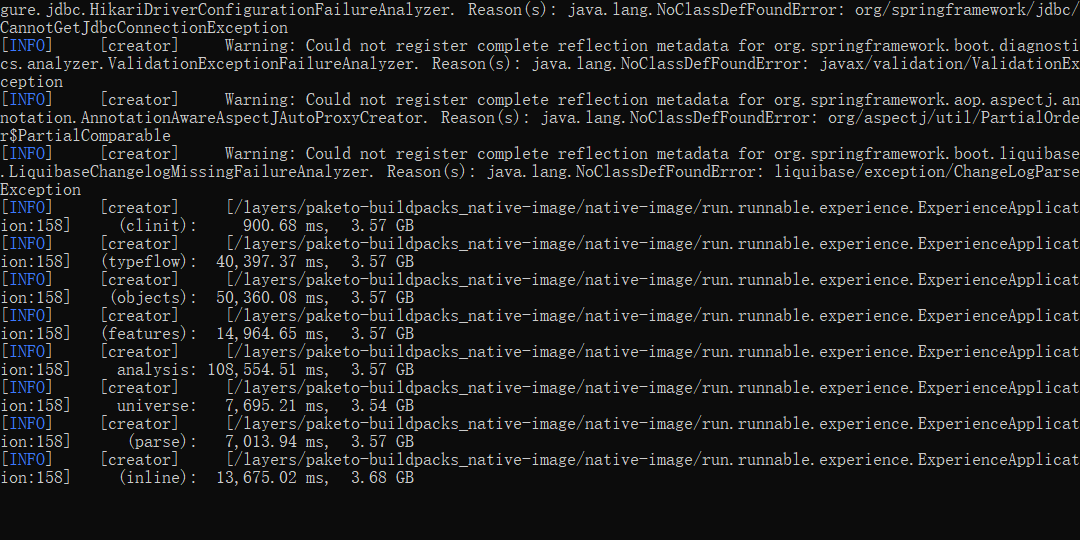
Here's why you need to set Docker memory higher - you'll notice the output shows space usage of several GBs:
When you see build success, it's done:
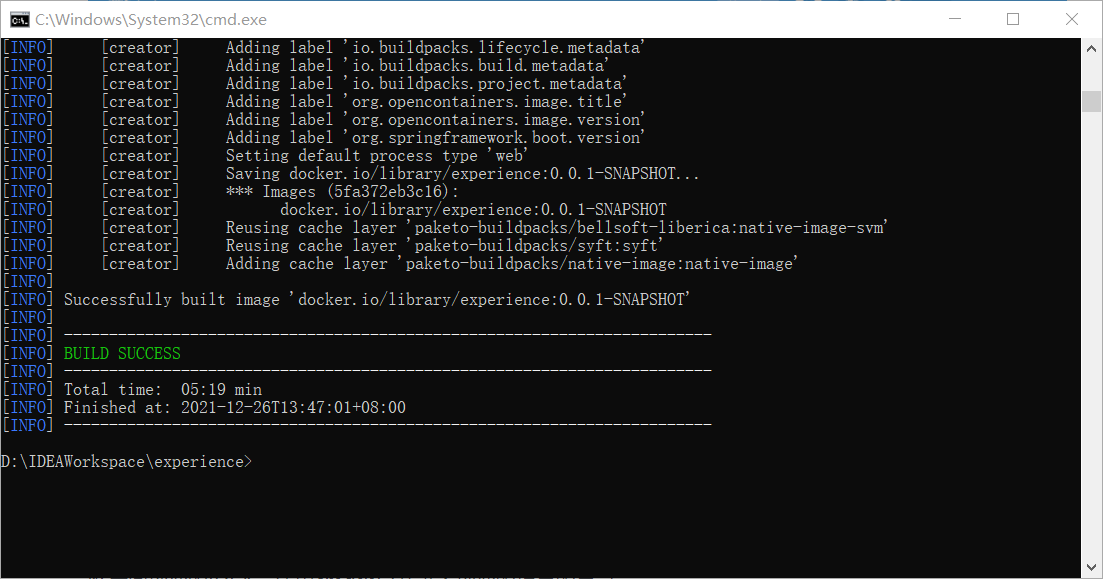
Use docker images to see the newly built image. Let's start it:
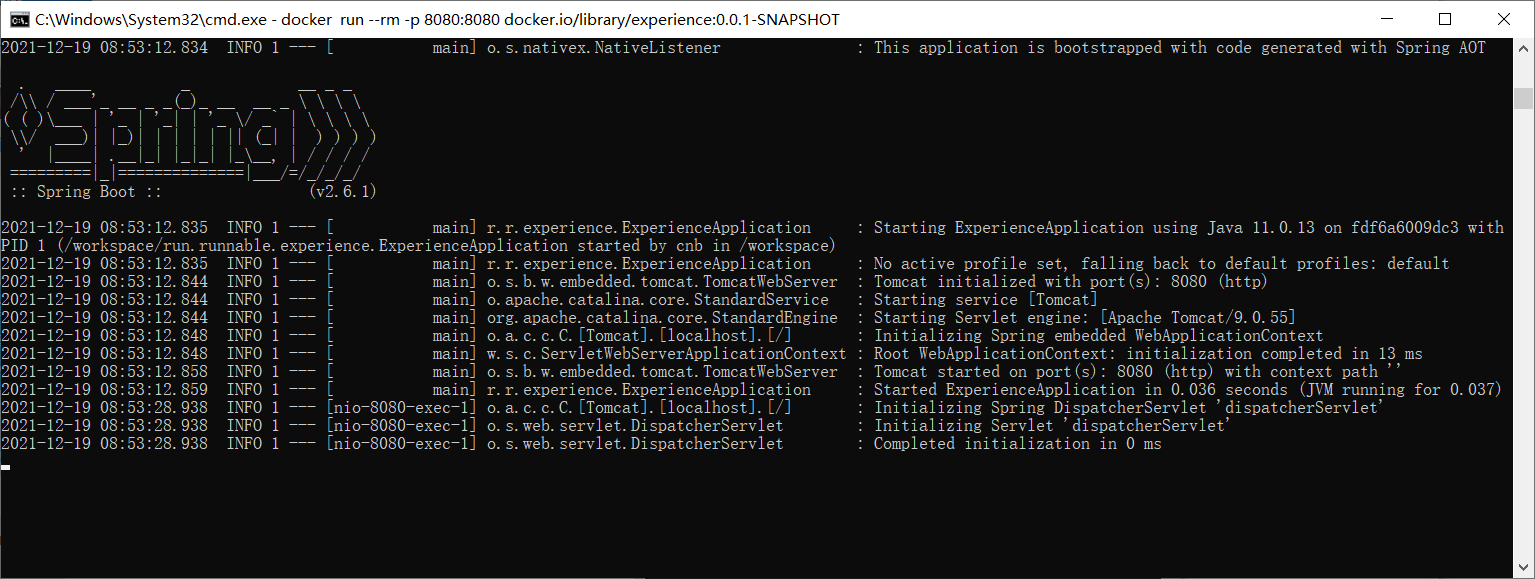
docker run --rm -p 8080:8080 experience:0.0.1-SNAPSHOT
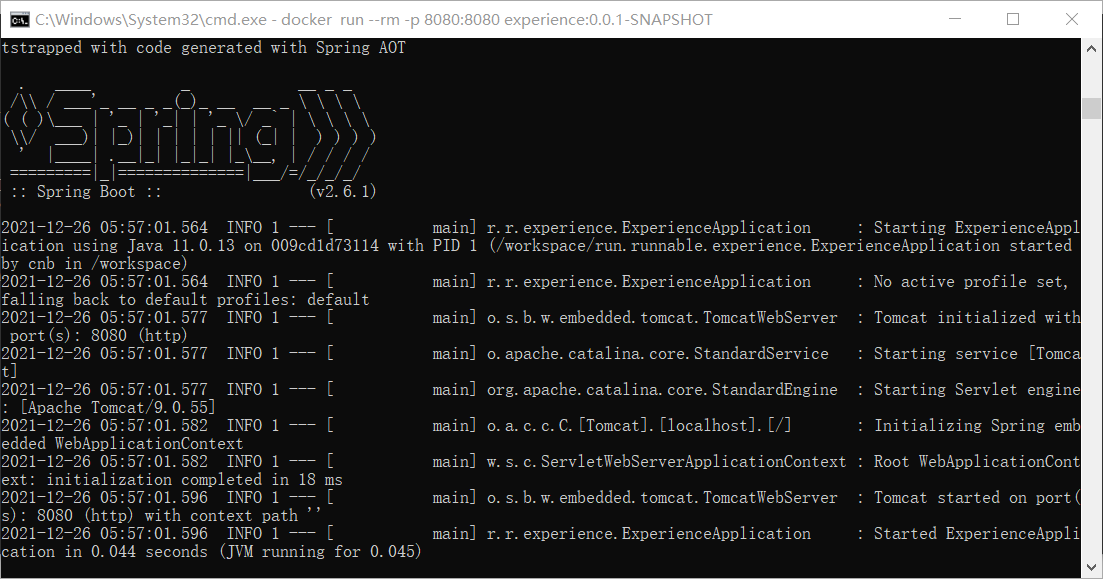
0.045 seconds! JVM really can't compete with this startup speed. This completes the simple use of Spring Native. For deeper exploration, check their documentation: Announcing Spring Native Beta!
6. Limitations
However, everything has two sides. For GraalVM, the good aspects are smaller package size, faster startup, and lower memory usage. This makes me think - a 1-core 2GB server used to barely run one application, but with GraalVM using only 50MB at runtime, couldn't I deploy many applications? And with such great performance!
Unfortunately:
- GraalVM has high configuration requirements for packaging - never succeeded on Mac
- For projects using reflection, you need to list all reflection-visible types in configuration before building native image with GraalVM
- For Spring Native, it's still in beta - no stable version for production yet
But I feel this is still a future trend. With microservices being so popular now, Java needs something to break through. Maybe in a year or two when this matures, we could even deploy enterprise projects on Raspberry Pi.
7. References
Announcing Spring Native Beta!
Oracle GraalVM Enterprise Edition
Using GraalVM to Package Maven Project as exe
How to Evaluate the GraalVM Project? - kelthuzadx's Answer - Zhihu
GraalVM native-image doesn't compile with Netty
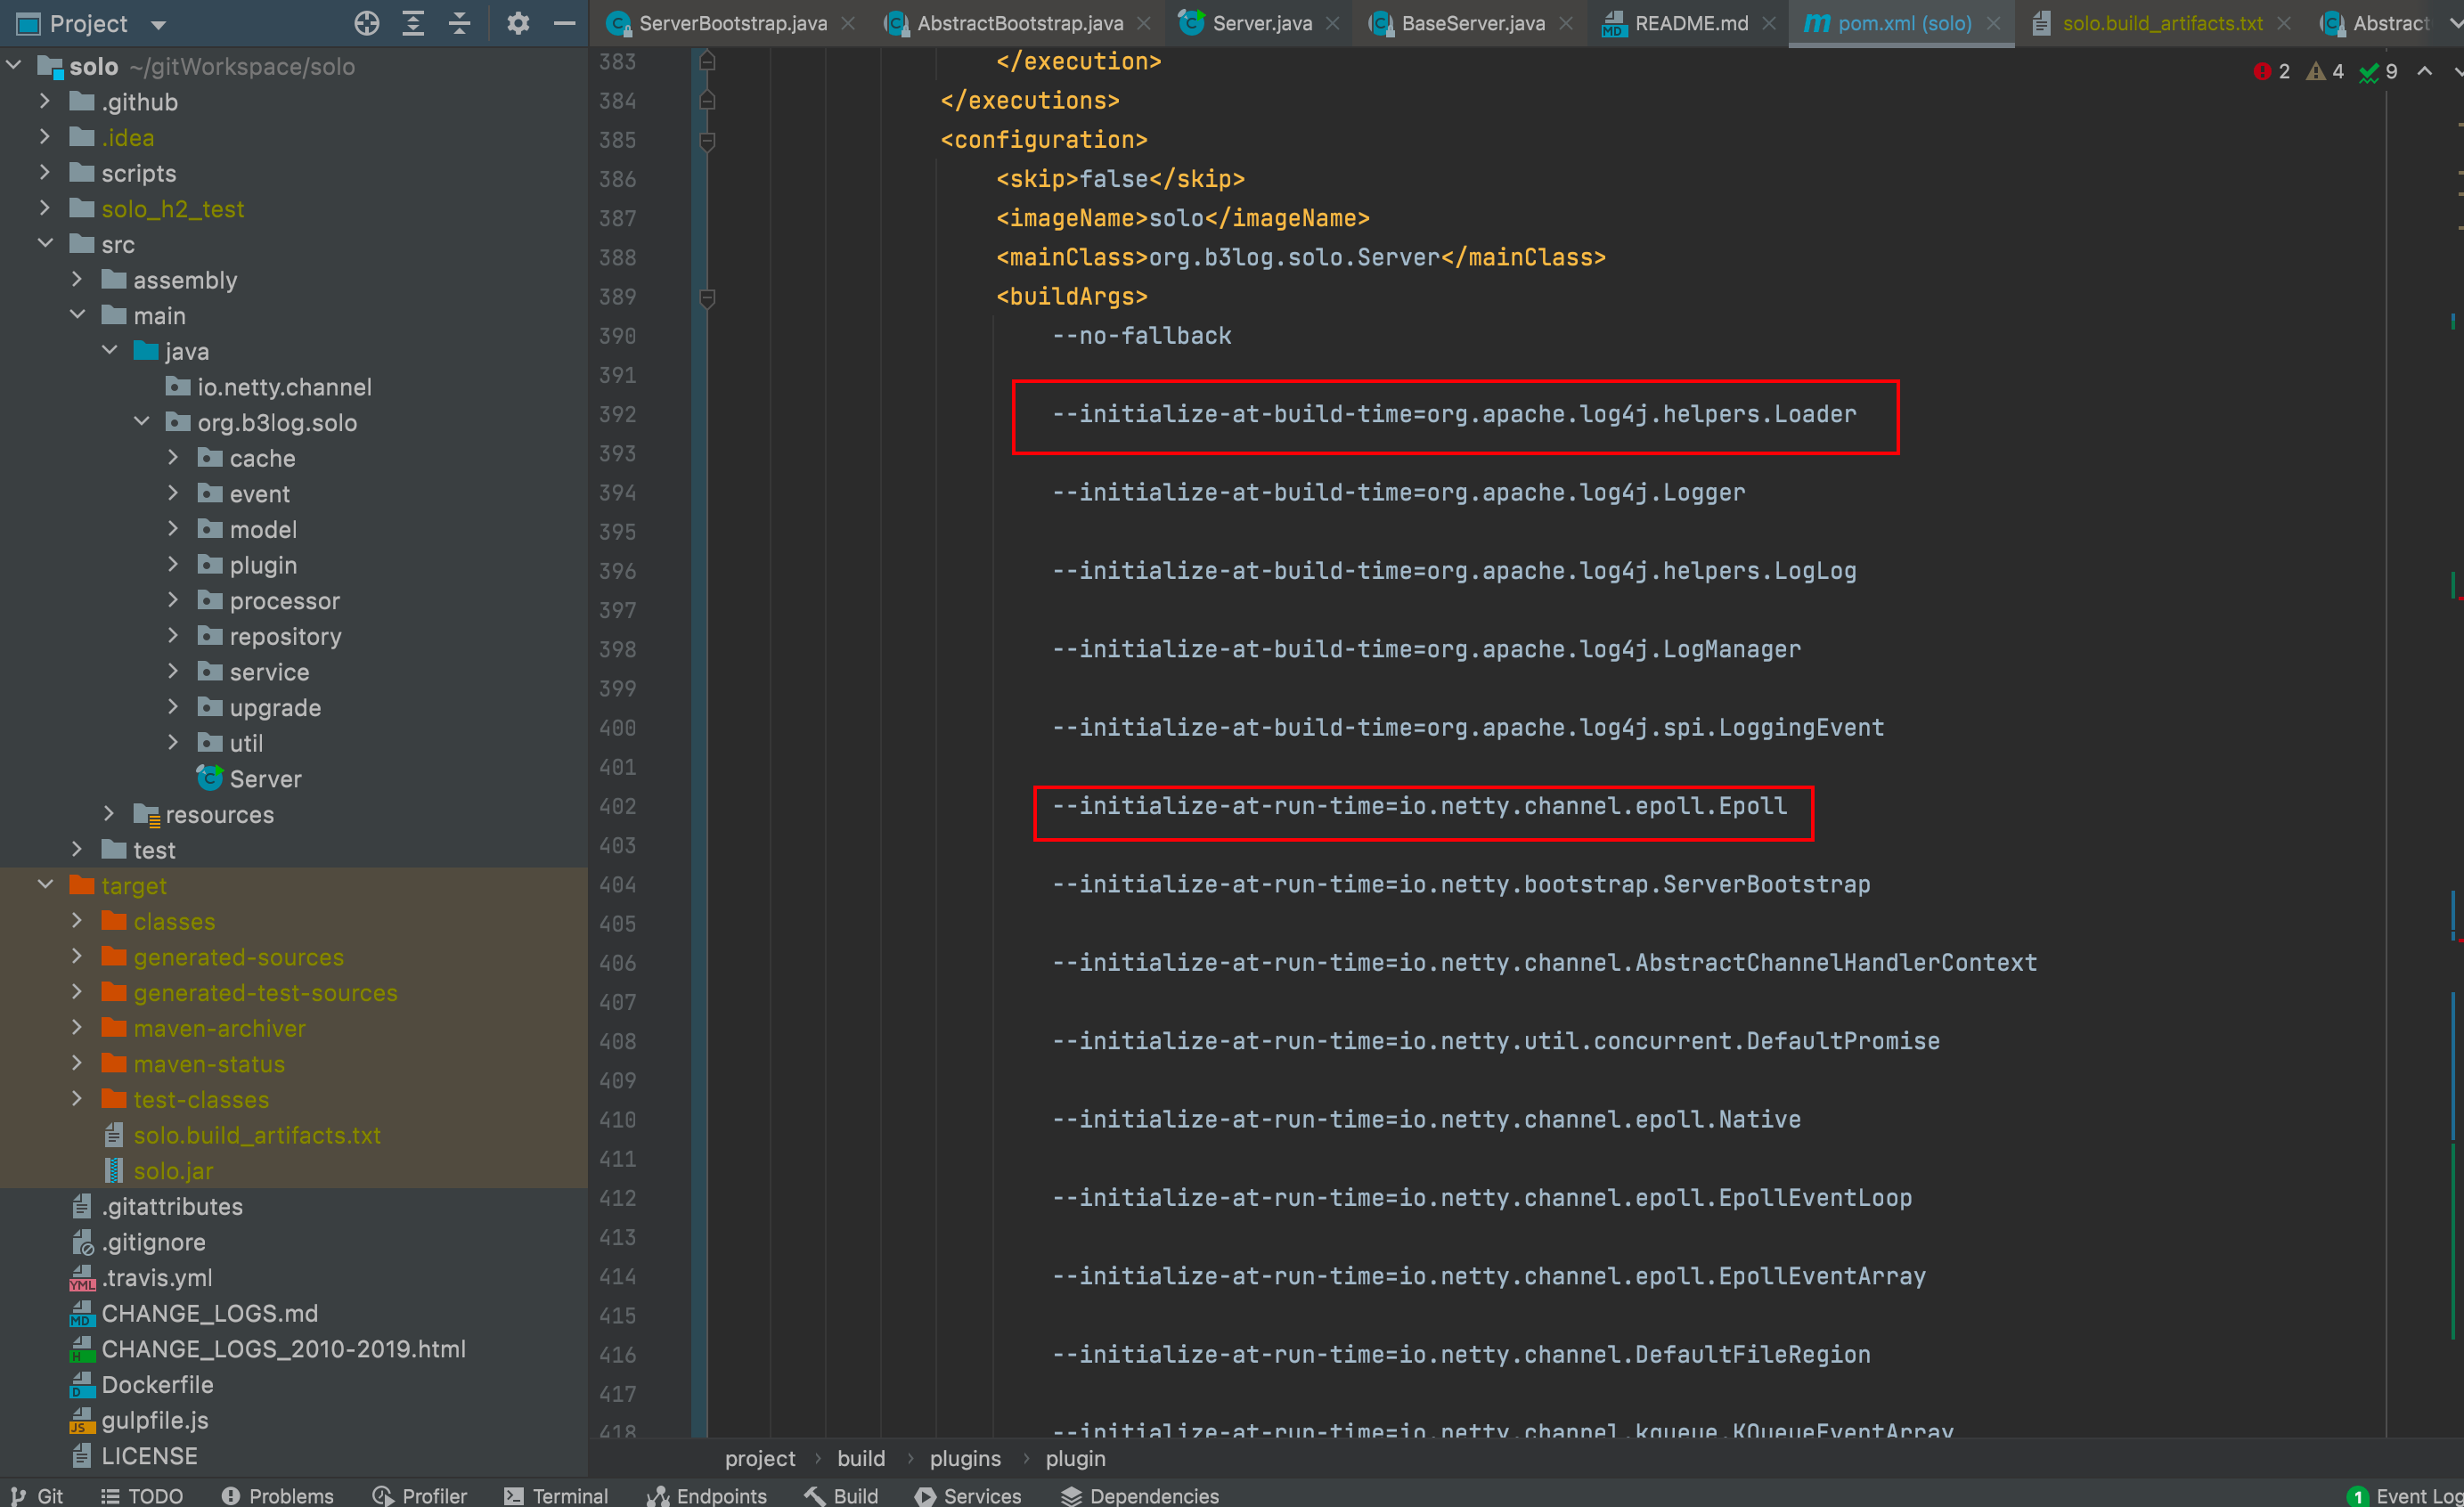
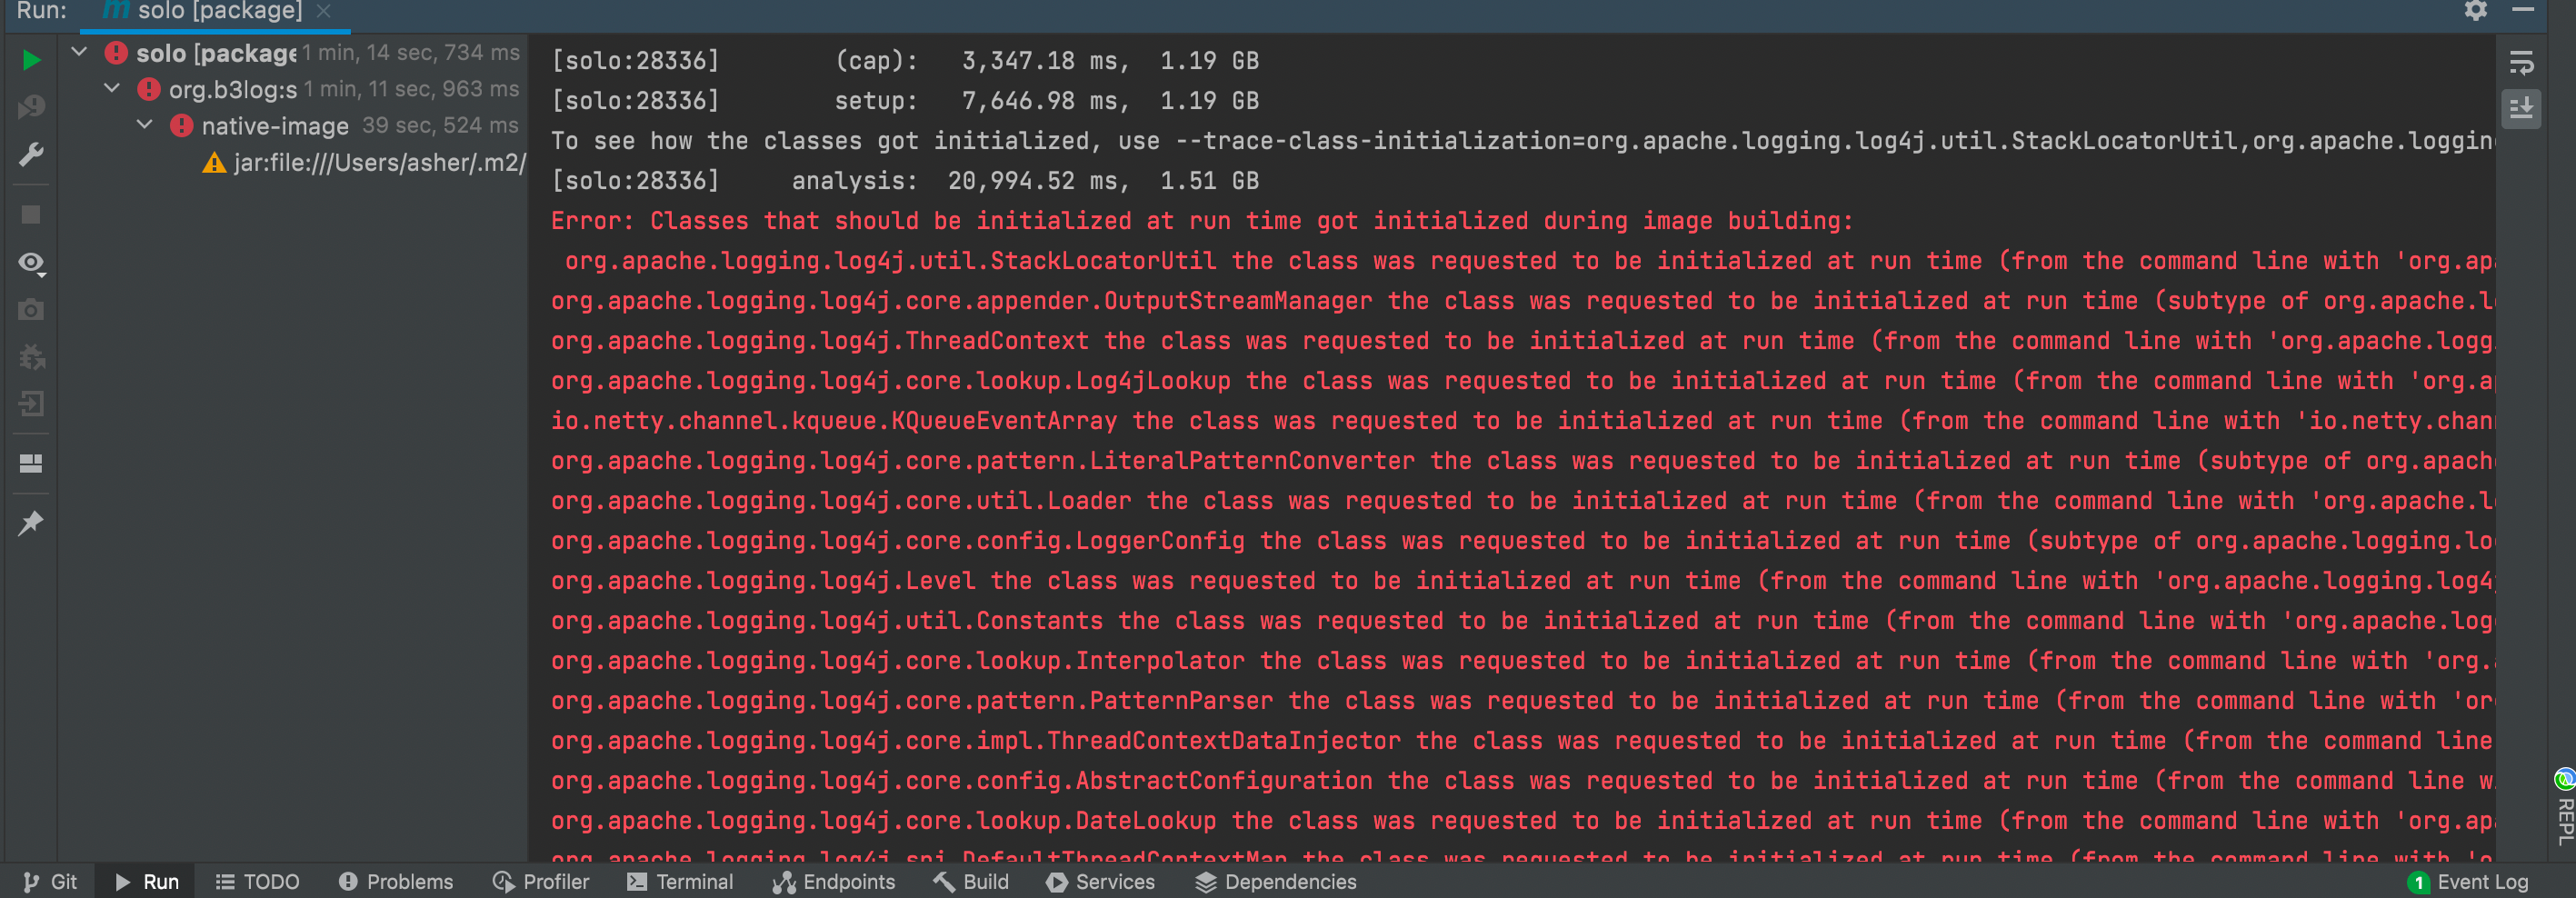
8. Transforming Solo
After discovering GraalVM, I was quite excited and immediately wanted to transform my Solo blog. This would reduce the blog's server footprint and let me experience new technology. Unfortunately, I'm still stuck at the packaging stage - Netty's extensive use of reflection causes packaging failures.
Then I thought, doesn't Dubbo also use Netty underneath? They can package successfully, so I should be able to too. I referenced their guidelines and got some ideas, but still couldn't make it work after trying.
Dubbo Project Supporting native-image
Maybe I need more research to solve this problem.
Added nearly a hundred lines of configuration like this: