SonarQube Installation and Multi-Branch Scanning Plugin Setup
1. Introduction
SonarQube is an open-source code quality management platform that provides various code quality management features such as static analysis, code metrics, code review, etc.
As an open-source developer, it's quite necessary to scan your own open-source projects. No one can guarantee they write bug-free code, but tools can help reduce the probability of writing bugs.
2. SonarQube Installation
You can go directly to SonarQube's official website for detailed installation documentation.
Link: https://docs.sonarqube.org/latest/setup-and-upgrade/install-the-server/
2.1 Installation Environment
Environment used: CentOS 7 + Docker
Database: PostgreSQL
SonarQube supports: Oracle, Microsoft SQL Server, so if your DB isn't PostgreSQL, that's fine.
2.2 Create SonarQube Directories
mkdir /dockerData/sonarqube/sonarqube_data
mkdir /dockerData/sonarqube/sonarqube_extensions
mkdir /dockerData/sonarqube/sonarqube_logs
These three directories store SonarQube's data, plugins, and logs. The official tutorial recommends using docker volume create because volumes are stored in a Docker-managed path (default /var/lib/docker/volumes/), and non-Docker processes can't modify files there, making Volumes the best way for persistent storage.
Related: Docker Data Storage
We're not using this method here for easier plugin installation later.
2.3 Pull Image
docker run -d --name sonarqube \
    -p 9000:9000 \
    -e SONAR_JDBC_URL=jdbc:postgresql://ip:port/sonarqube?currentSchema=sonar_schema \
    -e SONAR_JDBC_USERNAME=postgresql \
    -e SONAR_JDBC_PASSWORD=password \
    -v /dockerData/sonarqube/sonarqube_data:/opt/sonarqube/data \
    -v /dockerData/sonarqube/sonarqube_extensions:/opt/sonarqube/extensions \
    -v /dockerData/sonarqube/sonarqube_logs:/opt/sonarqube/logs \
    sonarqube:9.9.0-community
This command specifies the container's port and SonarQube's DB connection. Adjust according to your DB. The -v command mounts server directories to the Docker container.
After startup, access via ip:port. You should see this interface. Username and password are both admin - you'll be prompted to change the password on first login.

If SonarQube fails to start, check error logs with docker logs sonarqube. Common causes:
- DB connection failure: Check username/password or firewall
- SonarQube write permission issues: Since we're mounting folders, SonarQube writes to
dockerData/sonarqube/- check if it has sufficient permissions
3. Scanning a SpringBoot Project
Let's try with a simple SpringBoot example from GitHub: https://github.com/MingGH/demo-springboot-simple
Or use your own project.
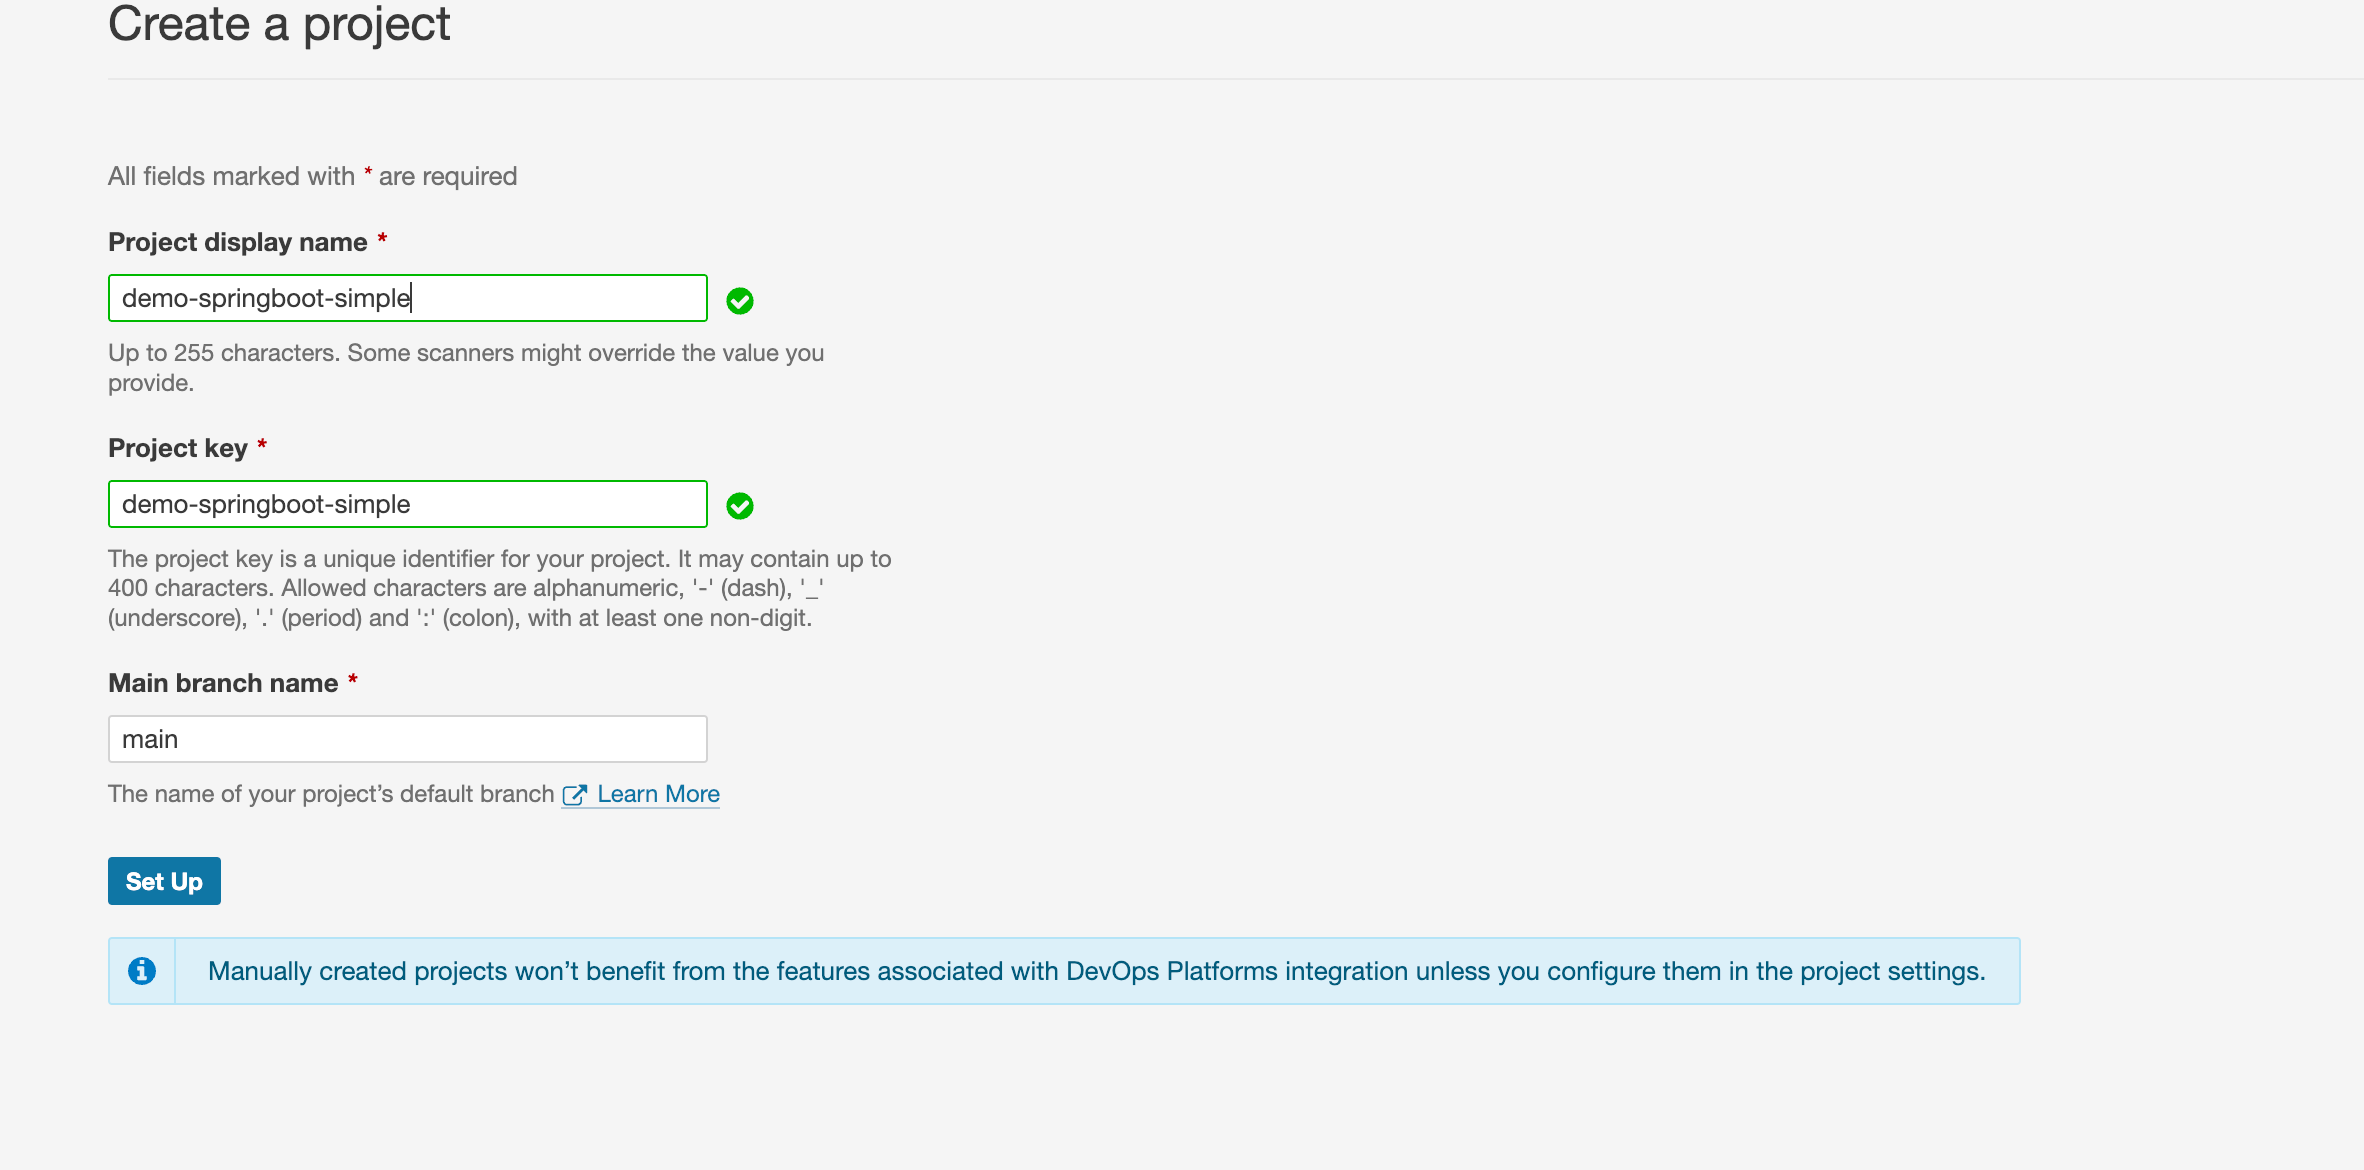
In SonarQube, click Create Project in the top right. Generally, use the project name.
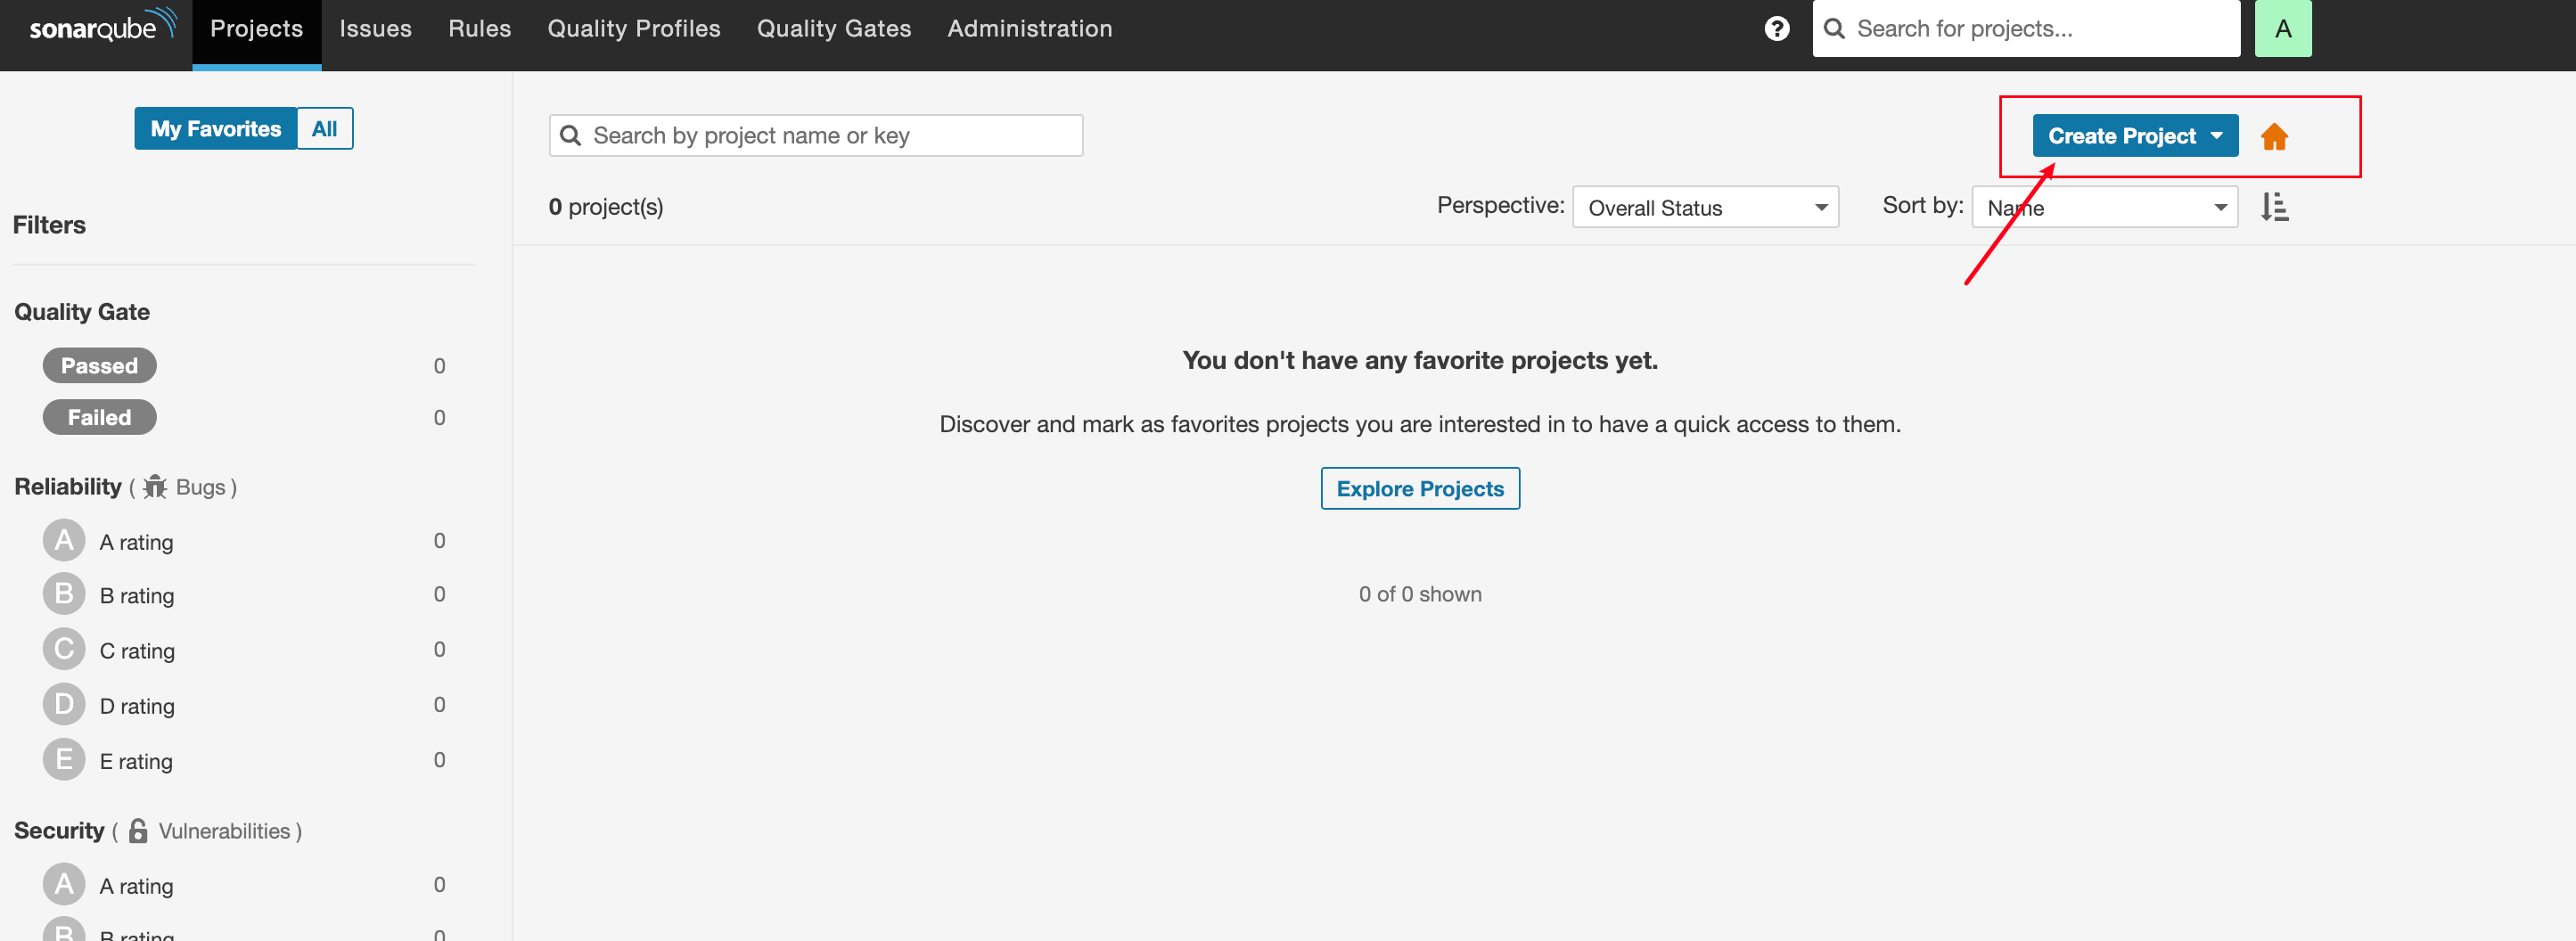
Click Set Up
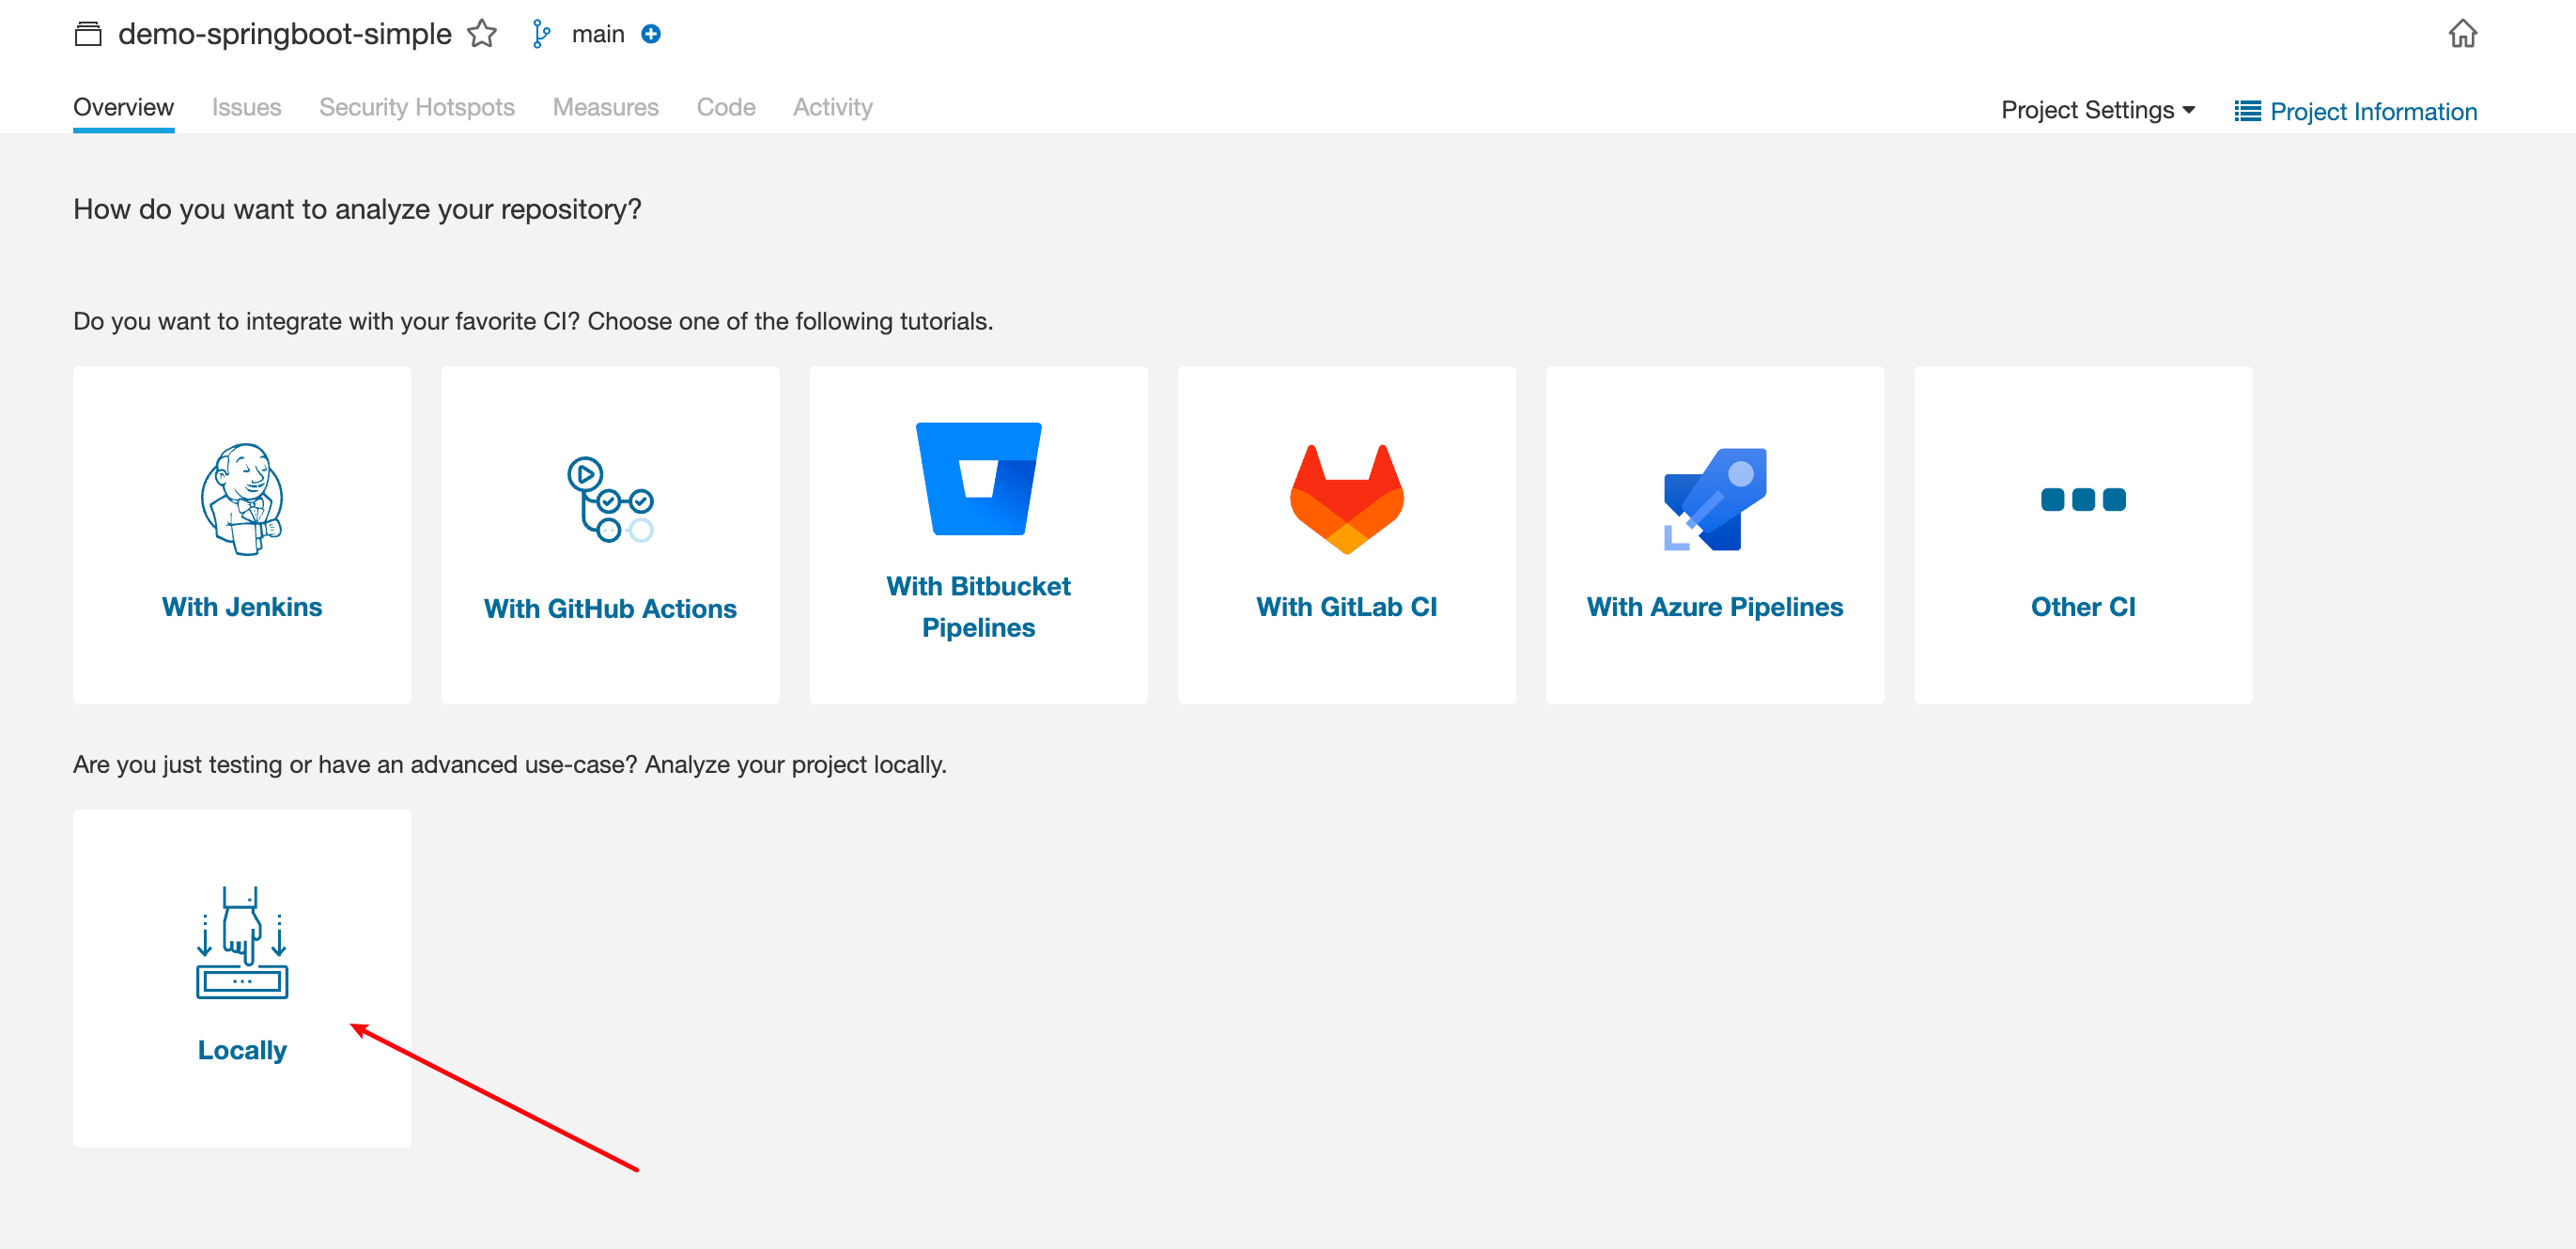
SonarQube provides multiple ways to trigger scans. Select Locally
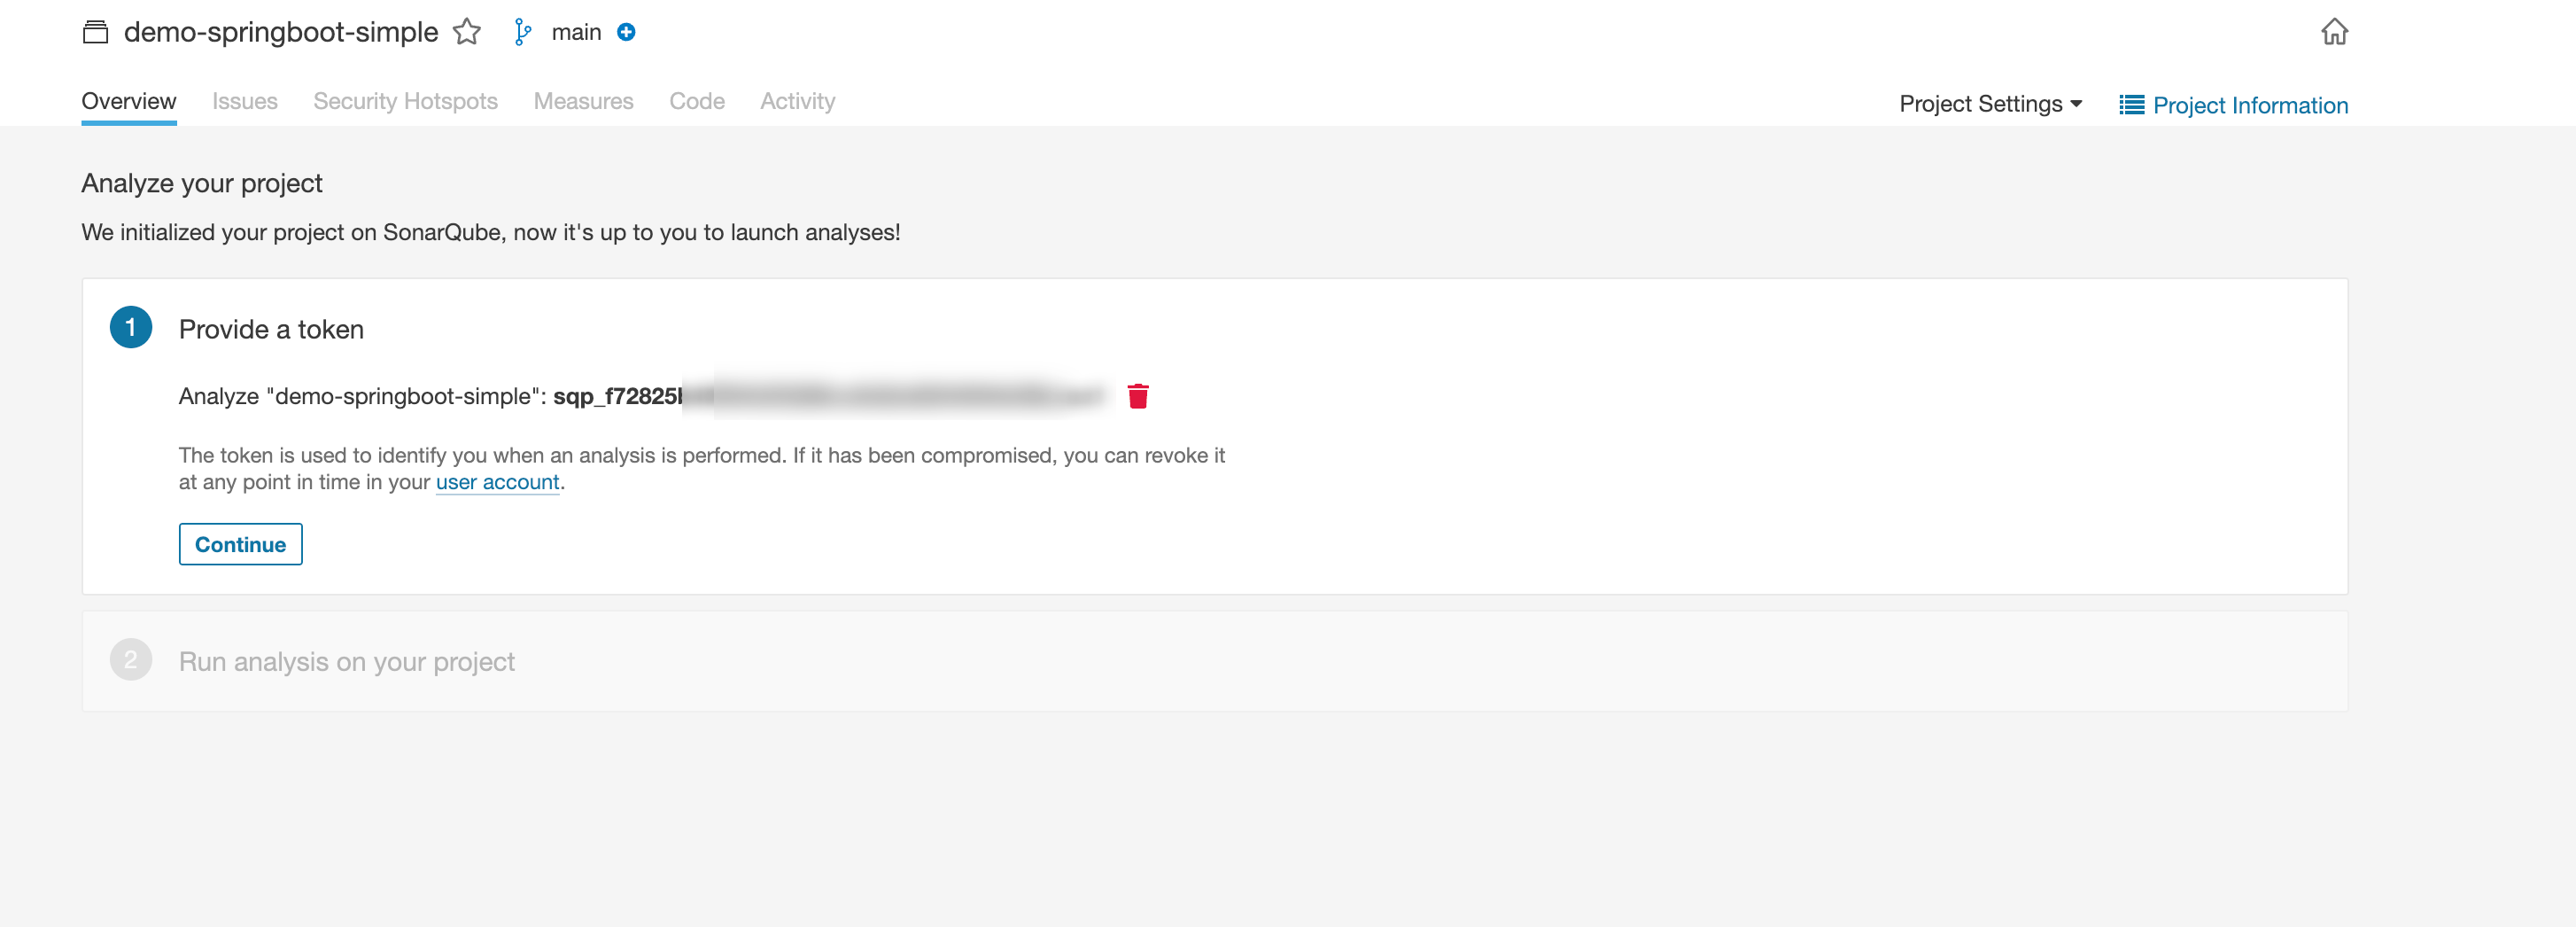
Create a token and set expiration

Since this project uses Maven, I selected Maven for local scanning.
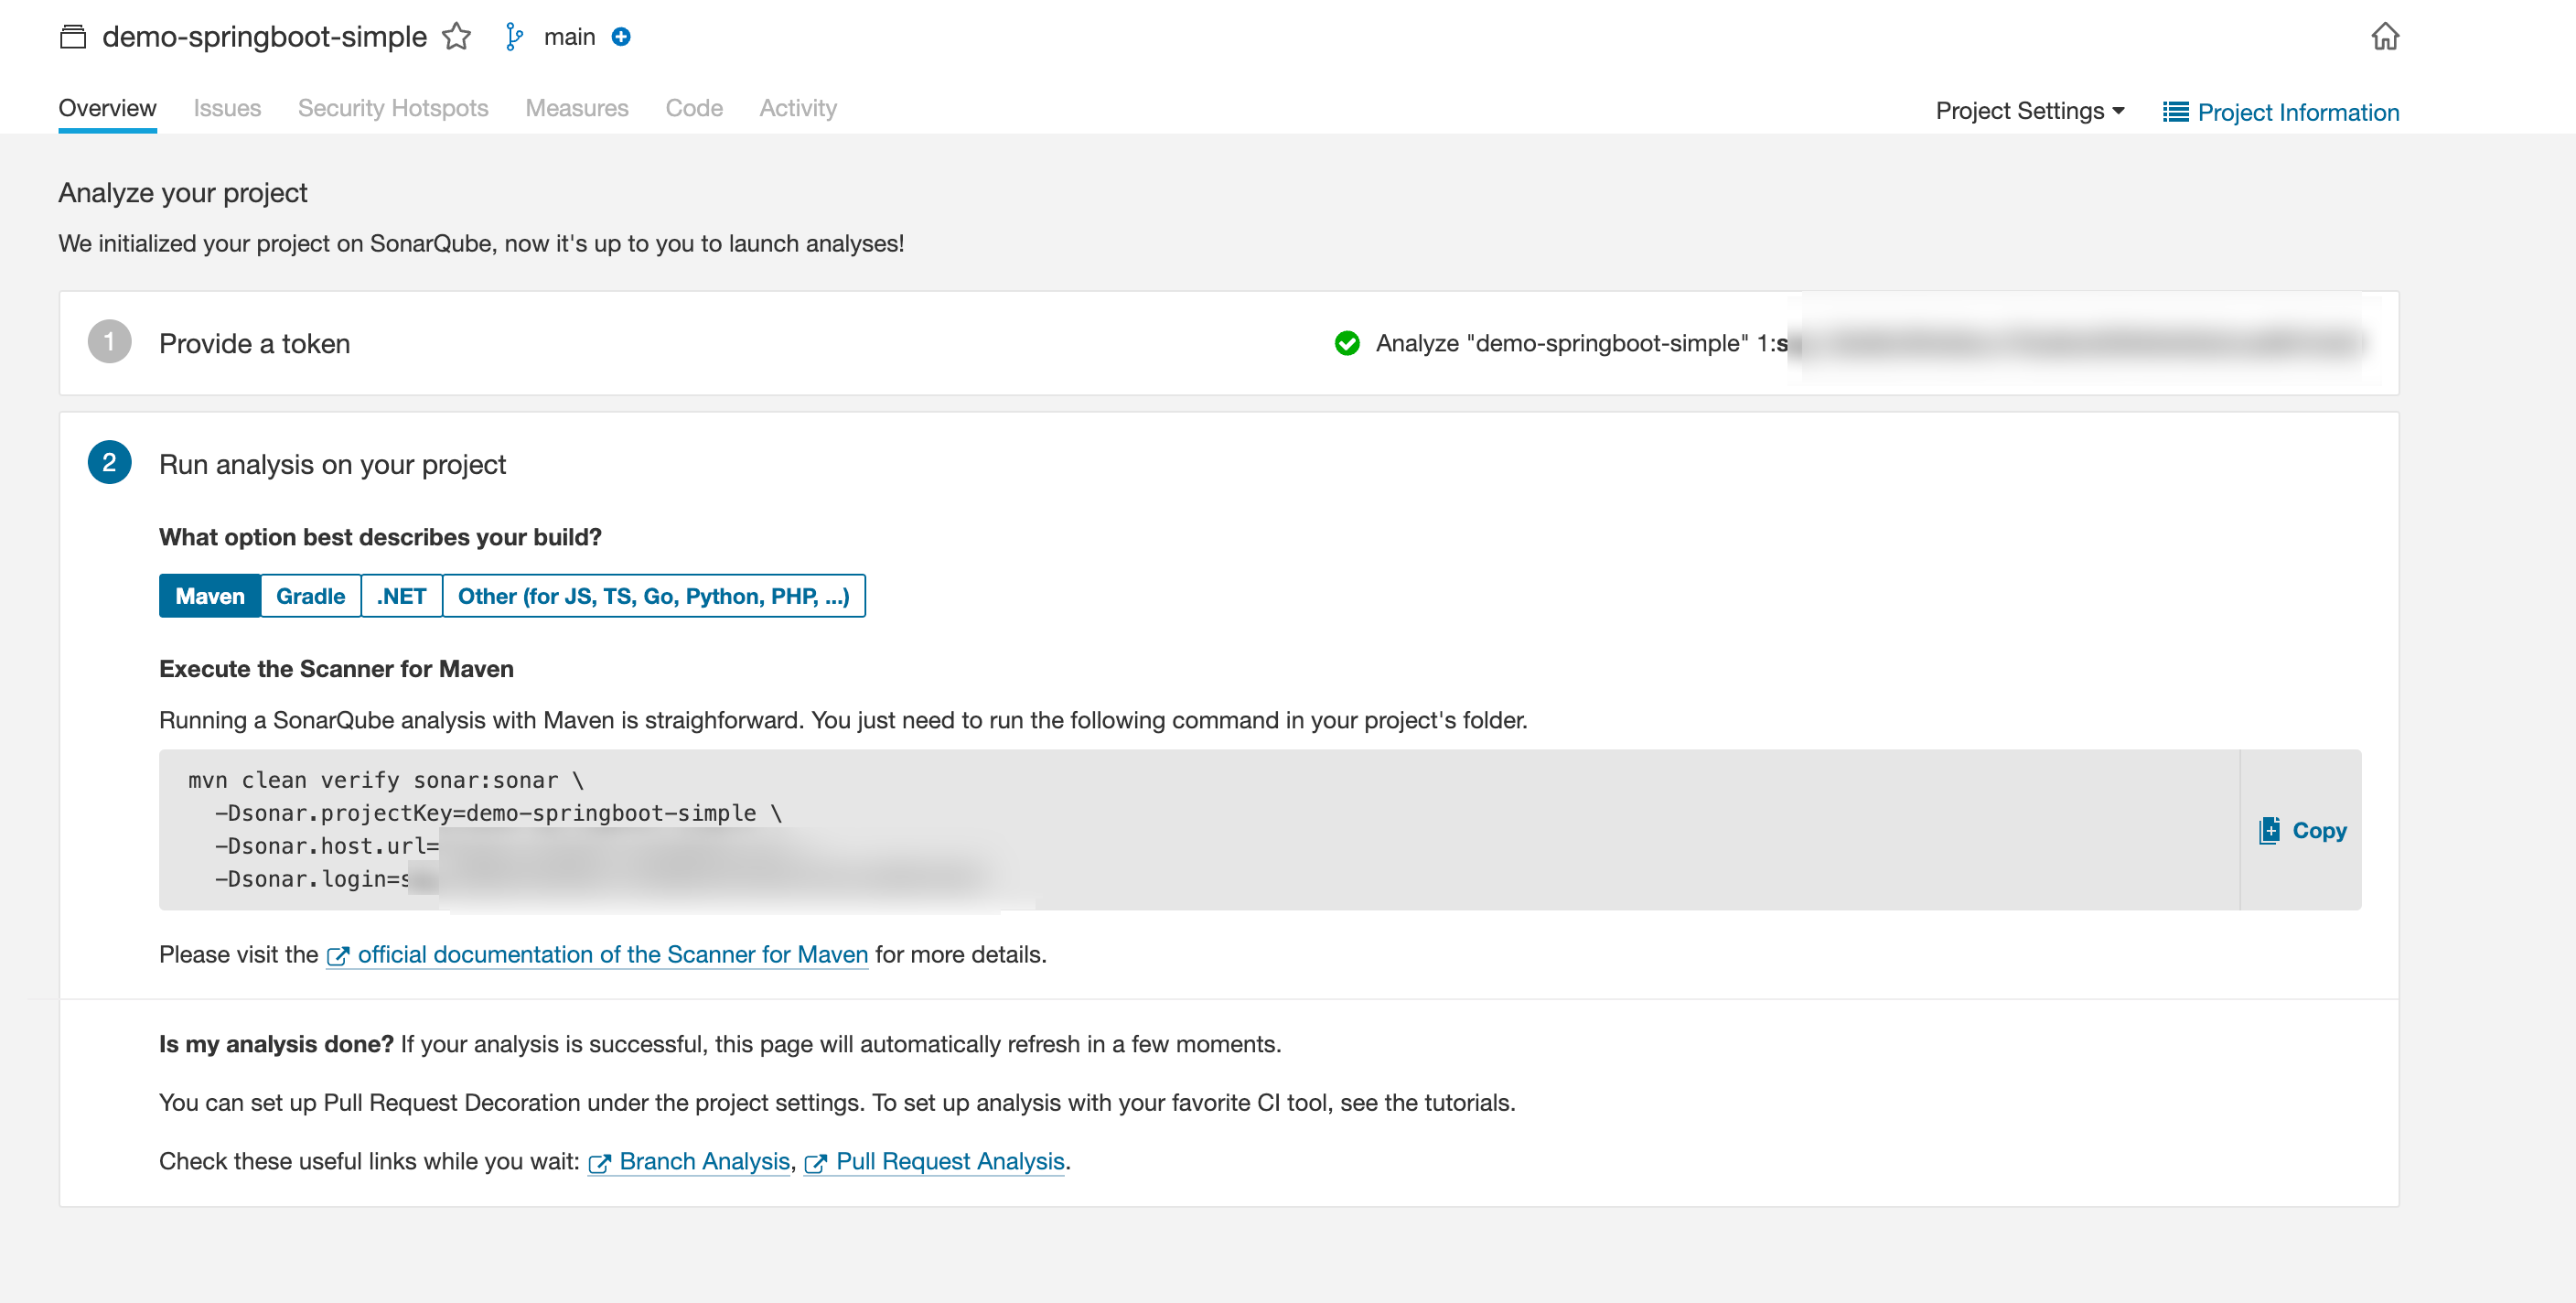
Copy the generated command and execute in your local project directory

After execution, the webpage auto-refreshes:
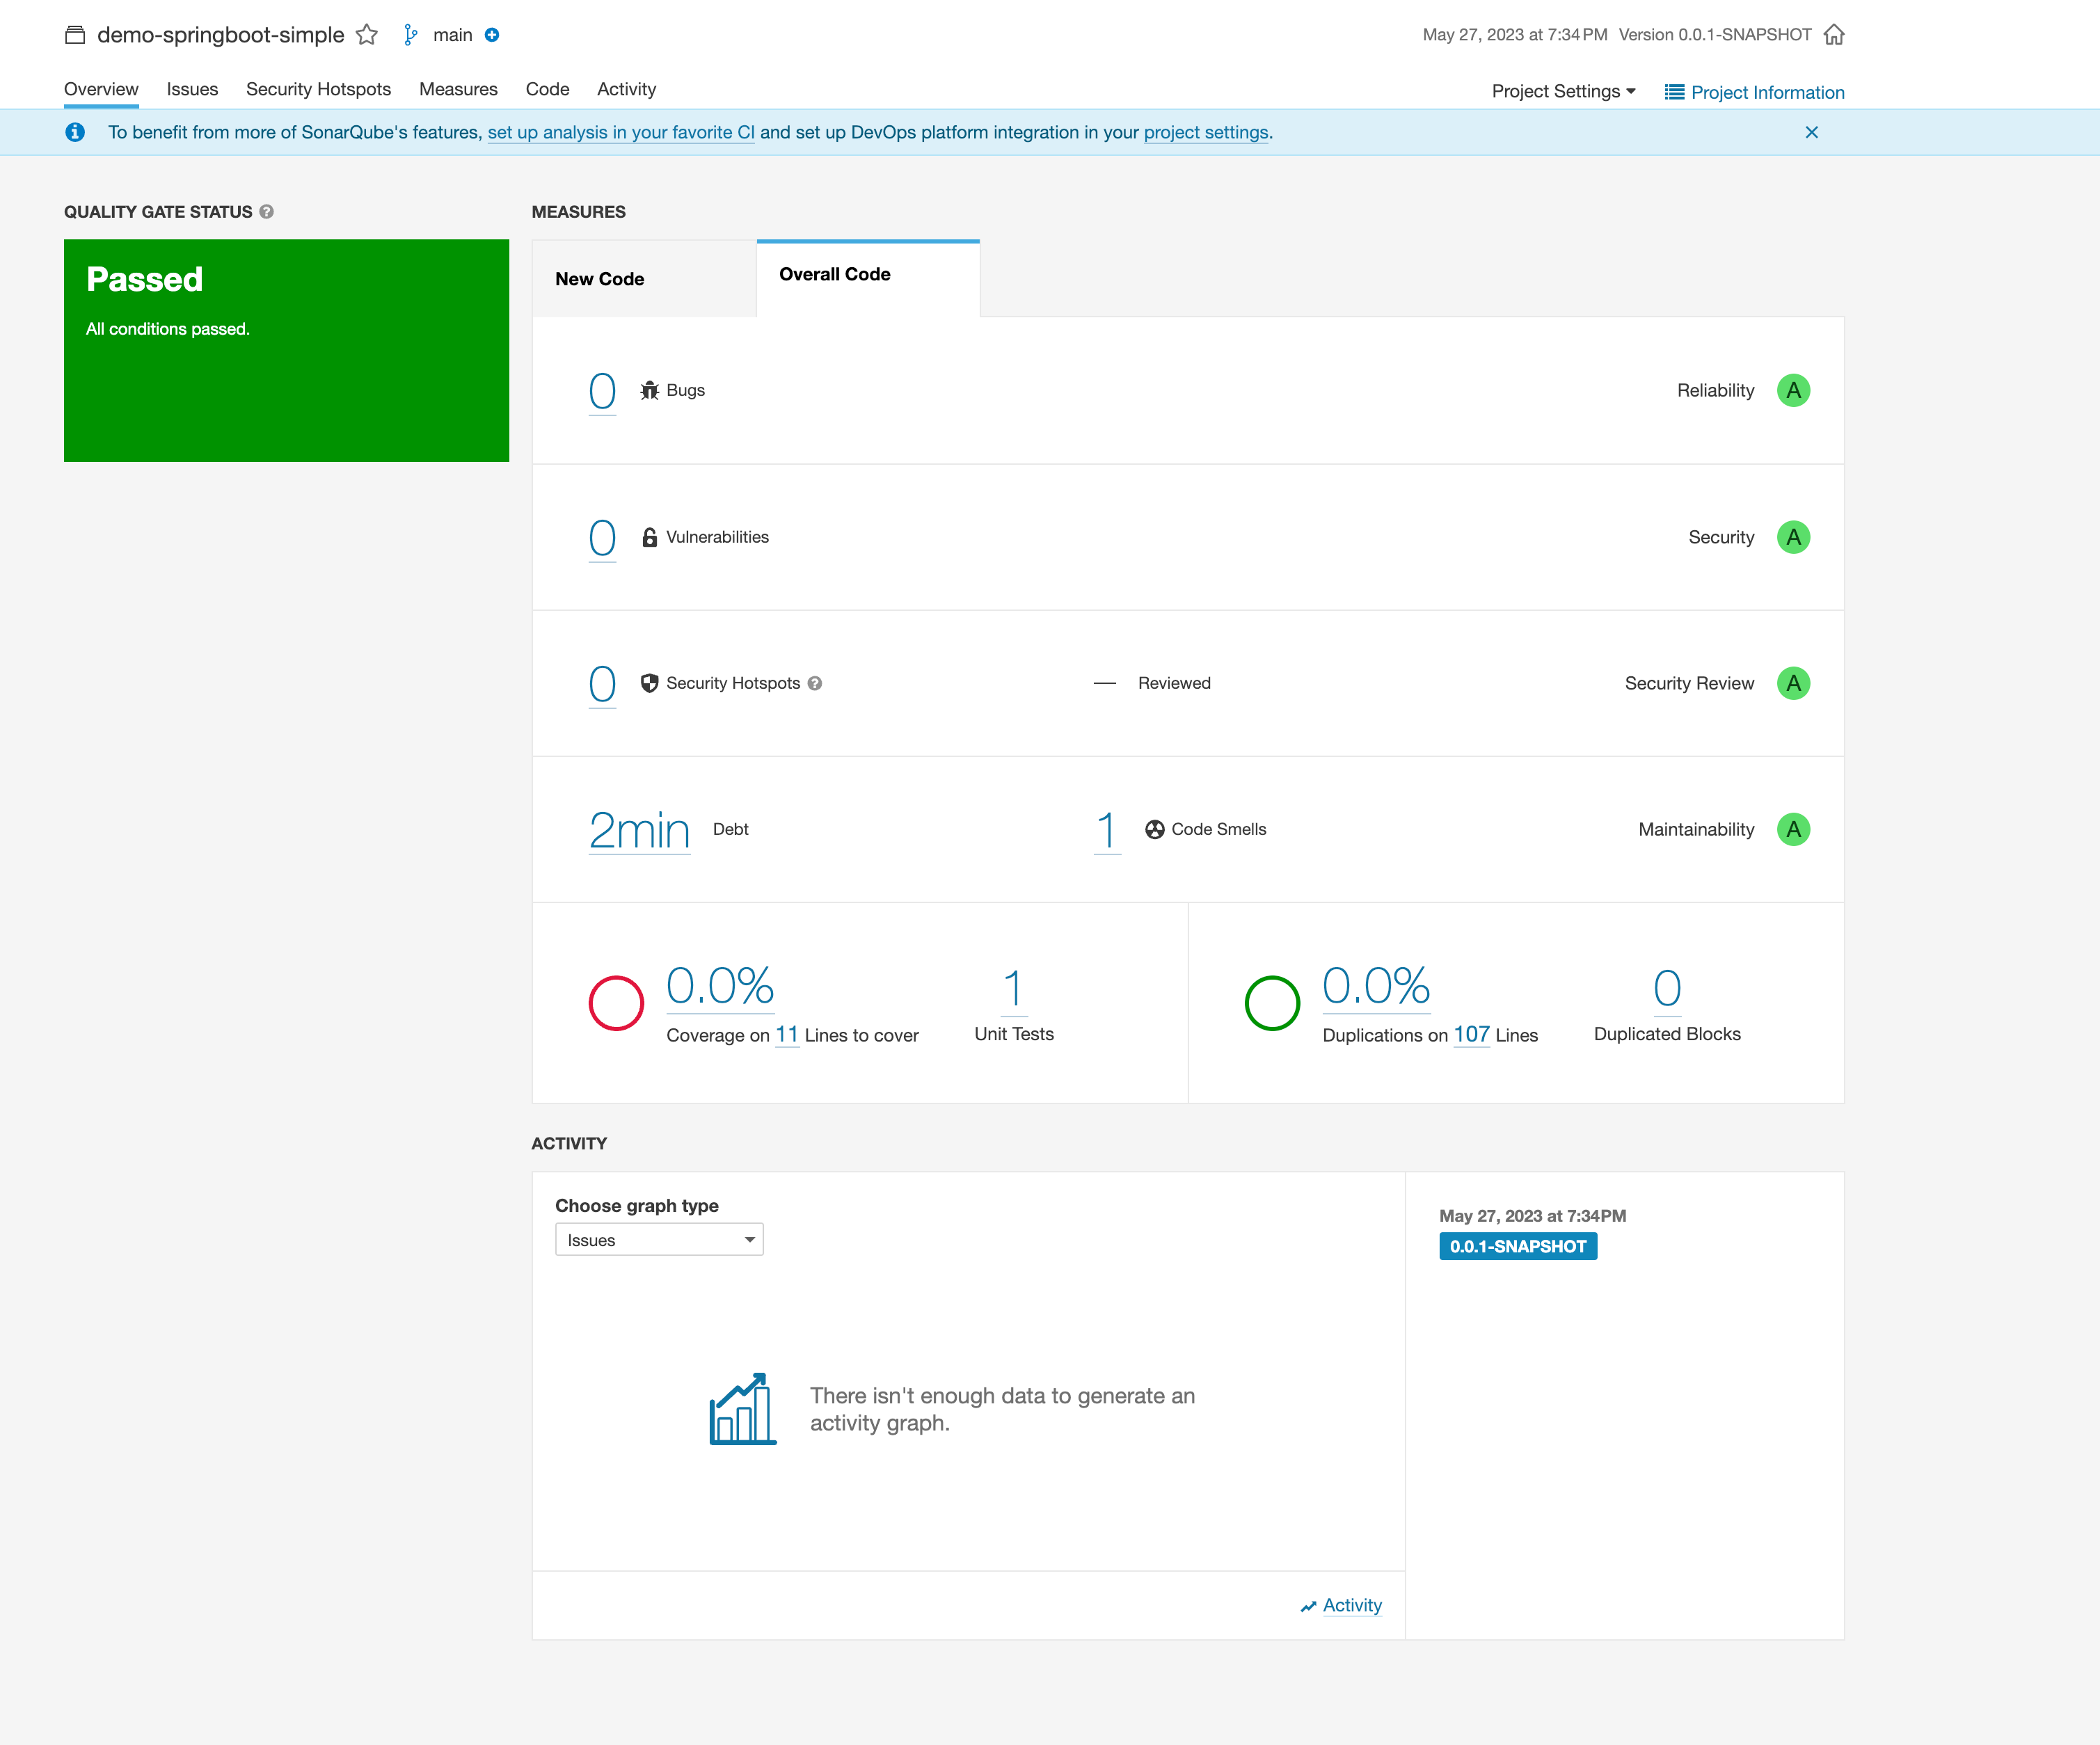
If there are code issues, click into Bugs, Vulnerabilities, Security Hotspots for details.
4. Installing Multi-Branch Scanning Plugin
In SonarQube Community Edition, only one branch can be scanned. A plugin is needed to extend this functionality.
4.1 Install Plugin
Plugin: https://github.com/mc1arke/sonarqube-community-branch-plugin
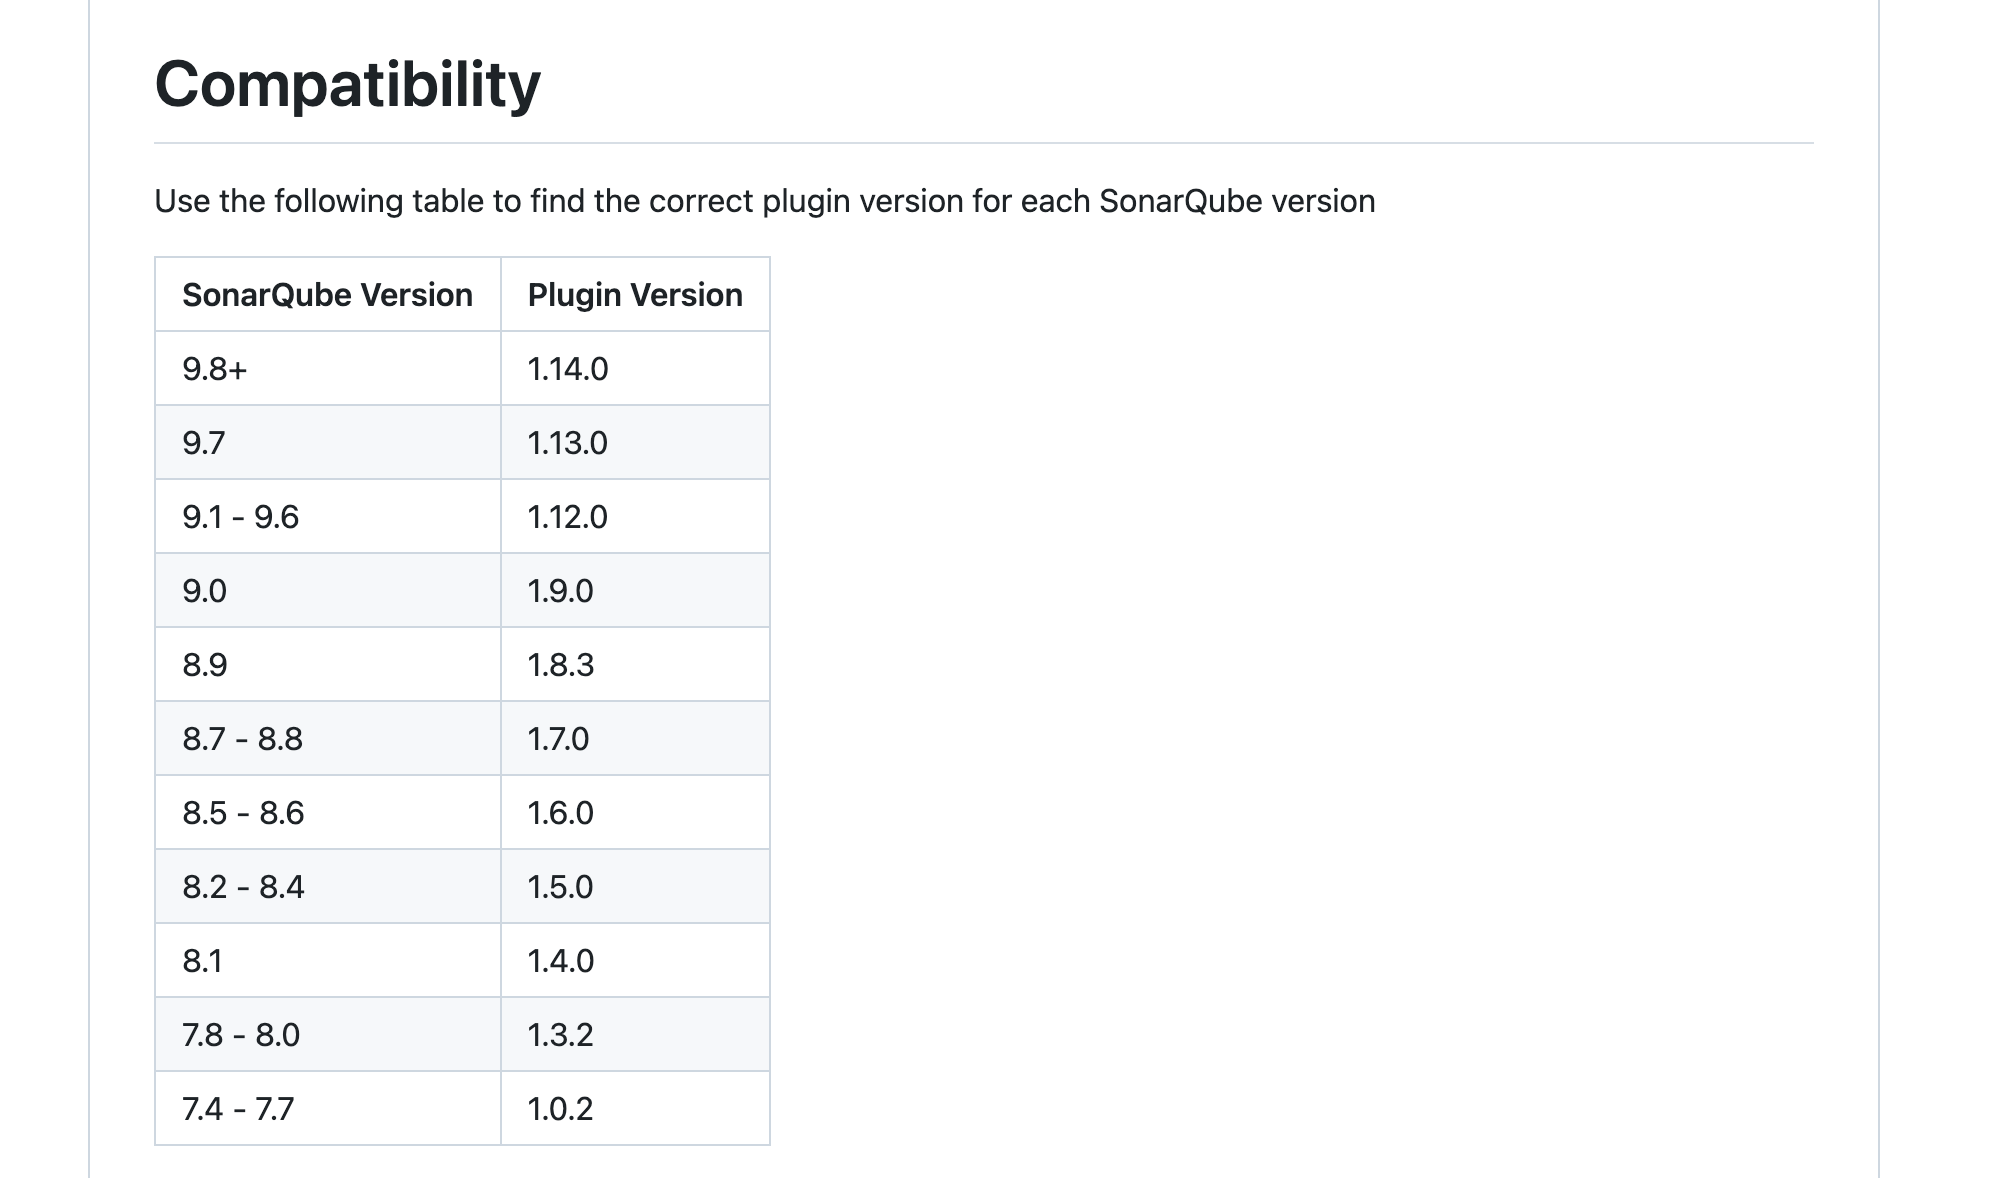
Note: Different SonarQube versions require different plugin versions. We installed SonarQube 9.9.0, so download plugin version 1.14.0.
This plugin also provides SonarQube with the plugin pre-installed.
After downloading, upload to /dockerData/sonarqube/sonarqube_extensions/plugins. Create plugins directory if it doesn't exist. Don't place the plugin jar in both /dockerData/sonarqube/sonarqube_extensions/download and plugins - this causes startup failure.
Restart SonarQube.
In your project, add -Dsonar.branch.name parameter to scan different branches:
mvn clean verify sonar:sonar \
 -Dsonar.projectKey=projectKey \
 -Dsonar.host.url=url \
 -Dsonar.login=token \
  -Dsonar.branch.name=develop
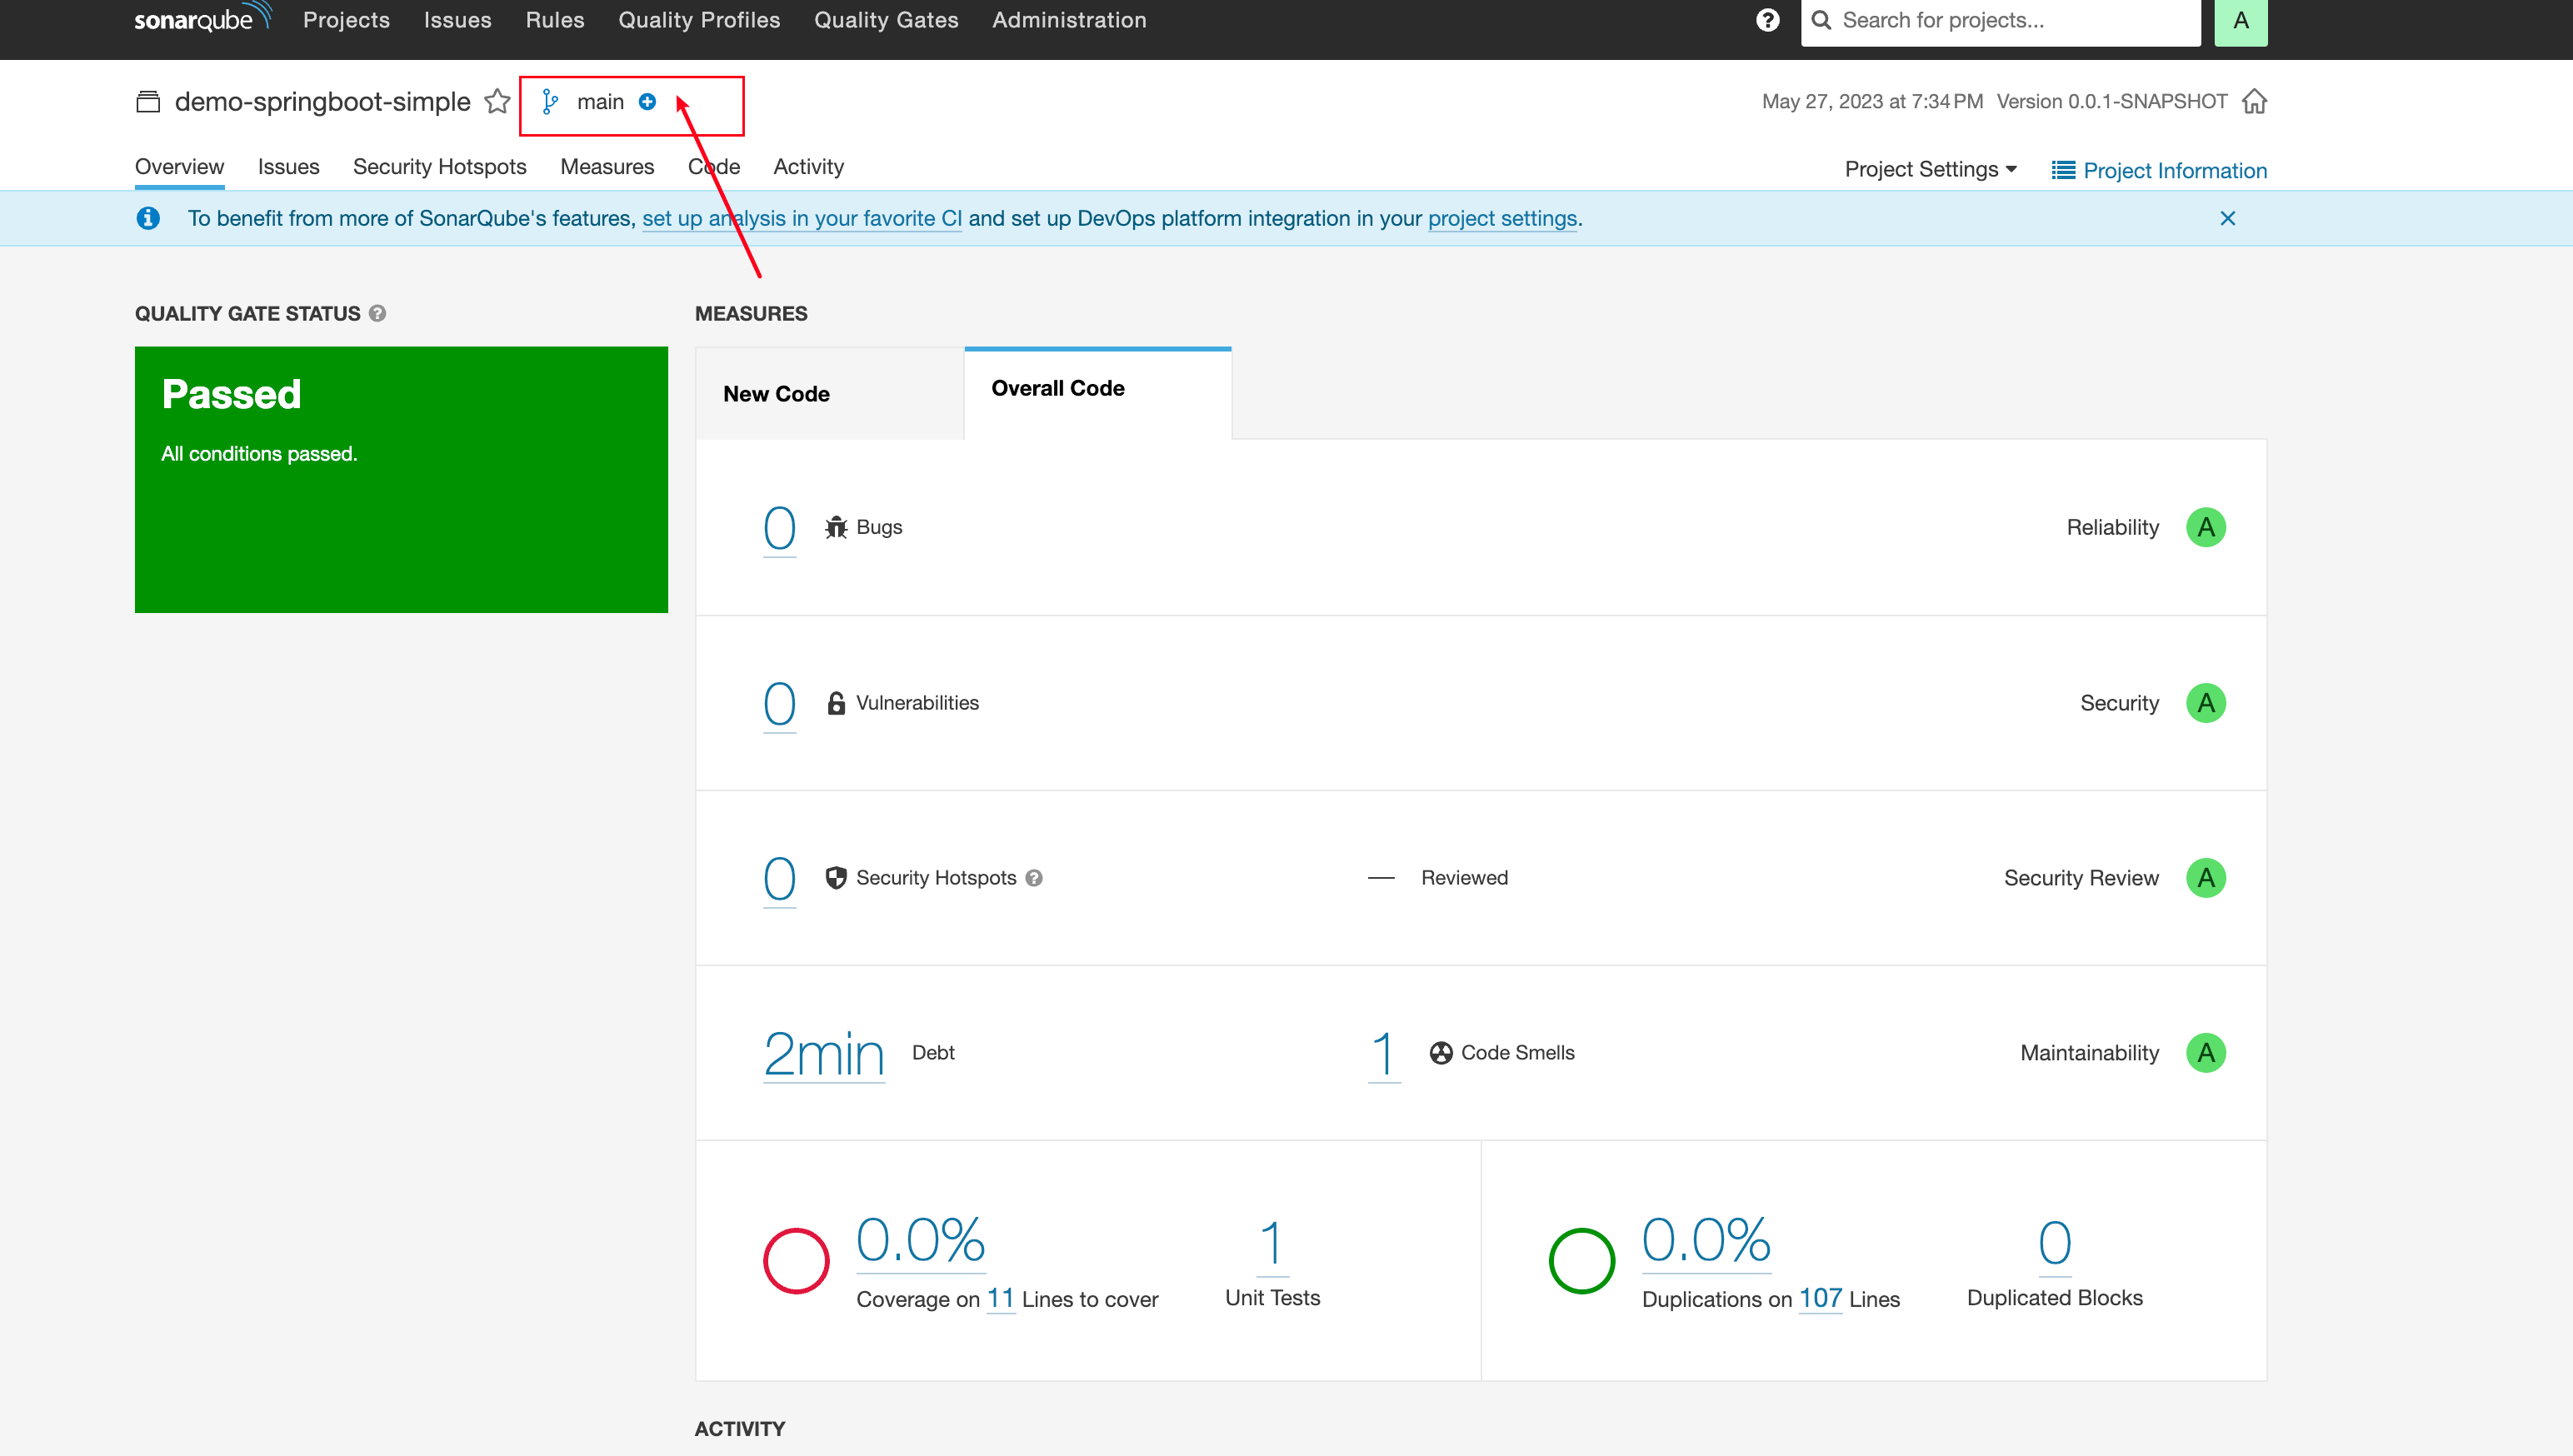
After execution, you'll see branch switching in SonarQube:

But things may not go smoothly. After installing this plugin twice, I encountered the same issue: Current edition does not support branch feature
4.2 Solving "Current edition does not support branch feature"
Solution in GitHub issues: https://github.com/mc1arke/sonarqube-community-branch-plugin/issues/663
Their approach is to create a new sonar container with updated environment variables. But I didn't want to create a new container, so I entered the container and modified the config file directly, then restarted sonar.
This method works.
Enter container:
docker exec -it sonarqube /bin/bash
Find sonar.properties in /conf directory and modify:
sonar.web.javaAdditionalOpts=-javaagent:./extensions/plugins/sonarqube-community-branch-plugin-1.12.0.jar=web
sonar.ce.javaAdditionalOpts=-javaagent:./extensions/plugins/sonarqube-community-branch-plugin-1.12.0.jar=ce
If something goes wrong and the container fails to start, copy files into the container:
docker cp sonar.properties sonarqube:/opt/sonarqube/conf/sonar.properties
Copy files out of the container:
docker cp sonarqube:/opt/sonarqube/conf ./